

wannabetrooper
-
Posts
105 -
Joined
-
Last visited
Content Type
Profiles
Forums
Gallery
Articles
Everything posted by wannabetrooper
-
MR CE helmet overhaul
wannabetrooper replied to wannabetrooper's topic in Build Threads Requireing Maintenance
Yeah, I know that I will end up polishing mine because there are some dry spots here and there that I'm not happy with. But I'm sure I'll get it to shine really good. I'm even considering a top clear coat. Any specific brands anyone can recommend for polishing paint? -
MR CE helmet overhaul
wannabetrooper replied to wannabetrooper's topic in Build Threads Requireing Maintenance
I used Rust-Oleum High Performance Enamel Gloss White like Mike used to paint his TE2 helmet. I don't own any armor at this time just this helmet. One day I hope to. Mobus, yours turned out excellent. -
MR CE helmet overhaul
wannabetrooper replied to wannabetrooper's topic in Build Threads Requireing Maintenance
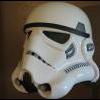
Alright, here it is painted... I'm going to let it sit till Sunday, that's my next available day to start painting in the details. I hope to get the ears I ordered by then or at least by next week. I still need to order the brow and neck trim too. I need to get on the ball with that I was also planing on buffing the helmet once the paint cured to bring out the shine even more. -
MR CE helmet overhaul
wannabetrooper replied to wannabetrooper's topic in Build Threads Requireing Maintenance
Got my replacements on ebay. Much better that the ones it came with. -
MR CE helmet overhaul
wannabetrooper replied to wannabetrooper's topic in Build Threads Requireing Maintenance
I was going to order some Weber's "S" shaped rubber gasket #RG102. I've read in other threads that this is very accurate looking trim. -
MR CE helmet overhaul
wannabetrooper replied to wannabetrooper's topic in Build Threads Requireing Maintenance
Thanks everyone. My brow trim didn't come off without a little damage either. Waiting on replacement ears, have other lenses, and I plan on ordering new brow and neck trim soon. If tomorrows weather is good I'll paint it. Let it sit for a week, then start all the hand painting. -
MR CE helmet overhaul
wannabetrooper replied to wannabetrooper's topic in Build Threads Requireing Maintenance
I also removed the bottom tab that's right above the ears on the back half. There are two on the back and one on the front. And I also made an opening on the front half as shown in the photo so that the lip from the front could be pushed in. Did this to both sides. You could try to grind down that edge, but I didn't think there was enough material. I'm sorry I left that out That's all I did, then once I put the small nut and bolts they tighten it all together. Basically I kept test fitting the halves and looked to see where something was making contact with something else and determined if I needed to cut or grind it away. I really hope this helps. -
MR CE helmet overhaul
wannabetrooper replied to wannabetrooper's topic in Build Threads Requireing Maintenance
Thanks guys. I hope to paint it within the next few days, but that depends on the weather. I'll post pics if I do. -
MR CE helmet overhaul
wannabetrooper replied to wannabetrooper's topic in Build Threads Requireing Maintenance
That's cool! I ordered some of your stripes for my helmet too. They look great. -
MR CE helmet overhaul
wannabetrooper replied to wannabetrooper's topic in Build Threads Requireing Maintenance
I ordered some other ears because I didn't want to use the ones it came with. I can't wait to get them, they should make a big difference. I agree about the frown. That's why I made the openings bigger. The teeth seemed to sit too far in the frown. I tried to make it look as if they were more raised. I think you have a good idea. -
MR CE helmet overhaul
wannabetrooper replied to wannabetrooper's topic in Build Threads Requireing Maintenance
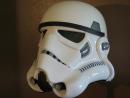
Here it is as promised. Painted the inside black and primed the outside. I was going to wait till tomorrow to do the primer, but I couldn't wait. I let the black paint dry for a couple of hours then taped it up from the inside to spray the primer. This is the first coat... Waited about a minute between coats. This is the fourth coat... Here is the helmet ready for the shinny paint. Don't know if I'll do it tomorrow or give the primer a day or two. But the weather was perfect today, both the black paint and primer dried pretty quickly. -
MR CE helmet overhaul
wannabetrooper replied to wannabetrooper's topic in Build Threads Requireing Maintenance
Planning on painting the inside black today and priming the outside tomorrow. I will post pictures when I do. -
MR CE helmet overhaul
wannabetrooper replied to wannabetrooper's topic in Build Threads Requireing Maintenance
Exactly! I have an unaltered one too that I plan on taking pictures side by side when I'm done. -
Started my MRCE
wannabetrooper replied to psych0ticmisfit's topic in Build Threads Requireing Maintenance
Hey Anthony, I was able to take mine apart (MR CE helmet overhaul), but it wasn't easy. Once I had the ears off I used a small flat head screw driver to gently and carefully snap the front & back halves apart from the inside (after I removed the foam pieces). But they are still attached to the cap. That took days and days of pulling on the cap till it came off! I was about to give up I hope someone comes up with an easier way, because that was nerve-racking for me. I thought for sure I was going to break it. -
MR CE helmet overhaul
wannabetrooper replied to wannabetrooper's topic in Build Threads Requireing Maintenance
After I opened up the space next to the third tooth I decided I wanted to open them all up a little. Here are some before and after pics: -
MR CE helmet overhaul
wannabetrooper replied to wannabetrooper's topic in Build Threads Requireing Maintenance
Thanks everyone. I found the MMD White Putty (actually more grey) in a local hobby shop. It's made by a company called Squadron Products. It dries fairly quick and it is easy to sand. For mine I use 220, 320, then 600 grit sandpaper. With the 600 I wet the paper and it smooths out the putty really good. You can feather out the edges onto the plastic. Next step is to clean the inside to get rid of the residue from the foam pieces, then paint it flat black. Then primer and paint. I just hope after all this I don't screw up the details by hand painting them instead of using decals. -
MR CE helmet overhaul
wannabetrooper replied to wannabetrooper's topic in Build Threads Requireing Maintenance
OK, I sanded the MMD putty around the ear areas and this is how they look: Next I will permanently reinstall the cap, seal the seam with more MMD, then primer. -
MR CE helmet overhaul
wannabetrooper replied to wannabetrooper's topic in Build Threads Requireing Maintenance
Awesome. I'll give him a try. Thanks! -
MR CE helmet overhaul
wannabetrooper replied to wannabetrooper's topic in Build Threads Requireing Maintenance
I had posted this already, but thought I should include it here too: I placed some electrical tape on the brow as a guide, then trimmed it: Before: After -
MR CE helmet overhaul
wannabetrooper replied to wannabetrooper's topic in Build Threads Requireing Maintenance
6. Next I removed the tabs just above the ear on the back half and these on the front, plus some other parts: This was so I could close the big gap between the two halves after removing the ears: I was hoping to use ears from one of the helmet kits, but I can't find anyone who will sell them to me. I might have to use the ones it came with 7. Filled in the areas with some MMD putty. Will sand smooth tomorrow: After that it should be ready for priming then painting. -
Wanted to show you guys what I've done to my MR CE helmet. I want to thank all who have shared their ideas. Came in very handy. Not done yet, but here's what I've done so far: 1. Remove neck & brow trim then disassemble helmet: 2. Sand off any mold lines and fill in gap under the frown: 3. I used 220 then 320 crit sandpaper over the mold lines. Then I sanded the entire helmet with 600 wet/dry using some water with a little soap. 4. I removed the aerators: 5. Next I wanted to open up the space after the third tooth: First I marked where I wanted the opening: Then I drilled a small hole in the center and worked my way out: Next, I used some small metal files and sandpaper to smooth out the hole. Now there is a more defined third tooth:
-
I hate it when people turn without putting on their signals! Like it's the most hardest or time consuming thing to do. Especially when you were waiting for them to pass so you could pull out of a street, lets say, then they turn at the last minute without signaling. Making you wait for nothing When people insist on talking in movie theaters. It amazes me that it happens in this day and age. Some people just don't care.
-
That was cool!. Yeah my wife and I thought Carrie Fisher was a bit friendly with the hubby. I think the girls should dress in the slave outfit all the time
-
I'm totally redoing my MR CE helmet and I haven't decided yet if I want to paint all the details or go with decals. But If I do decide on decals my question is, does anyone know which ones will fit the best for this helmet?
-
Hi everyone. I took my MR CE helmet apart, but in the process I screwed up one of the ears. I wanted to replace them with more accurate ones anyway so I was wondering if anyone here sells ears I can buy, or if someone has extra ones laying around for some reason. If not the only thing I can think of doing is making my on from scracth. But of course that involves sculpting, molding, casting and I don't know if they will look right. Well, any help will be appreciated. Thanks. Luis. PS. To anyone else who has taken their helmet apart: How do you take off the cap! I really need for it to come off to do the mods I want.