

wannabetrooper
-
Posts
105 -
Joined
-
Last visited
Content Type
Profiles
Forums
Gallery
Articles
Everything posted by wannabetrooper
-
NO! I can't believe this! I was a huge fan. I wanted to be a special effects artist growing up, and he was one of the ones I admired. I'm really shocked right now
-
MR CE helmet overhaul
wannabetrooper replied to wannabetrooper's topic in Build Threads Requireing Maintenance
I actually did buy some, but I just thought that since I had painted everything else, that I really should try to paint the stripes too. But, if I ever do this again(and I might ) I will definitely use decals because my hands aren't as steady as they used to be! -
MR CE helmet overhaul
wannabetrooper replied to wannabetrooper's topic in Build Threads Requireing Maintenance
Me too, me too! -
Started my MRCE
wannabetrooper replied to psych0ticmisfit's topic in Build Threads Requireing Maintenance
Man, the ears make it look complete. Now I really can't wait to get mine. Nice job. -
MR CE helmet overhaul
wannabetrooper replied to wannabetrooper's topic in Build Threads Requireing Maintenance
I wanted to use the same color for the tube stripes that Mike used when he painted his helmet, but I could not find it at my local hobby shops, so I ordered some from a website today. I went ahead and made the pencil lines on the helmet so that when the paint arrives I'll be ready. -
Turned out really nice! I'm STILL waiting on the ears and I have decided to paint the tube stripes, so as soon as I get the materials I need I'll start on that. Otherwise all that's left is the stripes, frown mesh, and ears.
-
MR CE helmet overhaul
wannabetrooper replied to wannabetrooper's topic in Build Threads Requireing Maintenance
Cool. Got any photos? -
Started my MRCE
wannabetrooper replied to psych0ticmisfit's topic in Build Threads Requireing Maintenance
Wow, it's coming along great! Looks like you were able to close the ear gaps really well. I didn't like the way mine turned out after I painted it so I sanded it then sprayed some crystal clear. When that dried I buffed it out with some rubbing compound. Now it looks great. Maybe it cracked because the base paint coats were not fully dried. I think that's what happened. -
MR CE helmet overhaul
wannabetrooper replied to wannabetrooper's topic in Build Threads Requireing Maintenance
Yeah, that's who I got mine from. -
MR CE helmet overhaul
wannabetrooper replied to wannabetrooper's topic in Build Threads Requireing Maintenance
No, no ears yet. If I don't get them in today's mail I'm going to send an e-mail. -
MR CE helmet overhaul
wannabetrooper replied to wannabetrooper's topic in Build Threads Requireing Maintenance
That's correct Mike. I was going for that look. Well, as for money, lets see...don't have the receipts anymore, but I'd say about $150 , give or take, including the helmet itself. Got it on eBay for 116.00 including shipping. Oh, I forgot the ears, so closer to $175.00. -
MR CE helmet overhaul
wannabetrooper replied to wannabetrooper's topic in Build Threads Requireing Maintenance
I got around to painting the lines in the tear drops and on the back... -
MR CE helmet overhaul
wannabetrooper replied to wannabetrooper's topic in Build Threads Requireing Maintenance
It was disassembled. I used black electrical tape as a guide, then used a dremel tool with a sanding drum to grind it away. -
MR CE helmet overhaul
wannabetrooper replied to wannabetrooper's topic in Build Threads Requireing Maintenance
Wow Mark, you'r helmet looks great. Yes, those are Stomper's Hovi's. When I removed the ones that came with the helmet there was a little rim still left just enough for Stomper's to fit. I just installed them with the supplied washer and nut. I've added photos for you: -
MR CE helmet overhaul
wannabetrooper replied to wannabetrooper's topic in Build Threads Requireing Maintenance
Thanks so much guys. I'm very pleased with the way it's coming out. This is all that's left to do: Finish painting details Ears Tube stripes Attach brow trim Frown mesh Padding for inside helmet. Still have original foam pieces I might reuse. I had a question: I want to make my helmet as accurate as possible, so should I paint the tips of the aerators or is it ok to leave them as they are? -
MR CE helmet overhaul
wannabetrooper replied to wannabetrooper's topic in Build Threads Requireing Maintenance
When I got both neck and brow trims I test fitted them, and as I figured, I had to modify them. This is what I did: For the neck trim I VERY carefully used a razor blade and removed half of the trim as shown in the photos. I did this because even though the rubber was soft it seemed too thick to bend around some of the contours, especially near the vocoder. Once I did that I used some super glue gel to glue it in place. Probably didn't have to, but I wanted it to be super secure. As you can see I also cut a small piece to put below the vocoder. I think it looks good. You will end up with this: Since I grinded the brow up more there wasn't a nice even edge all the way around anymore. So, again, I VERY carefully cut part of the trim so I was left with an L shape. Now when I'm ready to put it on the helmet I'll just put some glue on the bottom edge and it will still look as if it's going under the lid(see photo). Here are some photos with the neck trim, Stomper's aerators, and new eye lenses installed. The brow trim is only in place with some tape. I'm waiting to get the ears before I permanently install it in place and apply the tube stripes decals. -
MR CE helmet overhaul
wannabetrooper replied to wannabetrooper's topic in Build Threads Requireing Maintenance
-
MR CE helmet overhaul
wannabetrooper replied to wannabetrooper's topic in Build Threads Requireing Maintenance
Thanks Noel. The putty is called MMD White Putty made by Squadron Products. I got mine at a hobby shop. It dries pretty fast and is easy to sand. It shrinks a little bit, so like when I removed the ears it took three coats of putty to completely and smoothly cover the gap. -
MR CE helmet overhaul
wannabetrooper replied to wannabetrooper's topic in Build Threads Requireing Maintenance
I ordered mine from McMaster-Carr item#8507K41. They ship pretty fast, got mine the other day. I don't know what modification you have done (if any) to you're brow, but I'm going to have to alter my trim to fit. I will post pics soon. When I removed the brow on mine most of the residue came off. What was left I removed with some GOO be Gone. Didn't take it all off though. Then I sanded the rest off completely. -
MR CE helmet overhaul
wannabetrooper replied to wannabetrooper's topic in Build Threads Requireing Maintenance
OK, I painted more of the details today. I think I'll wait to do the small lines in the tear drops and back till tomorrow. I was going to put the tube stripe decals on, but I better wait to get the ears in position first. -
MR CE helmet overhaul
wannabetrooper replied to wannabetrooper's topic in Build Threads Requireing Maintenance
Yes I did. I thought about that same thing too as far as the brow trim goes. I will probably have to modify the trim itself, but I haven't received it yet. As soon as I do I will post pics and let you know what I did. -
MR CE helmet overhaul
wannabetrooper replied to wannabetrooper's topic in Build Threads Requireing Maintenance
Painted the frown today. I will start on the rest tomorrow. -
MR CE helmet overhaul
wannabetrooper replied to wannabetrooper's topic in Build Threads Requireing Maintenance
I'm getting mine from someone here. I don't know if it's cool for me to say who he is, so I'd better not for now. Can't wait to get them, I know they will make the helmet look good. -
MR CE helmet overhaul
wannabetrooper replied to wannabetrooper's topic in Build Threads Requireing Maintenance
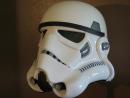
OK, so I had the helmet painted and I was not happy with it It didn't come out like the ones I've seen here on other threads all smooth and super shinny. So when the paint dried I sanded it then sprayed some Rust-Oleum Crystal Clear on it, then when that dried I hit it with some Turtle Wax Rubbing Compound. NOW it looks good. I wish I didn't have to go through the extra steps, but I'm much happier with it now. I'll start painting details tomorrow. Neck and brow trims have been ordered. Still haven't received the ears yet. I've never ordered anything from overseas before so I should give it a little more time I guess. Its been 18 days since I made payment. So here is what the helmet looks like now...