Obey Wann
-
Posts
148 -
Joined
-
Last visited
Content Type
Profiles
Forums
Gallery
Articles
Everything posted by Obey Wann
-
I think they will have to make a new mold for the ears, in all honesty. We'll put up with it for now, but I think they just need to re-do that part. The rest of it is fine, relatively speaking.
-
Enjoy the build!
-
My new NE build in Charleston
Obey Wann replied to Bostonjack's topic in Build Threads Requireing Maintenance
I am going to have to go the opposite direction, and cut off some of mine... I had an inch gap. -
Talk to ScottM. His decals fit mine perfectly.
-
OW's NE build: ANH Stunt
Obey Wann replied to Obey Wann's topic in Build Threads Requireing Maintenance
I did a test fitting this weekend at Con. I need to do a lot of work to get it to fit right, and I got a lot of good feedback from local TKs who were able to see it and we played with it to figure out what was wrong. First: What we thought was a fully trimmed kit, or had built in shims for folks.... not entrirely accurate. I am going to have to do a LOT of trimming, sanding and work to trim down edges and returns. Getting rid of the excess plastic will help it sit on me much better. Second: My trap muscles were making the kit push up too far on the chest, which had a net effect on... everything: Chest, back, kidney, butt, ab. I am going to heat gun part of the chest armor where the shoulder strap plastic attaches and tweak the angle a bit so that it fits better (more up, vs. in, if that makes sense.) We will then add more angle to the shoulder straps, and glue the shoulder straps back farther if needed. Based on refrence pics, I had glued the straps with the heavy line, and then 5 if the thin lines before the end of the chest strap plastic. I might need to move it farther up. What works for skinny people might not work on me. We popped off the shoulder strap (yet again, thank you all for forcing this CA-loving ex-clone to learn to love the E-6000!!!!!) and the whole thing settled out better. That's when we saw that we have to heat gun things a bit because the strap section of the chest top was really digging into my traps (shoulders). Third: I need to tweak the 4 straps on the chest-ab section. It is pulling things a bit wonky. E-6000 to the rescue. Fourth: I will need to trim the legs for more mobility. Fifth: I need to adjust the strap for the shoulder bells so they sit all wonky. Obviously, this is very much a work in progress. Once I kitted up, I was swarmed by a pack of garrison-mates, all offering advice. We poked, prodded, pulled and played with it as we could, but until I get on the belt sander and heat gun, it isn't going to be perfect. If you spot anything else wrong, I'm all ears. On to the pics: Looks like I need to pull the kidney closer to the back plate: Pulling the kidney up should pull up the sagging butt plate: I am also going to trim the forearms quite a bit, both to make them skinnier, and possibly shorter, and it looks like the belt popped off the snap on the chest plate, making it sag: Fixing the strap situation should pull up the chest and ab, which will fix the popping belt box issue. Yes, the ab/chest of wonky and getting pulled wrong. We will fix that. Forearms need trimming to fit more snugly. There was a solid inch in between my arm and the plastic. Good news: ScottM's decals will fit this kit. If you have an NE and need decals, contact Scott. I am close. I have a date with a belt sander and a heat gun. I have a lot of tweaking to do to get it to fit and look correctly. But for being a fat-an impolite person (er... linebacker build... er....fat in the stomach area and having a bulkier midsection and upper body).... I have a kit that should work for me once I work it correctly. I'm sure that there are other things that could be tweaked and improved, but until I get to the belt sander and heat gun, it's tough for me to look for other issues. But I'm excited that I am this close. I almost look like a proper Stormtrooper. -
Will do.
-
OW's NE build: ANH Stunt
Obey Wann replied to Obey Wann's topic in Build Threads Requireing Maintenance
Vielen Danke! Seriously, many thanks, I missed that thread. (sorry if the spelling is bad, my German is very rusty.) All I can say is that this is my helmet... it may not look like much, but she's got it where it counts. -
Looks like fun! Well done!
-
Great work on your Iron Man! Lots of fun!!! Definitely looking forward to seeing them this weekend!!! It's funny, I knew Judge hellfast was coming to DCC last year, but I didn't know he was one of the IBOT. I got my pic with them, but never said hi... not knowing it was him. I will say hi this year.
-
OW's NE build: ANH Stunt
Obey Wann replied to Obey Wann's topic in Build Threads Requireing Maintenance
Here you go. Scott will get me decals tomorrow, still no word from tupperwaretk on when they will have decals available: I absolutely love the helmet liner, I got it from a local, Darth Hair... he makes them for X-Wing pilots, but it fit in here pretty well. It is a custom made soft closed cel foam. With the ear cups, it fits snugly, but not tight. very nice!!! I went with lenses from Kevin Christley, he has a F/S thread on here somewhere. I hit them with a bit of heat gun and E-6000'd them in. I need to clean up some excess spillover, but that's easy to do. It's not perfect. There are many like it, but this bucket is mine. -
Is the rest of your kit done? Good luck with the bucket. :-/ BTW, have you heard anything from them about decals?
-
Woohoo!!! Let the fun begin!!!
-
OW's NE build: ANH Stunt
Obey Wann replied to Obey Wann's topic in Build Threads Requireing Maintenance
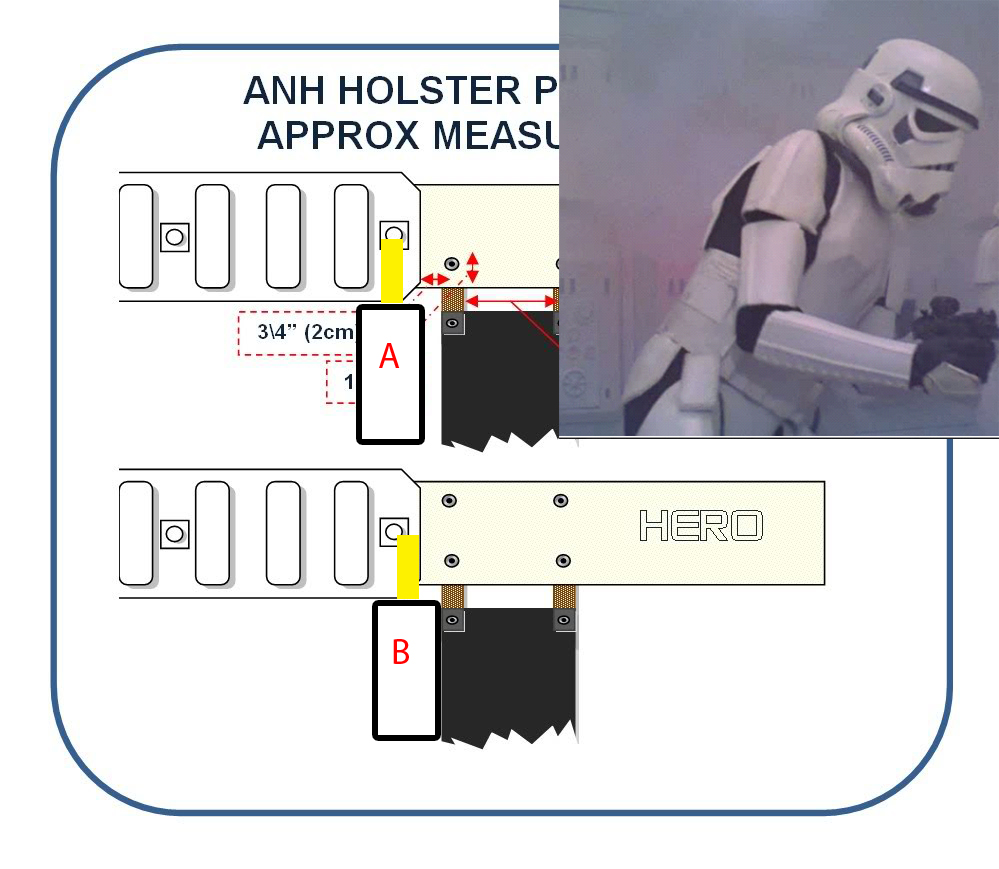
Mahalo! I made a quick drawing, is it better at option A or B? ED: It looks more like A: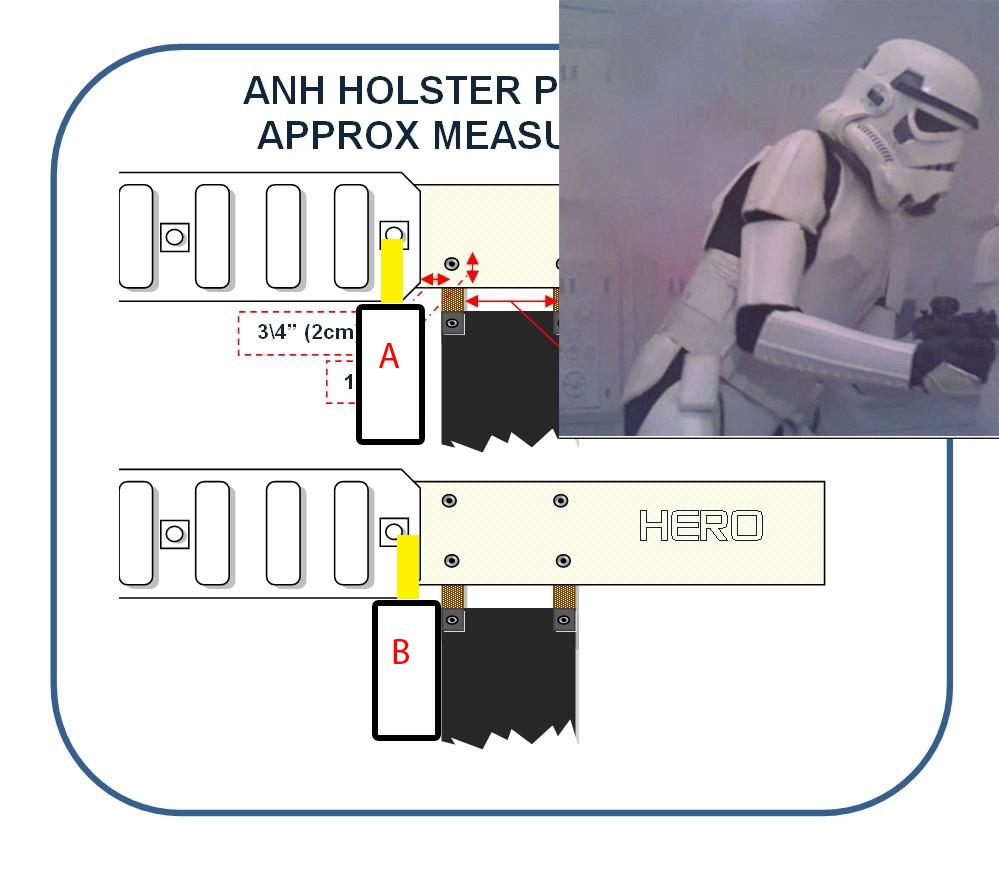
-
OW's NE build: ANH Stunt
Obey Wann replied to Obey Wann's topic in Build Threads Requireing Maintenance
I can definitely fix the drop box height. Easy fix thanks to E-6000. Are they positioned OK, or do I need to move them more to the outside? I'll grab a fresh batch of helmet pics tonight from all sides. Glad to help the cause. Please LMK if there are any other issues. The goal is eventually EIB, but I can't do that until I get a new blaster. -
OW's NE build: ANH Stunt
Obey Wann replied to Obey Wann's topic in Build Threads Requireing Maintenance
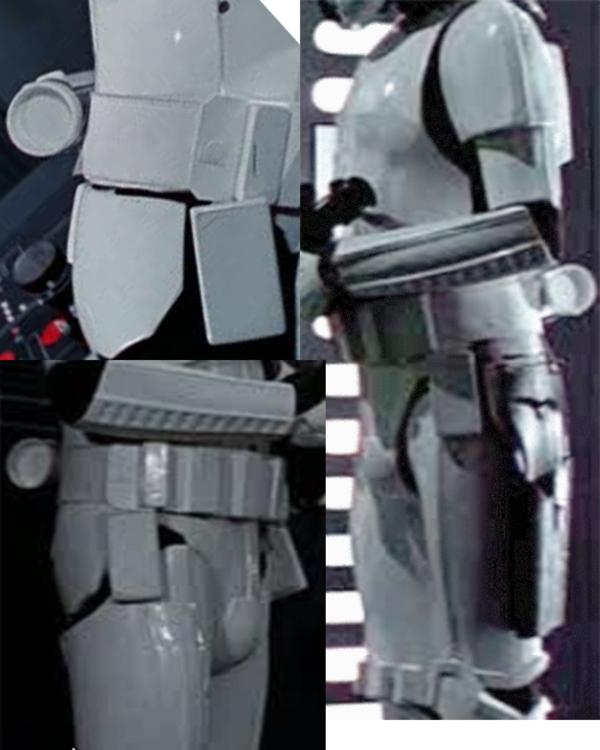
Ok, progress photos: Here is the snap on the back of the belt. This goes to a snap on the ab and keeps it from wandering: Looking down the shins... you can see the velcro strap that goes to the soes. This keeps them from moving up: Front view of the calves / grieves: Gluing in snap plates for the thighs. This goes to parachute buckles and straps that keep the thighs in place and keeps them from wandering: Bells and biceps. I ended up cutting / sanding everything below the bottom of the tape line. front armor, now with the straps for the sides and to the thighs. I also ended trimming a lot of the strap at the bottom of the cod, and the back plastic strap off the butt armor: Back armor. I will move the placement of the straps from the kidney to the butt so that the butt doesn't move forward all wonky: I had to remove the ears so I could trim a bit more off the back piece at the bottom of the ear: And finally an op-test of the top: I need to replace some straps and snaps for the right shoulder bell. Lesson learned: Snaps and elastic do not work. The elastic will stretch out and make the snap pop off. Do not put snaps into elastic. If you have to, cut small squares of nylon to go on the back side of the elastic so it has something relatively rigid to bite and hold onto. We ended up putting the forearms on the band saw at about the bottom of the blue tape line. It was the only way I could move my wrists to hold a blaster or put my bucket on / off. I'll also adjust the biceps so they ride much higher. I am getting much, much closer to finished. -
Thanks! He did the best he could with it. It does have a bulge. Let's just say that I heard a lot of grumbling and near-cursing from Scott as he built the bucket. There's no way I could have assembled it as a person new to TKs.
-
OW's NE build: ANH Stunt
Obey Wann replied to Obey Wann's topic in Build Threads Requireing Maintenance
I am now 98% complete. We're just waiting on black vinyl and Scott will make some decals for it. (Still no word on when they will ship decals for the bucket). I have to fix a bit of strapping issues, I had a blowout on a snap that was on some elastic. I need to reinforce it with some nylon webbing or plastic. Completed in the last 5 days: Re-glue the front of the calves with CA. Added side elastic straps to the chest / back Painted black stripe around the grey ear bits. (I must suck at applying pinstripe, this was easier for me.) Added strapping to shoulder bells and biceps. Cut one part of the bucket plastic near the left ear/tube. Attached aerators to helmet and attach screen. Added strap to the shoe and calf to keep the calves from riding up. Added strap from ab to thigh to keep them from wandering. Added strap from cod to butt. Added mesh to the frown. Fitted and attached ab button strips. Fitted and finished assembling the forearms, added velcro so they can clamshell together. We had to use the band saw to cut off an inch or so, and had to trim some of the inside so I could move my arms enough to get the bucket on and off. Added lenses to bucket. Made the clips for the thermal detonator And I got an answer to this question: Should I paint the screen for the aerators? If so, what color? The CRL isn't specific. Answer: Silver. Still to do: Add either hard hat liner or padding to helmet. Add decals to helmet. I'll try to get progress pics up later today. We had to cut almost an inch off the top of the thighs so I could move, but I should (hopefully) be able to go up and down stairs of needed.) I'll be debuting it at Denver Comic Con this weekend. I might not be able to get submission photos taken until the con, but it will be done by then. Oh yes. It will be done. -
I think they are too small:
-
I think the ears might be a bit small. We ended up with a gap from the top of the ear to the bottom of the brow. ScottM helped me on this one, and this is the best he could do. ( have since trimmed up that extra bit of plastic under the left tube / ear. ----------
-
NE is larger than the T/MC kit. I'm not sure about the rest (TM and RS)... but it does seem smaller than the old FX kits. It is definitely not huge... I barely fit my calves in it. We have had 2 guys in my garrison sell their T/MC kits and move up to the NE because the T/MC was just too small for them. (MC is local, so that's what a lot of folks wear here.) Sorry, but I don't have experience on the other kits yet.
-
I had to trim quite a bit around the neck in order to get my melon in. I might trim some more to make room for the seal. I had to trim most of mine so that it would bend properly.
-
OW's NE build: ANH Stunt
Obey Wann replied to Obey Wann's topic in Build Threads Requireing Maintenance
I can paint the rivets white, if needed. That won't be a problem. -
OW's NE build: ANH Stunt
Obey Wann replied to Obey Wann's topic in Build Threads Requireing Maintenance
From what I read on the 501st CRL page, that's just for Centurion. Please LMK if I am mistaken. http://www.501st.com/databank/Costuming:TK_anh_stunt -
OW's NE build: ANH Stunt
Obey Wann replied to Obey Wann's topic in Build Threads Requireing Maintenance
OK, picture time... Adding in snaps and straps for the chest to ab. Bucket progress: I need to cut out a bit of excess plastic under that left ear: Completed legs: Here is a nifty trick that ScottM added to keep the knee boxes from shifting too much: Calf armor / grieves: Detail shot of what I had to trim of the return to get it to fit. I have very large calves. An op-test of the straps and snaps. I fixed the placement of the snap on the left side after this shot, so it isn't so wonky. E6000 is great for that!!! We cut out the box on the ab because it was interfering with how the belt snap will go on. I'm going to glue a new plate in from the back side. Before I do, I'll add a snap to match the snap that we put on the belt. This will keep it from shifting up/down/sideways. It looks like I'll have to adjust the snap plate on the back so that the butt armor sits more level. Other progress completed: Touch up painting on the bucket and ab buttons. Painted the interior of the aerators white. Added rank stripe to ears. Trimmed shoulder bells and added snap plates to shoulder bells. Added strapping to shoulder bells. Things left to do: Re-glue the front of the calves with CA, possible add reinforcing strip to the inside. Add side elastic straps to the chest / back Add black pin stripe around the grey ear bits. Add strapping to shoulder bells and biceps. Tweak one part of the bucket plastic near the left ear/tube. Attach aerators to helmet and attach screen. Add strap to the shoe and calf to keep the calves from riding up. Add strap from ab to thigh to keep them from wandering. Add strap and snaps from cod to butt. (not required, but I have the parts.) Add mesh to the frown. Fit and attach ab button strips. (Monday) Fit and finish assembling the forearms, add velcro so they can clamshell together. (Monday) Add decals to the helmet. (Scott's decals should fit this bucket). (Monday) Add lenses and either hard hat liner or padding to helmet. (Monday) Make the clips for the thermal detonator (Monday. ) Question: Should I paint the screen for the aerators? If so, what color? The CRL isn't specific. My goal is just approval initially and EIB later. I have a Hasbro ESB modified blaster, so I will need to wait until I can get a new one. It'll be a while, but I'm considering one of the THB rubber blasters... just gotta wait on funds. I may also need to add shims to the sides for this bit of EIB requirements: Please LMK if there is anything else I am missing or need to tweak. -
First Armor Buy RS Propmaster or T/MC armor
Obey Wann replied to Brewski's topic in Hard Armor (General Discussion)
Just make sure you get a kit sized for your body. Some kits are designed for skinnier people. I'm a bit bigger, and went with the NE. We have 2 people in our garrison who have had to shift from T/MC to NE because it was a bit too snug. I think folks were calling the NE kit the "linebacker" kit... for folks who are a bit huskier in the chest and midsection.