

Chiassontimothy
-
Posts
61 -
Joined
-
Last visited
Content Type
Profiles
Forums
Gallery
Articles
Everything posted by Chiassontimothy
-
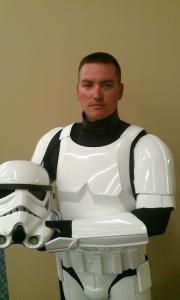
 Requesting access. TK 15522 Garrison 66 XO
 -
Don't feel bad, A buddy of mine ordered a TK. waited a year and a few months, when it finally arrived, it was a Shadow trooper kit. Needless to say, he was NOT a happy camper. Michael Tangen, I have seen the Anovos kits. Some pulls are ok, others were lets say, could be a lot better. My personal opinion, I do not like ANOVOS pulls. There are makers out there who have higher quality, thicker ABS pulls with greater detail that are far less in price. I am not going to knock ANOVOS as it is what it is. Just make sure you research as much as possible before buying. and EXPECT a LONG WAIT TIME!!!!.
-
Thanks for sharing the flight helmet I built for a buddy. That was a real fun project.
-
Whats in your bucket?
Chiassontimothy replied to Chiassontimothy's topic in Build Threads Requireing Maintenance
Anytime sir. You have a great day and please stop by again. Iits great to see what folks have done. https://www.facebook.com/timothy.chiasson.9#!/photo.php?fbid=10152249002383850&set=t.1172731317&type=3&theater Here is a picture of the side lights for my TK bucket. When they are turned off, you would not even know they are there. Here is the link to a picture of my modified Thermal Detenator https://www.facebook.com/photo.php?fbid=10152249002383850&set=t.1172731317&type=3&theater#!/photo.php?fbid=10205549539595839&set=gm.1587372628193676&type=1&theater My last charity build helmet https://www.facebook.com/photo.php?fbid=10152249002383850&set=t.1172731317&type=3&theater#!/photo.php?fbid=10205549539075826&set=gm.1587372628193676&type=1&theater Have a great day everyone V/R Tim -
Whats in your bucket?
Chiassontimothy replied to Chiassontimothy's topic in Build Threads Requireing Maintenance
Sorry folks that I have been away for just a little while. Loads of work keeping me busy and building multiple charity helmets. Yes, those are MICH pads. great to use as they can be pulled out and washed and tossed in the dryer after a troop. I have sinse updated my helmet with two internal fans, hidden lights that when turned on, I can see at night (People who are up close) and over all, made it look very clean. I will post a picture as soon as I can. along with several charity helmets so you can see the insides of them for ideas. Looking at the pictures posted here, great ideas and love those external mic speakers. Everything in my helmet is internal. My speaker system however, I kind of blew the speaker so i am using the external box for the moment. Have a great day everyone and troop away!!!!! Sorry, just saw the last question. Dan, those glasses are actually promask (Gasmask) inserts. You can have them made at any eyeglass center. or take an old set of glasses you may have, remove the side arms that wrap over your ears and insert them in the helmet. I have not had any problems using them, they do not fog up and I have them nounted with velcro tape so I can remove them if needed. I hope that helps sir. Timothy -
My charity build TIE Helmet
Chiassontimothy replied to Chiassontimothy's topic in The Foundry - Armor and Prop Making
Here is where I am at today. I am excited as I finally found my tubes for the back of the helmet........Thank you Farm Store at the end of the street. -
Look forward to seeing your build. Have a great time and hope to see you trooping in the near future.
-
Whats in your bucket?
Chiassontimothy replied to Chiassontimothy's topic in Build Threads Requireing Maintenance
Thank you. I figured I would make use of the glasses instead of letting them collect dust. Wearing my day to day glasses are not fun to wear under the helmet. These are so much more comfortable. -
Here is the padding I used. I think you are referring to Mich Padding. Hope this helps with any ideas.
-
Whats in your bucket?
Chiassontimothy replied to Chiassontimothy's topic in Build Threads Requireing Maintenance
Sir, The hoses house all the batteries and electronics for the helmet. (Sound system and lights) I have a small fan between the hoses. Speaker system inside the hoses. -
After my armor build, I decided to pack a bunch of stuff into mine to make it a bit different. Very comfortable. What do you folks do with yours?
-
My charity build TIE Helmet
Chiassontimothy replied to Chiassontimothy's topic in The Foundry - Armor and Prop Making
Added my own little pill box to the back as well -
My charity build TIE Helmet
Chiassontimothy replied to Chiassontimothy's topic in The Foundry - Armor and Prop Making
Here is where I am at so far. Still have to finish up some paint work and find the tubes for the back of the helmet to run the hoses into. But over all, not to bad. -
A question about fans and wiring
Chiassontimothy replied to DroidHunter's topic in Electronics for Helmets / Blasters
The best thing for you to do (As I ran into that situation myself) Go to radio shack, by the small fan ($18-$20) by one on off switch ($2.00) one baggie of (9Volt battery hook up) $1.50 and some wire. It would be cheaper to buy that then try to rig what you currently have. I would not recommend you use that fan. As much as you may not want to hear that, it would cost you more and more time to rig what you are showing. When you have time, purchase those items and I will support you by email on how to hook it up. it only took me 10 minutes to hook up my fans to my bucket. and it works nicely. -
My charity build TIE Helmet
Chiassontimothy replied to Chiassontimothy's topic in The Foundry - Armor and Prop Making
I can do that if they do not mind. I am already sharing the build on several other sites. This is a fun project. -
My charity build TIE Helmet
Chiassontimothy replied to Chiassontimothy's topic in The Foundry - Armor and Prop Making
Thank you I appreciate it. -
My charity build TIE Helmet
Chiassontimothy replied to Chiassontimothy's topic in The Foundry - Armor and Prop Making
A close up of the skull I painted -
Here is a pic of my current fan build charity helmet, The entire build process can be viewed on my FB page from start until completion.
-
Truely a great job! love the detail on the paint job
-
Making Stormtrooper Armor
Chiassontimothy replied to Grimez's topic in Hard Armor (General Discussion)
I can share that if you take your time, plan before you cut (Measure more then once), ASK ASK ASK questions. If you are not sure, folks on this site are full of great information, can lead you on a great path. Just be patient, cut slowly, take small bits at a time. This way you know for sure you are not overcutting then find yourself sqeezing into a part. The cost can very and the amount you put into it is the real question. I personally am at just under $1000 (US Dollars) so far, my E-11 was actually a freebie as it was a gift from a friend (Modifications to it were purchased). Do not get frustrated! Enjoy your build and if you find yourself in a small rut, just step back and work on something else until you are ready to go back. Post pictures of your build as well, this will give the members of this forum a chance to share info while you are building. Outside of that, ENJOY! -
TK 15522 requesting 501st access 70th Explorers SQD 66, Springfield, MO
-
@ Donovan, my butt plate is seperated from the kidney plate. when i sit down, I go slow, and turn my thigh pieces outward a bit so I dont get pinched right along the inside of my legs. I put my armor on just a little while ago and sat on my couch to see if I could better explain it. I just take my time, sit up straight and be careful. Stools are better to sit on but they are not always there. Please understand that I am by means not an expert at sitting. I look just as uncomfortable as the folks in the above picture provided by paul. I have never tried to sit on the ground. Only something as in a chair or one of those padded foot rests that are actually seats.
-
I just sit down with a straight posture. Thats all. And just be careful not to just sit down fast. My butt plate is seperate so its easy to adjust when sitting.
-
I do it and have no problems
-
Patrick, I myself ran into that problem until I was able to figure out a solution. It cost me less then $10. I used the Mitch pad (Circle) velcroed to the center, Mitch side support pads two on the left and two on the right. I placed the Kevlar Donut pad in the front (by the forehead) and one in the back of my head. Both donut pads where cut in half and adjust for the support to keep the helmet in place. There are two types of Mitch padding. Black (Small) Grey(currently used as one size fits all.) and they are actually thicker and can help with what you may have issues with. I chose black because it just fit better for me. They can be bought on line for around $30 for a complete set of six or, just go to your local or nearest army surplus and pick them up for around $3. They are washable so wash them first. I hope this helps as I did see you have already tried. I was not ready to by baseball, football or bike helmets just for the padding. Best of luck, these guys and gals have great ideas and have helped me out tremendously. V/R Tim
