

Brent
-
Posts
196 -
Joined
-
Last visited
Content Type
Profiles
Forums
Gallery
Articles
Everything posted by Brent
-
Hmm. My bad apparently. I'm getting the grey buttons now on all pages. I had to clear my cache several times for some reason.
-
It looks like IP Board is running the css through some sort of minifier. I can see the change you made in the css on the main page: http://forum.whitear.../ipb_common.css Contains #primary_nav { background-color: rgb(200, 200, 200) } or something to that effect http://forum.whitear.../ipb_common.css does not contain that Some sort of server side css cache preventing the change from coming through?
-
The grey background seems to have only applied to the main index. It seems unchanged when viewing a topic.
-
I can't wait for you to see it out on a troop . Ok, I'm slowly piecing things together and planning my next moves. I've laid out the torso pieces and am verifying I know what to do for the rest of the steps. Here is my rough layout of how I will assemble to torso: Brackets are 3/4" from the top of the butt, bottom of the back, and bottom of the chest. The rest are either centered, or aligned with those positions. My plan is: 1. Drill holes for brackets using dremmel and attach brackets 2. Attach rivets 3. Glue on straps and shoulder bridges Here are some questions I have about these steps: Attaching the rivets: Do I need to pre-punch a hole in the elastic? I'm guessing just a leather punch from a pocket knife would do the trick, but I don't want to do anything that will cause the material to rip. My kit came with 8 split rivets. I know I need 6 for the side closure. Joey's suit appears to have one on the cod holding the strap. Is that the same type of rivet? I can't seem to find a reference photo clearly showing that area (not a popular camera angle I guess). I think that leaves me with one spare rivet. Gluing the straps: May plan is to suit up and tape them in place to figure out the exact placement. I'm going to use E6000 for the straps. Does anyone know how permanent that will be? If I need to tighten or loosen the torso later is it possible to break the glue and reattach?
-
I believe this is the experience of most web developers
-
In the far lower left there is a "Change Theme" link.
-
Removing the jump-to-unread blue dot was good motivation to move to the 2012 theme . I'm looking forward to everything working well though.
-
The new theme looks great. Unfortunately I'm having bugs with some of the browsers I'm using, so I hope I can help get some of the kinks worked out. Cross browser style and layout issues are a huge pain, so I'm sorry to have dump these issues on Lucas and our other webmasters. I'm using Internet Explorer 10 in compatibility mode. (Browser Mode: IE 10 Compat View, Document Mode: IE7 Standards). I'm experiences similar layout problems with the Windows Phone 7 browser, which is an IE9 variant, but I can't take screenshots from the device so I'll primarily refer to the desktop experience. There are quite a few quirks right now, so I'm not going to go deep in to the style sheets to try to figure out what's going on unless someone wants me to try doing that. I'm just going to try documenting the most noticeable effects I'm seeing. Title: "Also tagged with" over run: Buttons: Grid alignment: While looking at this I also notice that there are some HTML issues that might be confusing the browser, such as multiple elements with the same id (I think id was used instead of class for the "left active" content). Check out the html for: http://forum.whitear...=0 <div class='desc lighter blend_links'> Started by <span itemprop="creator"><a hovercard-ref="member" hovercard-id="2179" class="_hovertrigger url fn name " href='http://forum.whitearmor.net/index.php?showuser=2179' title='View Profile'><span itemprop="name">ZeroRoom</span></a></span>, <span itemprop="dateCreated">Yesterday, 09:23 AM</a> </div> It appears that there is a mismatch between a span and an anchor near the end <span ...> … </a> Thanks for the work keeping the forum going! Let me know if there is anything I can provide that will help.
-
It looks like Invision's technical support requires I have "Client Access" to their forums, so I can't post a topic or search through their existing support tickets. Whoever has the e-mail and password for their support forums will probably have to post the request. Their support forums have the same issue, so hopefully it will get caught soon. In the mean time I'll start a separate thread with the layout issues I'm having with compatibility mode.
-
Wow. Is that a pipe kit, a resin kit, and two Hasbro kits? You're going to be one well armed TK. Looks like you'll be keeping busy.
-

Finally... it begins! Anphrax's ANH ATA Build
Brent replied to anphrax's topic in Build Threads Requireing Maintenance
Great job! Will you be taking it out for the first time at ECCC? -
I made some more progress trimming. Return edges had me pretty worried before I started. You see a lot of mentions of specific numbers of millimeters for different parts in build threads, and until I had the pieces in my hands it was hard to get a real sense of what needed to be accomplished. When it comes down to it, comparing to screenshots and archive photos seems to be the only way to get the right feel for the edges. I narrowed down the back and finished the rest of the torso pieces. If anything I'm probably still leaning on too much return edge, but I can always tweak it to be thinner later. I've started working on trimming the arm pieces. I've got the biceps to the point I can start trying to figure out the fitting.
-
I realize tracking down IE10 issues may be a bit premature so I've been using compatibility mode up until now to avoid IE10 problems. However the new skin has different layout issues with compatibility mode that actually seem to be fine in IE10 normal mode so it would be nice to figure out what's wrong with menus in IE10. For now I'm stuck between broken layout or broken scripts In IE10 all the menus fail to pop up. This includes notifications, PMs, switching search mode, etc. This occurs in all themes. The failure occurs in this file: http://forum.whitear...94f20488fc&g=js at line 284, character 95: SCRIPT5007: Unable to get value of the property 'replace': object is null or undefined Callstack: > stripAlpha, index.php, line 284 setOpacity, index.php, line 286 _methodized, index.php, line 60 update, index.php, line 607 Anonymous function, index.php, line 602 loop, index.php, line 604 loop, index.php, line 596 Anonymous function, index.php, line 54 The "filter" variable is undefined. A possible workaround would be replacing: return filter.replace(/alpha\([^\)]*\)/gi,''); with return filter===undefined?'':filter.replace(/alpha\([^\)]*\)/gi,''); I can't really test this since I can't modify the source files, and this probably won't fix the underlying issue, which is that somewhere along the line the 'filter' variable isn't getting properly set. Maybe there is an update for whatever library this is using?
-
Thanks everyone for the encouragement. I'm still fighting off this cold so I'm not making much progress. My head felt clear enough this evening for me to take the plunge on the first cut though. I started with the back plate and tried curved lexan scissors. I found that they were really hard to maneuver in the inside curves, and I couldn't force it to cut in as tight a diameter curve as I needed. I backed off from using the scissors and switched to my dremmel using a sanding wheel at low speed. Personally I felt like I had a lot more control with the dremel, so I'll probably use the scissors for rough cutting and use the dremmel and sandpaper for the rest. I'm basing the return edge depth from TK9477's post and I'm leaning toward the larger dimensions, figuring I can always sand it down further later. During my convalescence I've spent some time watching the Star Wars blurays and it appears that the normal amount of return edge is on the smaller side, so I'm guessing I should sand this one down another 2-3mm on the sides. Maybe I'll wait until I've made more progress before I nitpick at that sort of detail.
-
My armor arrived last week! I've unfortunately been fighting off a cold that put me out of commission over the weekend . It's hard to force yourself to rest with all that shiny white plastic waiting for you . My plan is to build to centurion standards and use the original strapping system. The helmet is preassembled by Paul. I also ordered a strapping kit, belt, holster, and a pair of his new latex hand guards. It all looks amazing. Thank you Paul, for a wonderful job on the armor and for the great details on the helmet! For reference on how to assemble the strapping I'm referring to joey's pictures and TK 4702's RS Props build, as well as LFL archive photos. It would be helpful if anyone could point me to more threads that discuss the original strapping system. The obligatory out of the box photo: This is my first armor build so I have been nervously looking at each piece and comparing them to reference photos, but haven't dared to make the first cut yet. I'll start marking out the return edge and hopefully will get the chance to start trimming tomorrow. I have lexan scissors and an exacto knife ready to go as soon as I'm comfortable with where to use them. I'll try to post plenty of pictures along the way. Please provide me feedback as I go. I'd like to stay as accurate as possible so I'm looking for the help of the experienced eyes on the FISD to keep me on track.
-
I started off my blaster with E6000. I figured it would be good practice for my armor, and it was forgiving. I've totally switched over to CA glue (Duro Super Glue is what I'm using). The stuff seems to love resin and it bonds fast. The E6000 was really hard to keep clean without having little trails of glue and blobs seeping out where the joints were. Both feel pretty solid once cured, but I'm not tempting fate by pressing too hard either.
-
A feature that I'm working in to my blaster is a -----------. As an added bonus I can fire my blaster as a starting gun and it will activate the stop watch . We'll see how this goes, but I think it will be pretty handy. Has anyone else tried working a clock in to their kit?
-
My soldering set up is considerably better now. I'm using a temperature controlled soldering iron with a fine tip. I also got some fine tweezers and magnet wire. This beats the pants off of the radio shack soldering iron I was using earlier (the tip was thicker then the whole watch I was trying to solder on to). Here is a picture of the new connections to the watch. The thick wire is what I was using earlier. It is out of a gutted ethernet cable. The new thinner wire is magnet wire, which is small enough to make good contact with the pads, and flexible enough that when I move the watch it doesn't rip off. I'm using a small right angle header to bridge between the magnet wire and the thicker wire connected to the switches. I was then able to get everything connected and glued in to place. I needed to cut back a bunch of plastic from the other side to allow room for the wires to pass through. It took a while push the wires and tape them out of the way for everything to close up as well. Now that it is all closed up I ran some E6000 around the edges and will let it cure until tomorrow.
-
I'll give that a try as soon as I can close it up. I found some magnet wire and I'm upgrading to a better soldering iron, so I should be able to make more progress soon.
-
I cut off the Hasbro barrel and attached my new one. So far so good. I'm almost ready to seal up the body except I can't get the soldering to stick on the watch. I think I'm stuck until I can get some magnet wire and possibly a finer soldering iron. Even the finest wire I have can only make a temporary bond to the tiny solder pads on the watch, and when I try to move it in to position for gluing, the wires tend to pop off. Once sealed I need to extend the Doopy Doos folding stock by about an inch. Anyone have suggestions on what I can use for that? I'm thinking of using whatever scrap plastic I have around to make a rough skeleton for the gap, then fill it over with Bondo. Would some sort of clay be better? Fiber glass? I need to be careful because this will be up against the finished barrel, which I will try masking off.
-
TK boots feel a bit loose
Brent replied to bigtrev503's topic in Boots, Soft Parts, and other Accessories
I noticed the same thing. I think usually the way I lace my shoes helps them fit more snuggly for my normal size, but that isn't an option for TK Boots of course. I got some insoles and thicker socks, and around the house that seems to work well at least. I'll need to try them out trooping to say for sure. -
I just went out to the mailbox and discovered that the t-track I ordered from Marv has arrived! It looks awesome, and puts my earlier crude experiments to shame. It's a good black color as well, so I plan on attaching it without even needing to paint it.
-
Same here. I can't access the CRLs from the side links. In the mean time I'm referring to them here: http://www.501st.com...tuming:FISD_CRL, which I think are the same thing.
-
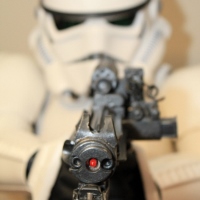
After painfully waiting for the paint to dry I finally was able to peel back the "chips". This is two layers of metallic, followed by some latex, followed by flat black, followed by a wider layer of latex, followed by hammered black. I then peeled off the paint by dabbing at it with masking tape. I think the two layers of paint give it a more "worn" look. The metal is a bit two shiny I think. I'll stick with this recipe for the rest of the gun for consistency, but I think future attempts will use a more dull metallic layer. In the reference pictures of the folding stock I showed earlier you can see that where the paint is worn away the metal is a very dark grey except for right on the edges. It seems that if I want to replicate that look I'll need to do a lot of experimenting. This is definitely turning out to be pretty heavy weathering, which I wasn't originally planning on, but I think will turn out fine. The pictures in this post are right after peeling back the paint. I've now applied a clear coat on top of that, which I'll need to let dry before I can move on to the next part; attaching the barrel to the Hasbro.
-
Another thing I found with the hammered black. Too light of a coat and you could see pin pricks through to the metallic base. Too heavy of a coat and it started pooling pretty badly. This is probably just due to my lack of spray painting experience, but it's one more good reason for me to have a flat black undercoat for it.