

Brent
-
Posts
196 -
Joined
-
Last visited
Content Type
Profiles
Forums
Gallery
Articles
Everything posted by Brent
-
Use the search box up in the top. If you are currently looking at a thread it defaults to searching within that topic only, so click "This Topic" and change it to "Forums". Sometimes you need to know exactly what the magic search term is to make it work right since it isn't as smart as other search engines. Another good place to start is by browsing through the Expert Infentrymen and Centurion applications and looking for ones that have [AM] in the title. They will also have good pictures, and even if you aren't interested in those programs, there are often some good tips you can get out of them since people tend to provide a lot of feedback and point out common problems.
-
Glad to help. If you search for "*AM" you will find a whole bunch of threads where people have built the same kit. You will probably find some good pictures that will help with your particular situation.
-
Do you know what maker your armor came from? There are some differences in how people do shims depending on the maker, and if you are making ANH/ESB/ROTJ. In ANH assembly there is no overlap, the two sides go flush against each other and have a cover strip glued on from the outside. There are other ways, but that's the one I'm familiar with. For the belt there should be three circles/square peices that go on the far left, right, and in the middle. They were originally used to cover rivets that held the plastic to the canvas. A great source for pictures is the reference gallery You can find pictures of the original belts from the LFL archives there.
-
I lent someone my clamps, so when I get them back or get some more I'll try adjusting this a bit. I made my chest loops a little bit longer as suggested earlier, and I think it helps with the evenness. My biggest issue is that my shoulders start hurting after about an hour. I think I may need to put some padding in the torso where the belt is at so that more of the weight rests on by hips since right now it is pretty much all on my shoulders. The bottom of the torso tends to slide down a bit over time so I think this would help. I first thought it might have been my Aker causing shoulder and neck strain since I'm hanging it around my neck, but I tried without it and I still ended up feeling pretty uncomfortable after a while.
-
Thanks! I really appreciate the feedback. I think the biceps where the first limb piece I trimmed down, and I was probably a little less aggressive on them the the other parts. After having worn my suit now a few extended times I'm working on figuring out the next tweaks I need to make and I might add trimming down the biceps a bit to the list. I'm having some discomfort in my left arm and I'll try seeing if that might help. I think the forearm isn't rotated enough in respect to the bicep so the joint binds up causing the front of the forearm to pinch my hand. I think moving the elastic a bit would help, and maybe shortening the forearm if that doesn't help.
-

Painting rivets and details help
Brent replied to TrooperJay's topic in Assembly, Mods, and Painting
I just used some white model paint with a small brush. I didn't bother other masking the plastic. -
After trimming with either scissors or the dremel I used two passes of sandpaper to clean up the edges. I used mostly 100 grit followed by 220. The 100 grit would knock off most of the roughness and round the edge and the 220 would really smoothen it out. I initially got my sandpaper out of a variety pack at my local hardware store so I could experiment with the different grits a bit. If you aren't comfortable with the trimming or sanding you can get some practice a bit on an edge that will be covered with a coverstrip. I gave up on sanding those edges very thoroughly by the time I was done. I also recommend cutting the sandpaper in to pretty small pieces so you are less likely to brush the surface of the armor while you are working the edge.
-
Knee Pack and Sniper Knee Reference Galleries
Brent replied to Darth Aloha's topic in Assembly, Mods, and Painting
Awesome Eric! I would have loved this when figuring out my sniper plate. You're going to make it too easy -
The individual buttons on the ab plate might be hard to separate, but Jimmy makes a good point, you could have buttons hidden anywhere so if you don't have enough there you can spread them out a bit. If you try it, show us pictures. I've been considering some similar stuff and I'd love to see more examples of cool electronics hidden in armor.
-
I think I heard someone suggest using a magnetic reed switch hidden behind the buttons and a small magnet in your glove. Something to give the impression that the buttons work without actually changing the appearance.
-
Fortunately the Hyperfirm can withstand the fall .
-
1st build - Random Questions
Brent replied to kupertrooper's topic in Getting Started - Read this First!
Looking through screenshots is always your best bet for something to model from. Some stormtroopers in the movies are a bit off and wouldn't meet CRLs (I think there is one in the boarding party with his belt on upside down for example), so don't emulate a particular screenshot without checking the CRL first. Check the Centurion application threads for clarity too, you can usually figure out what the CRLs mean from what others have done. The Stunt holster is attached with two rivets that go through the bottom of the belt and the top of the holster straps. This differs from Hero, where there are four fasteners used. Search around; for almost any detail there has probably already been a long discussion that will cover just about every possible way it could be interpreted. -
Ian posted some pictures of the mods he did to get his Jedi-Robe approved: http://www.whitearmor.net/forum/index.php?showtopic=18997&hl=&fromsearch=1
-
On my very first troop an older girl asked if she could hold my blaster. I told her to be careful, and handed it to her. Within seconds a younger kid rushed up and was taking it from her. I was able to get it back quickly, but I realized that if you let one kid hold its probably best to be ready for them all to want to a turn. Not a minute later I watched as another trooper handed a hyperfirm to a kid who immediately dropped it on the ground. I held a tight grip on my blaster for the rest of the day.
-
1st build - Random Questions
Brent replied to kupertrooper's topic in Getting Started - Read this First!
Here are a few pointers. Do look around and try searching (I find the search box can be a pain sometimes to find good results unless you have really targeted keywords). I also recommend starting a build thread, it's a great place to show everyone else what you are doing and ask questions as you go along. 1. I bought some curved sisscors. Do I need straight ones too? You can probably get away with just curved. Like Rob said, score and snap works good for straight cuts. 2. Do you use elastic to hang you armor or do you use straps? I used elastic, but I also used the original strapping method and I'm not as familiar with the other techniques. Not everyone uses the same strapping method and different parts are often attached and strapped differently. Look at people's build threads and at tutorials for good references. 3. I noticed a lot of people use pop rivets on their armor and then paint them. Why not buy the white pop rivets? The only place I needed pop rivets on my armor was attaching the holster to the belt, and those ones aren't painted white. Other rivets I used were cap rivets and split rivets, and I'm not sure if you can get them in white in the correct sizes. I don't see why already white rivets wouldn't work though where they are appropriate. 4. How tight should my armor by? I don't want to look skinny in it but I don't want it to look big on me. I'm worried that I won't trim it correctly and then be screwed. FYI - I'm a worrier. There was a thread yesterday that might help you: http://www.whitearmor.net/forum/index.php?showtopic=21003 6. If I choose to go with split rivets for Centurion down the road, are these the right kind and how many would I need to order? http://trooperbay.co...ts-and-washers/ The original suits had six split rivets on the side and one in the cod. They were brass rather then nickel, but the side rivets at least should be painted white. I think those are sufficient for centurion (refer to the CRL if in doubt), but I can't say for sure. A tip for Centurion details is to look at people's EIB and Centurion application threads. They usually feature up close pictures of their rivets and other details. -
Armor Cleaning and Polishing
Brent replied to The White Knight's topic in Hard Armor (General Discussion)
Eric has a good tutorial on using Novus to polish off the scuffs on your armor: http://www.whitearmor.net/forum/index.php?showtopic=19398&hl=novus&fromsearch=1 I've also heard magic eraser works well. Of course you can also opt to let your armor naturally weather a bit. Some prefer to have their armor look more like the suits used on screen, which were generally mistreated and pretty scuffed up, but it's your preference. -
I made a stab at the scope rail today. My first attempt was using aluminum. I had a hard time trying to put 90 degree bends in it and the bar kept snapping. I switched to steel, and while harder to cut, the bends seem pretty sturdy.
-
Don't wait to finish your armor before getting your undersuit though. You will want to have it on hand while you are checking the fit of your armor pieces. +1 for EastBay.
-
I started a build thread where I'll post updates as I get things put together: http://www.whitearmo...showtopic=20887 For more pictures I'm dumping all the detailed shots here: https://picasaweb.go...feat=directlink Let me know if you have any suggestions . Tonight I think I'll either try working on the false bolt or I'll start on the rail.
-
Perfect! Thank you sir
-
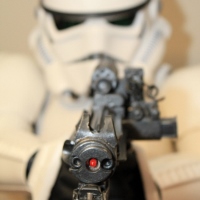
I can't seem to find any good detailed pictures of excatly how the firing bolt looks in the at rest position on a Sterling. From what I've seen there is a little U-shaped channel at the front of the bolt, which is partially filled with some sort of metal block. The best image I've found so far is one posted by @v7sg on The Best Sterling Templates Ever thread. In this picture the detail I'm trying to figure out is on the left side. Does anyone know where to find some good up close pictures of the bolt in the receiver? I'm trying to figure out how much of that detail is exposed, and also how exactly the diagonal ridges align with the ejection port. Thanks!
-
Ok, one last update for the evening. I've been thinking about how to make a false bolt. I still have 1.5" OD acrylic tube that I used to form the receiver on my Hasbro. Since it's only slightly too large a diameter for the bolt I realized I could cut out a segment and it should fill the gap and the radius is close enough it shouldn't appear wrong. I cut out a piece and it can be inserted from behind through where the clip attaches. I think if I paint it up and make a diagonal strip it should look pretty good. I believe the actual bolt has a U-shaped opening in the front. I haven't found a good reference for the exact shape of that opening yet, if I can I may try cutting that out.
-
Congrats! That's a lot of trooper helping troopers
