

Star Raider
-
Posts
238 -
Joined
-
Last visited
Content Type
Profiles
Forums
Gallery
Articles
Everything posted by Star Raider
-
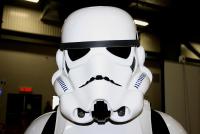
 Here is a large update: (Again) ... Whats completed: Everything above the belt.... Whats not completed: Most things below the belt... - Need to stud snap/attach the thighs to the abdomen plate. - Need to attach button caps over belt revits - Need to attach middle plate on abdomen plate - Need to add foam in locations required - Need to assemble helmet interior - Need to buy a pair of gloves (Those are my leather ones for driving... had to wear something for photos lol... ) Whats next after finishing the above items? Apply to 501st Website
 -
Any major problems before I apply?
Star Raider replied to Wiggleplum's topic in Build Threads Requireing Maintenance
^^ I wish I had know that before I started to drill holes in my ABS -
Sorry Guys (And girls) I've had a busy Christmas!! But I'm getting back in the groove.... I really want to get this done!! I have a full week here to dedicate to finishing this... That doesn't mean I'm going to speed up and do a sloppy job, I'm just at the point where everything needs to be assembled now. Everything has been found/cut/put together, Now its gluing and strapping that's left. Here is the progress on the shins. Edit: The left boot (facing pic), The top is a bit uneven. Once I glue the front strap over top, I will use the top as the guide and trim the bottom to maintain an even curve. Assembled Armor as per: http://forum.whitear...showtopic=16608 Always open to suggestions and criticism.
-
First cut, then throw up, then measure, right?
Star Raider replied to LadyInWhite's topic in Assembly, Mods, and Painting
Looks like your doing great! Don't rush near the end though! Keep the consistent excellent grade your doing already! I bought my armor around the same time as you and I'm still sizing, making adjustments and making sure everything is done right... That being said, most of it is all sized and ready to go, just need to do small attachments and final adjustments... Here's my build thread, its ROTJ, So there are differences in the armor, but how I attach things might help-------- -
Glad to have helped
-
Updated Thread: Dec 26, 2011 - Added Pictures - Updated Tool list
-
W.I.P ANH Stunt AM TK[*AM]
Star Raider replied to Spectre's topic in Build Threads Requireing Maintenance
White armor has a whole bunch of tutorials!! http://whitearmor.net/fisd/Tutorials Check out the arms one, this is how I did mine! Gives lots of pictures and details... http://whitearmor.ne...d/Tutorial-arms Edit: Also when you glue, glue the one side of the bicep then let it sit for a good 4 hours... (Maybe even 24) Then glue the other side... Sometimes people use Velcro on the back part of the bicep, and glue the front so you can get it on and off easier. Check out the Incinerator Build Thread, I am showing how I'm building my armor there. ---> http://forum.whitear...showtopic=18060 BIG DIFFERENCE IN ANH AND ROTJ Please dont copy everything, just look at biceps.... the armour is considerably different then ANH.. -
Shoulder Update:
-
Need some advice, I've found some stretchy white cloth elastic that's about 3 inches wide. I will put that on the inside of the armor on the abdomen and butt plate to help fit the armor, It should work out. With the trim being added it should look alot better. The white elastic isn't permanent. This was only temp to see if it would work, I will adjust it by fixing the elastic so there is no gap (Between armor and face of elastic)... Let me know what you think... The elastic is currently horizontal, it will run vertical in one piece instead of two for final product.
-
High Resolution - Incinerator Images (26 Images)
Star Raider replied to Star Raider's topic in Incinerator Trooper
Happy to help! -
Thanks Steve for the images, Ill use those as well Thanks, That was exactly something I was looking for. I'm probably just going for EIB only because my helmet is eFX... I don't need to buy another helmet to go for the extra punch... (I would love to though.. . dont get me wrong ) Another note, Does anyone know where I can pick up SNL /mini - Edge Trim for the required pieces of armor? (In Canada)
-
Thanks guys!! I'm using a lot of ideas from the Centurion and EIB approved pictures Just trying to make sure I do everything as accurate and "Long Lasting" as I can!
-
GOAL: Progress:In Progress 501st status:Not Applied White Armor EIB Status:Not Applied Nov 15, 2011 Unpacked the box, went and bought a snap system. Nov 18, 2011 Update 1: Starting to cut and measure things. Not gluing until everything is officially sized and fits, don't want to make a mistake with the gluing. Doing all the Snap Studs! Update 2: Decided to glue all the ABS Stud Snaps into place for all the main pieces, still have more to do, but in pictures below you can see the work done. Also started to cut the leg pieces. I'm going to have to cut 2 strips for each leg and glue one for the front and back as a finish. Nov 25, 2011 PermaPoxy-ed the front facing sides of the two elbow and upper arm parts. Attached Velcro as the connection for the rear facing parts. Dec 10, 2011 Finished most of the sizing. Added the Over all Progress to keep you updated on what things are done! Lower body parts are fitted, waiting on boots to finish sizing. Abdomen, Kidney and butt plate are almost finished for sizing. Next update will include pictures of progress! Over All Progress Helmet: 100% Neck Seal: 0% - Still looking/Need to Order Shoulder Straps: 50% - Need an Idea of what type of fabric to use. Cant be like a cloth strap, tried it with Stud Snap, wore out within a few pulls of Stud Snap. Shoulder Bells: 100% Biceps: 100% Forearms: 100% Handplates: 50% - Need to attach elastic strap. Gloves: 0% - Still looking/Need to Order Pauldron: 100% Pouches: 0% - Still looking/Need to Order (German MP-40 Style) Chest: 100% Back: 100% Under Suit: 0% - Still looking/Need to Order Abdomen Plate: 30% - Needs to be trimmed on sides to fit with Kidney/Butt Plate - Front button panel need to be glued on - Holes and Buttons in position on abdomen plate - COD plate was trimmed to fit... (Lol) Kidney & Butt Plate: 70% - Kidney and Butt plate are glued together - Needs to be trimmed on sides to fit with Abdomen Plate Belt: 10% - Need to find canvas belt - Have pieces, needs to be assembled Thermal Detonator: 10% - Need to find PVC Pipe - Have pieces, needs to be assembled Thighs: 80% - Items fitted - Needs to be glued using 1 piece of ABS on the front and back to cover seam. - Ammo belt needs to be installed on Thigh Lower Legs: 60% - First fitting done for upper part of lower leg - Waiting on boot for final fitting Boots: 10% - On order Holster: 0% - Still looking/Need to Order Weapons: Flamethrower: 0% - Still looking/Need to Order Light Saber: 0% - Still looking/Need to Order Things I need help with: Dec 10, 2011 How do I connect the Abdomen and Kidney/Butt Plate along the side of the body. I have an idea trimming the sides so they touch then using a wide white elastic to help stretch if needed. (IE. Breathing Room) Things I'm looking for: Dec 10, 2011 U-Shaped material as trim for: Back, Chest, Abdomen, Kidney/Butt Plate (FOUND) German MP-40 Style Pouches ABS Filler ABS Polish Dec 19, 2011 White SNL /Mini - Edge Trim for Chest, Abdomen, Back... List of Tools Used: - PermaPoxy (5 Min) - Canadian Tire $8.99 - Dremel 100 - Home Depot $45.99 - Dremel Drill Kit (4 Assorted Drill Bits) - Home Depot $13.49 - 30 Stud Snaps (4 Pieces per Stud Snap System) (Post Snap: 59 Cents each, Stud Snap: 59 Cents each, Cap Snap: 69 Cents each, Socket Snap: 89 Cents each) - Home Depot $100 Total - DON'T USE THESE: Stud Snap Clamp Tool (Comes with 1/8" snaps, don't use these, Just use tool) - Home Depot $100.00 - SNIP Shears (Industrial Scissors) - Home Depot $13.49 - Pencils - Ruler - Masking Tape (1" & 3") - 1/2" Mini Paint Brushes 6 Pack (For PermaPoxy Glue) - Canadian Tire $3.99 - Set of 14 Assorted Mastercraft Clamps - Canadian Tire (On Sale) $7.99 - 18 Inch Metal Ruler - X-Acto Knife - U-Shaped Gasket - 3/4" Black Flat Web (Strapping) - Mountain Equipment Coop 2.0 meters @ $0.85/meter - 1" Black Flat Access Web (Strapping) - Mountain Equipment Coop 4.0 meters @ $1.00/meter - MUCH EASIER TO USE: (3x) 10 Pack Stud Snaps with Tool - Fabric Land $6.49/each - 2" Wide White Elastic Canvas - 2.0 meters @ 4.00/meter Guides being Used: Incinerator CRL: - http://www.501st.com...:TK_incinerator Stud Snap System: - http://www.tonybarne...s.com/snaps.htm Armor Attachments/Tutorials: - Entire Armor: http://whitearmor.ne...Tutorials-armor - Legs: http://whitearmor.ne.../Tutorials-legs - AM Chest and Back Modifications: http://forum.whitear...showtopic=17887 Armour Examples: - Entire Armor: http://forum.whitear...?showtopic=9964 - Entire Armor: http://forum.whitear...showtopic=17421 - Entire Armor: (Thanks to Steve): https://picasaweb.go...feat=directlink Images: Nov 15, 2011 Nov 18, 2011 Nov 25, 2011 Dec 10, 2011 - Problem Photos Dec 10, 2011 Dec 26, 2011 Image Notes: The image above was my first test fitting. Almost nothing is actually being strapped to the body (Mostly flexing to hold in place) except for the chest and back piece which is strapped at top. Currently masking tape is holding the thighs and shins together till I feel comfortable gluing them permanently. Shoulders don't have straps (Yet), So I couldn't place them on and hold them in place while taking photo. No more trimming to the armor will be done, only strapping and assembly now. Motivational Music: PRINCE-LITTLE RED CORVETTE
-
Updated links for some Swag!! There selling fast!! Most pages are sold out... TK Spatula - http://www.bigbadtoy...028&mode=retail Ice Cubes - http://www.bigbadtoy...813&mode=retail iPhone Hard Cover - http://www.bigbadtoy...247&mode=retail iPhone Silicon Cover - http://www.bigbadtoy...248&mode=retail
-
How did you apply the wet based masking? Did you just use a paint brush and dab in areas, and how did you get the rippled look along the edges of the tape? Thanks , Star Raider
-
High Resolution - Incinerator Images (26 Images)
Star Raider replied to Star Raider's topic in Incinerator Trooper
Done Its in its proper section -
Images are owned by Lucas Arts. I have ported these images from The Forces Unleashed. Hope they help! Images are a large resolution, they make take a minute to load. ------------
-
Incinerator Build using "AM" Armor[*AM]
Star Raider replied to Quartermaster's topic in Build Threads Requireing Maintenance
Can I ask what company and colour code (Shade) of red you used? -
Here are some images of the Incinerator. I 'ported' the model out of TFU and made close up views. Hope this helps! If you need a specific view, just send me a PM and I'll try to find the view your looking for. Important to remember!!! These images are terrible computer renderings. The thigh pack on the lower right thigh should be attached to the ridge at the bottom NOT to the the area above and please don't seek out an octagonal thermal detonator. This costume is an ANH helmet with ROTJ armor. Make sure to include the 5th button on the left button plate and make the proper changes to the waist belt and drop boxes!!!
-
How many incenerator troopers are actually out there?
Star Raider replied to Wiggleplum's topic in Incinerator Trooper
I'm working on mine!! Gonna take a bit of time to finish up the sizing on paint, but its a big WIP -
Wonderful newsletter! Thanks for the great tips! I look forward to using them when my armor arrives next week!!! Where can we place orders for the patches? Thanks, Star Raider
