

snoberg
-
Posts
187 -
Joined
-
Last visited
Content Type
Profiles
Forums
Gallery
Articles
Everything posted by snoberg
-
I was worried about that... I hate to spend more than what I am for the TK boots.
-
10s are on backorder for 7 weeks as well!
-
Well, I am working my way towards EIB with my build, and I have contacted TK boots but they are on backorder for 7 months. What is a cheap 501st passable boot that I can use in the meantime? I don't want boots to keep me from trooping for a month and a half!
-
Mic tips with speakers - wich ones to get?
snoberg replied to Elder's topic in Electronics for Helmets / Blasters
I have yet to purchase my sound system for my TK, but originally I wanted to get in-helmet speakers like you. From what I have seen and heard they just don't cut it unless you are in a small quiet place. I have been convinced to go with a chest speaker. -
Okay so I ordered 10 of these things, and HOLY CRAP. I am going to injure myself using these, haha. I seriously fear them and what they are capable of doing to my fingers and random metal objects on my bench.
-
AP ESB helmet build[*AP]
snoberg replied to Shovelheadjedi's topic in Build Threads Requireing Maintenance
I second Brian's padding, very awesome solution, look how sexy my helmet looks like ON THE INSIDE! -
It might get a little warm if worn outside, but I walked around the house with my dome on for a while and it was tolerable, and it felt nice and poofy. For me and those that want to stick their head in a pillow, this stuff is great.
-
SolderMaster (Brian) was kind enough to let me prototype a new way of taking care of helmet padding. He can tell you much more about it, but from what I gather, he has this great foam that he uses on the job for soundproofing. When cut properly to size and installed in a helmet, it makes for a very comfortable and secure padding system. What is even better is the fact that this stuff has industrial strength adhesive on the back of it. No velcro, no glue, no mess! Here is what I got! With a little measuring and a box cutter, you can get nice clean pieces tailored to your specific dome. It cuts cleanly in two passes, one for the foam, one for the adhesive layer. You can get it even crisper than what I did if you are a perfectionist. When you are ready, just peel off the backing and stick them in. This picture also shows the various levels of poofyness in the foam. And this is what you get.... VERY comfy, a little hot, but that is to be expected with all that foam in there. And I still have whole strip left for friends or repairs! Thanks a ton Brian! He is planning on maybe selling these foam strips on the market, and if he does, I highly suggest it!
-
If it makes you feel any better, I used some white GE caulk on mine. Everyone says just get caulk sealant, so I did, not even two days ago. They pretty much fell off and now they have a layer of caulk stuck to the bottom of them making it impossible to get a flat seal again. Looks like I get to order another pair of handguards... at least I am keeping Karin in business... Brian, how well does your loctite hold? I know I wont be like, picking at them, but I want to be able to move my hands around without fear of them falling off again. If an when I ever get another pair. I'm so pissed.
-
Cool, just needed clarification, thanks!
-
In the requirements page the side closure using rivets are under the "should have" section. My side gaps are going to be closed, but without the use of rivets on the outside, the snap tabs do it just fine for me. Is this acceptable for EIB? I just really don't want to have to punch rivets through my armor...
-
I think I could comfortably do it either way. I do have skinny legs, but I can always cut off more on the flat end if needed. Is the standard way to do it butting these edges together?
-
SO, the front of my AP thighs seem to match up well, and the finishing strip seems self explanatory. The back of the thighs are a different story. One side has the raised edge, the other is flat. How does one achieve a proper finishing strip like this? Do you overlap the smooth edge under the raised edge? I plan to glue my thighs by the way, no velcro. I have looked around and I have seen no explicit instruction on this.
-
What he said...
-
ROM/FX in RT-MOD helmet
snoberg replied to Shovelheadjedi's topic in Build Threads Requireing Maintenance
I honestly just want to start wearing my helmet around the house for no apparent reason (considering my legs are taking me freaking foreeeeeever to finish)... ah the joys of single life. -
Need sound help... mabye a chest speaker instead?
snoberg replied to HAWK's topic in Electronics for Helmets / Blasters
Hey Jim, how do you get the aker to work with rom/fx? I am assuming it replaces the speaker that comes with the rom/fx kit, but to my knowledge isn't the rom'fx speaker unpowered? By adding the aker do you just get more volume out of the speaker? Also, does this change the voltage needed going into the rom/fx itself? One last question, does the mic that comes with the aker work well with the rom/fx? As it stands now, I really don't want to glue an omnidirectional mic into my dome, I would like my dome as clean as possible. I know those are a bunch of random questions, but I have yet to purchase either, and I was thinking of maybe starting with your kit, then sticking the basic rom/fx kit in the mix to get me a static burst. -
ROM/FX in RT-MOD helmet
snoberg replied to Shovelheadjedi's topic in Build Threads Requireing Maintenance
Score! What is the best way to cut it cleanly?? -
ROM/FX in RT-MOD helmet
snoberg replied to Shovelheadjedi's topic in Build Threads Requireing Maintenance
PM sent, you rock! -
Get this, I did, love it.
-
After just test fitting and wearing a few pieces here and there, NO trooping, my shiny new suit of AP seems to discolor quite easily around the edges. The edges have been sanded, so they are not glossy like the rest of the suit, so maybe that has something to do with it? My undersuit is a one piece and cotton. Would sanding the edges to a finer grit and polishing them prevent this? I just fear that if it is this bad after only an hour or two of total wear, by the time I get trooping I am going to have black edges on my armor :/ Maybe washing my undersuit to get any leftover residue from the dying process off of it? I am kind of at a loss. Halp! ***EDIT*** I went over a piece with a razor and trimmed off the sanded edge, just a sliver. I romped around in my torso for a while and it seems to retain its white color now. I guess leaving a sanded edge rubbing against a undersuit will leave it looking like crap. False alarm!
-
Noted, thanks. I am currently finely sanding the current finish on the aerator so I can apply a final thin layer, I think it may work out after all, I will let ya know.
-
Where to order snaps (press studs)?
snoberg replied to TomBangkok's topic in Boots, Soft Parts, and other Accessories
I use dritz heavy duty snaps and they work great too. You can get them at hobby lobby, jo-ann and similar stores. Make sure to get one that comes with the install tool. I found that the pliers work great as long as the snap will be placed close to an edge. For instance, I placed snaps for my belt on my torso, and they were too far into the torso to use the gun so I had to use the kit that comes with a setter and a pin that you hammer in place. -------- There are links to the other tools used on that page as well, hope it helps! -
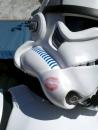
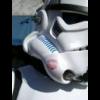
I still think I am going to raise the frown with some little screws under the rubber seal, and as far as the ears go I used pinstriping tape, so that is kinda the width I am stuck with unless I paint over the edge of it, which would look sloppy, at least imo. The eyes are such a touchy area too, I get nervous every time I shave more out of them. Overall I am really happy with the kit, I will recommend AP domes to everyone I can, it looks great even unfinished. The bubbly paint on the aerator is annoying me though, thats my biggest gripe (which is my fault, not the kit's).
-
Ask and ye shall receive! Still looking for advice on the bumpy testors paint, if anyone knows a good fix.
-
Here is my near completed helmet. All that is left is lenses and hovis, both of which are on order. Inside is rubberized, neck trim is in place, screws are painted white. My only concern is the testors paint on the frown and mouth piece. I had to do two coats to get full coverage, and there is a little bit of bubbling and drippyness, you can't see it in the pics but up close it is apparent. Is there a way to sand and polish enamel once it is fully dry? I have heard of ultra high grit sandpaper and might pick some up if that will help.