


pandatrooper
-
Posts
2,730 -
Joined
-
Last visited
-
Days Won
1
Content Type
Profiles
Forums
Gallery
Articles
Media Demo
Posts posted by pandatrooper
-
-
Look for hockey performance under garments for kids. I've seen them at Walmart.
-
Shoe horn.

-
Sand with 400 grit, clean with detergent not alcohol, prime, paint. Abs will take paint fine if prepped.
Auto paints used to be chemical or lacquer based, but the industry moved to water based for environmental reasons.
Prep is the key as is temperature and humidity. Crappy prep = crappy paint.
-
Guys, the last image with the new helmet and upper body is not production, its a fan made image in the last couple days.
In regards to Vader in EP VII, the rumor is that its a flashback scene. Same with Carrie Fishers daughter portraying Leia, its a flashback.
-
I'm going to call it: I bet the armor will have slightly more exposed fabric / carbon / mesh areas. Like the Dark Knight suit or the Jaeger pilots from Pacific rim. My guess is the body won't be completely covered with armor, in order to allow for more movement.
-
Just mocked this up. An element I like is how the eye holes are kind of joined together, and the mouth is seamless with no teeth, much like the original Liz Moore sculpt. I personally like the functional tube stripe vents. Blue paint / decals were only justified in '77 when you couldn't see the detail on film.
I understand the need to streamline the design somewhat, so it has less "sticky outy" bits than the original TK. I do agree with some people that it looks like it was designed by Apple or something. Rather Tron like.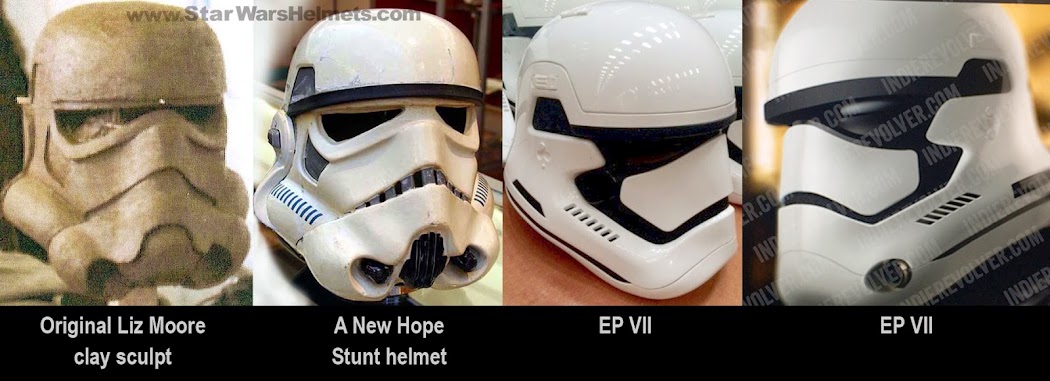
-
Unlikely its vac formed. Look at the sharp seam lines. My guess is 3D printed, finished then molded and cast.
Its growing on me. The part I like is how the eyes connect, like the Liz Moore sculpt from 76
-
This is a good start, but check the current eib standards. Best upgrade would be to change the chest and back to RT mod.
http://www.whitearmor.net/forum/topic/12478-howto-easily-make-your-fx-armor-eib-acceptable/
-
If you modified the armor properly, yes you could.
-
My personal opinion is you've trimmed the ear way too thin. The area that wraps around the cheek tubes should be taller if possible. The flat circle of the ear is also too thin.
Do you have a spare set?
-
Draw some pencil guidelines first matching the screens or photos from original helmets. Starwarshelmets.com is a good resource.
Don't prep your surface with alcohol, use dish detergent, rinse and dry. Watch out for lint.
Use a flat brush no wider than 1/4" and paint up to the pencil lines. Do black first for the front traps, tear ducts and rear vents. Do one coat, then let it dry overnight before you do another coat. Top coating right away will lift the previous coat.
After the black is done then do the gray the same way. 2 coats. Then do the lines with a round brush like a 0 or 00.
Tubes stripes I cut from vinyl and airbrush them but they can be done with a brush if you're careful.
Check my Ata helmet build thread, lots of pics there.
-
I've built plenty of ATA lids and have never had issues with the trim.I actually prefer it over many others.
The trick is you need to work the trim into every nook and cranny along the bottom edge of the helmet. Push the trim into a dip but never let it stretch out, if anything condense the trim back in the direction of where the trim was first laid down. When you get to the end cut it a half inch longer than you need it to be, so that there's tension on the trim.
I have never had any come off when doing this method.
-
Looking sharp. Glad the tutorial was helpful.
-
One of the issues is because the brow is so low its making the ears more difficult to trim. personally I would raise it to the top of the eye holes and redo the ears but that's just my opinion.
-
I still use rivets on my snap plates instead of the ones that come with the snaps. Way more surface area for gluing, just tap the back with a hammer and hammer the inside of the snap / rivet end and it sandwiches tight and the back goes concave, making a flush surface for gluing.
I've built several sets of armor this way and never had a failure. Or if your armor has return edges that can take it, use the screen accurate wire brackets / elastic.
-
I usually trim the round part flat first, then scoop out the cheek tube area. Do a rough trim and leave more plastic then you need and trim a little at a time. The front of the ear usually has a little more plastic left on it than the back. If you "scoop out" the same amount front and back, you'll have a gap.
I use a pencil to make marks of where to trim and just take off small bits at a time. After I get a rough fit, I drill the holes in the ears and the bucket and use them as alignment guides for test fitting so that they are sitting in the same place each time.
Then its final trimming and sanding to get the fit perfect. Tightening the screws also closes up small gaps.
-
I would glue a strip of ABS behind the join. You don't want that to move at all if you are going to hide the seam with ABS paste.
You could add a return at the top and bottom as that's the most visible. The butting edges of the actual an and kidney could be hidden.
-
I believe the originals didn't use inner strips at all. But I still use them at least on the thighs and shins as I find they get the most abuse.
-
I'm just a large guy overall (6' 3", 230) and will probably need to go with RT's suit. I had been looking at Cap-W's buckets and was just curious what the effect would be if I mixed and matched. I'm hoping to get to meet some of my local garrison in the next month or so.
Thank you for the picture!
Keep in mind that plastic color might not match. If that matters.
-
Welcome. I think I already saw you on Badlands. Let us know when your kit arrives.
-
No problem. I have 2 ATA kits now - one TK, one TD.
-
Here's how to trim it and do the return. Make sure to use reference photos for the shape.
-----------
I would pull up the torso a bit too based on your height.
-
Understood. When viewing on the mobile version of the site, I don't really pay attention to the forum name. You can't see it very well as the letters get cut off where it says "The Repli..."
-
Ah right. Gotcha.
TK Helmet kit. Spray paint or just polish?
in Hard Armor (General Discussion)
Posted
Go look at my Ata helmet tutorial. I polished it and then airbrushed the tube stripes.