


pandatrooper
-
Posts
2,730 -
Joined
-
Last visited
-
Days Won
1
Content Type
Profiles
Forums
Gallery
Articles
Media Demo
Posts posted by pandatrooper
-
-
Looks great!
-
I would just trim the neck opening bigger and use thinner padding.
-
Nice! glad to see it worked out!
-
I think they used some tape for the top and bottom of the stripes and hand painted each stroke with a brush. The pics of the screen used lids led me to believe this, as the stripes are often inconsistently spaced and there's bleed lines under some of the stripes.
Some say they were screen printed but that area of the cheek tube is too curved for screen printing and they don't really use screen printing for such small compound curves back then.
-
Full article has been posted here, with permission from Jez of Starwarshelmets.com.
-
Decals can be fine if used properly. My suggestion: use decals to get approved, practice hand painting the details on scrap plastic then later when you have finished your build and want to apply for EIB or Centurion, paint the details by hand.
For the teeth some people like to drill them out and file them or Dremel them out. I use a smalll drum to grind down the backside, then clean up the oval shapes with a tooling bit or sharp hobby blade / file.
My helmet build thread:
------
-
Superglue is not going to hold. maybe try Velcro? Personally, I would just use foam.
-
RT-mod or AM would be slightly bigger / more suited for your build. RT mod is more accurately shaped than AM.
-
Article posted on FISD, courtesy of Jez from StarWarsHelmets.com Thanks Jez!

=======
ESB Mk 2
Original Stormtrooper Armour
Nov 2011 - some of you may be aware that Christies of London is having a memorabilia auction on November 23rd and there's a rather nice set of Stormtrooper armour due to go under the hammer. A couple of months ago Christies kindly invited us down to its Kensington showroom to help them identify this slightly unusual suit.
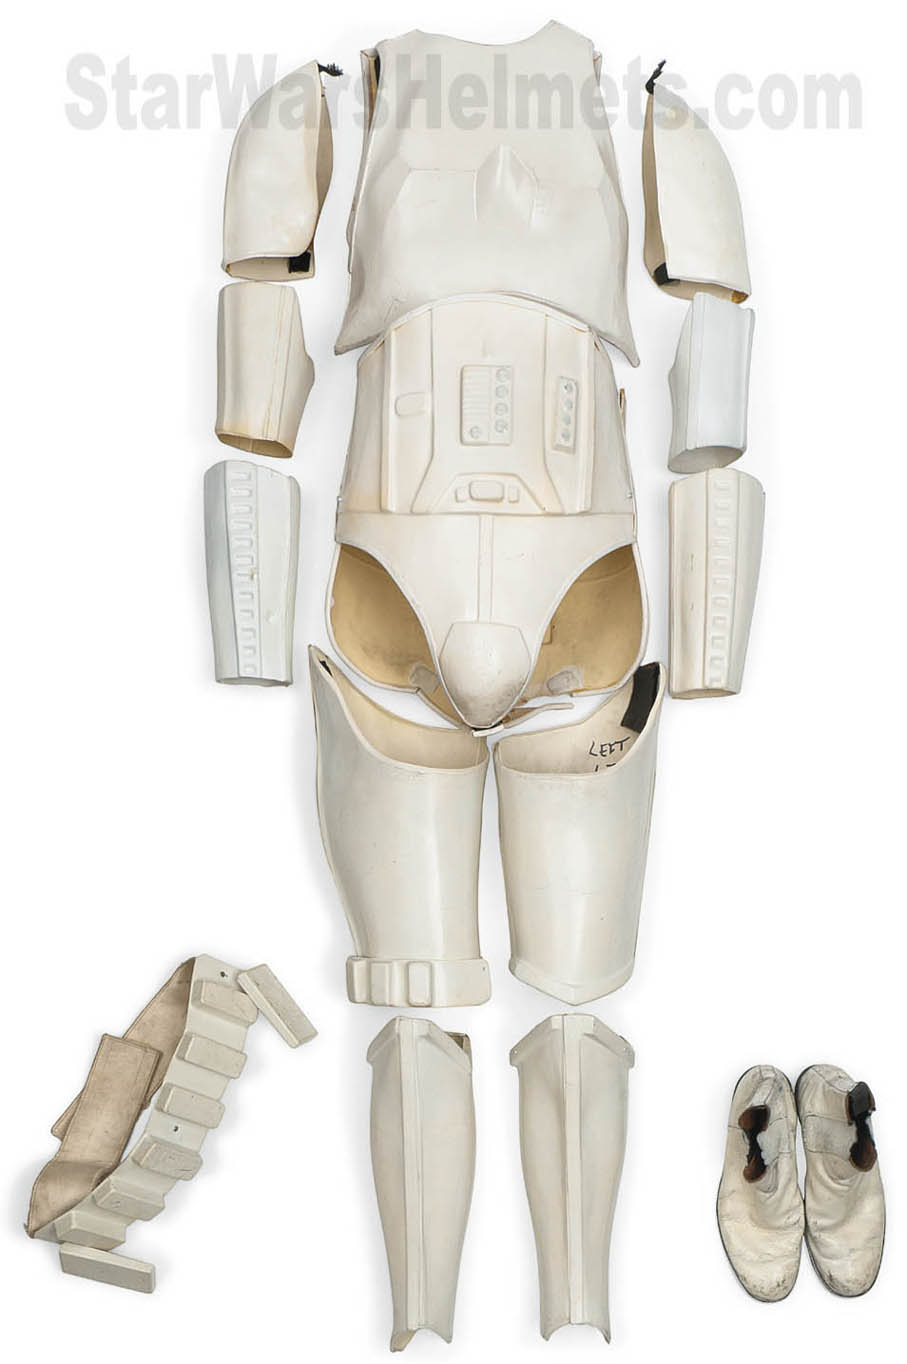
We say "unusual" since though some parts are clearly Star Wars A New Hope (1977), but not all are and those were certainly not Return of the Jedi (1983) either (although they look extremely similar). Hence the suit is a kind of mish-mash of both armour styles. Parts including the belt, one forearm, and one bicep were clearly ANH, however the other parts including Chest, Back, Ab front and rear and leg sections were similar (but not exactly the same) to the style used in RotJ, yet we believe pre-date that movie by 3 years.
It didn't take long for us to realise that this was the illusive "Mk2 ESB" suit seen in the Publicity photos taken on Empire Day waaaaaay back on May 20th 1980 (the Trooper on the right in the photo below). Essentially this was a set made up from two different sources including left-over parts from ANH combined with newly cast parts made specifically for ESB by John Mollo's costuming department.
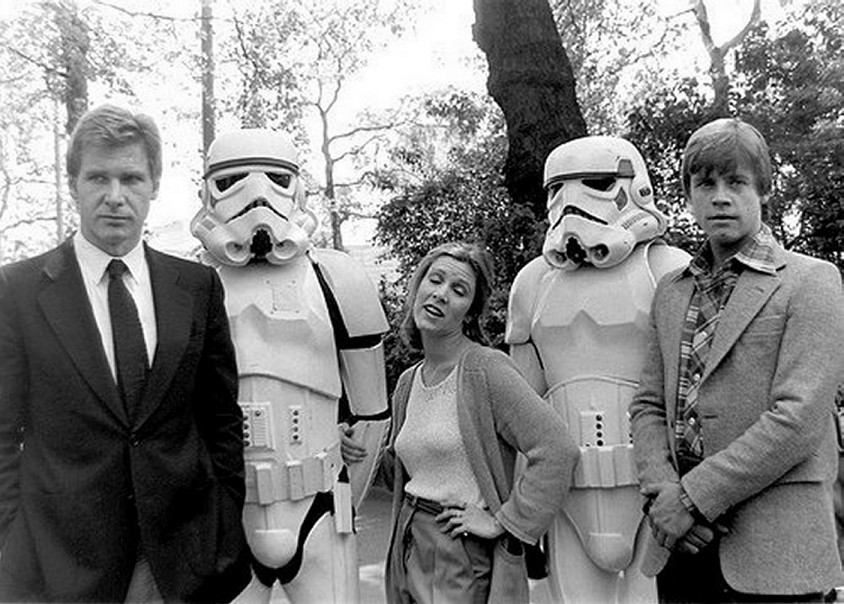
As an interesting side note, we also managed to identify the other trooper (next to Harrison Ford) but will talk about that at another time. However we're pretty sure that the suit in Christies auction is the one standing next to Mark Hamill, for example the cut lines and seams of the Ab section appearing to match up extremely well. To be 100% sure we'd need better reference material but in our view it looks very promising. By the way, I'm sorry to say we've not been able to locate the helmet that went with this armour.
The background to the ESB "Mk 2 " suits in a nutshell is; while making ESB John Mollo realised that there would not be enough complete sets of armour for some of the final trooper shots seen in the movie like the Bespin escape section scenes, so additional vac forming was done and a number of pieces were made to augment the left-over ANH parts. The vast majority of the armour you see in ESB (the "Mk 1" if you like) is simply the same reused amour seen in ANH - with the occasional bit of refurbishment thrown in. After some investigation we carried out a few years back we were able to determine that there wasn't enough complete suits for some of the latter scenes - thanks to Costume Designer John Mollo's detailed notes made at the time.....
Here's an extract from his diary made on 11th June 1979....
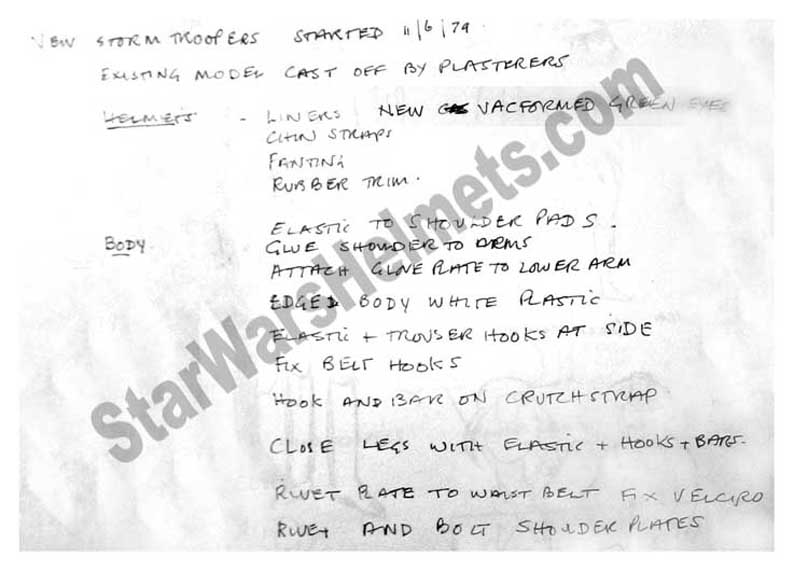
So we know that some parts were made - we just don't know which marts and the quantity. Again going back to John Mollo's notes we know that 2-3 days were spent (budgeted) working on this and the approx cost of the ABS.
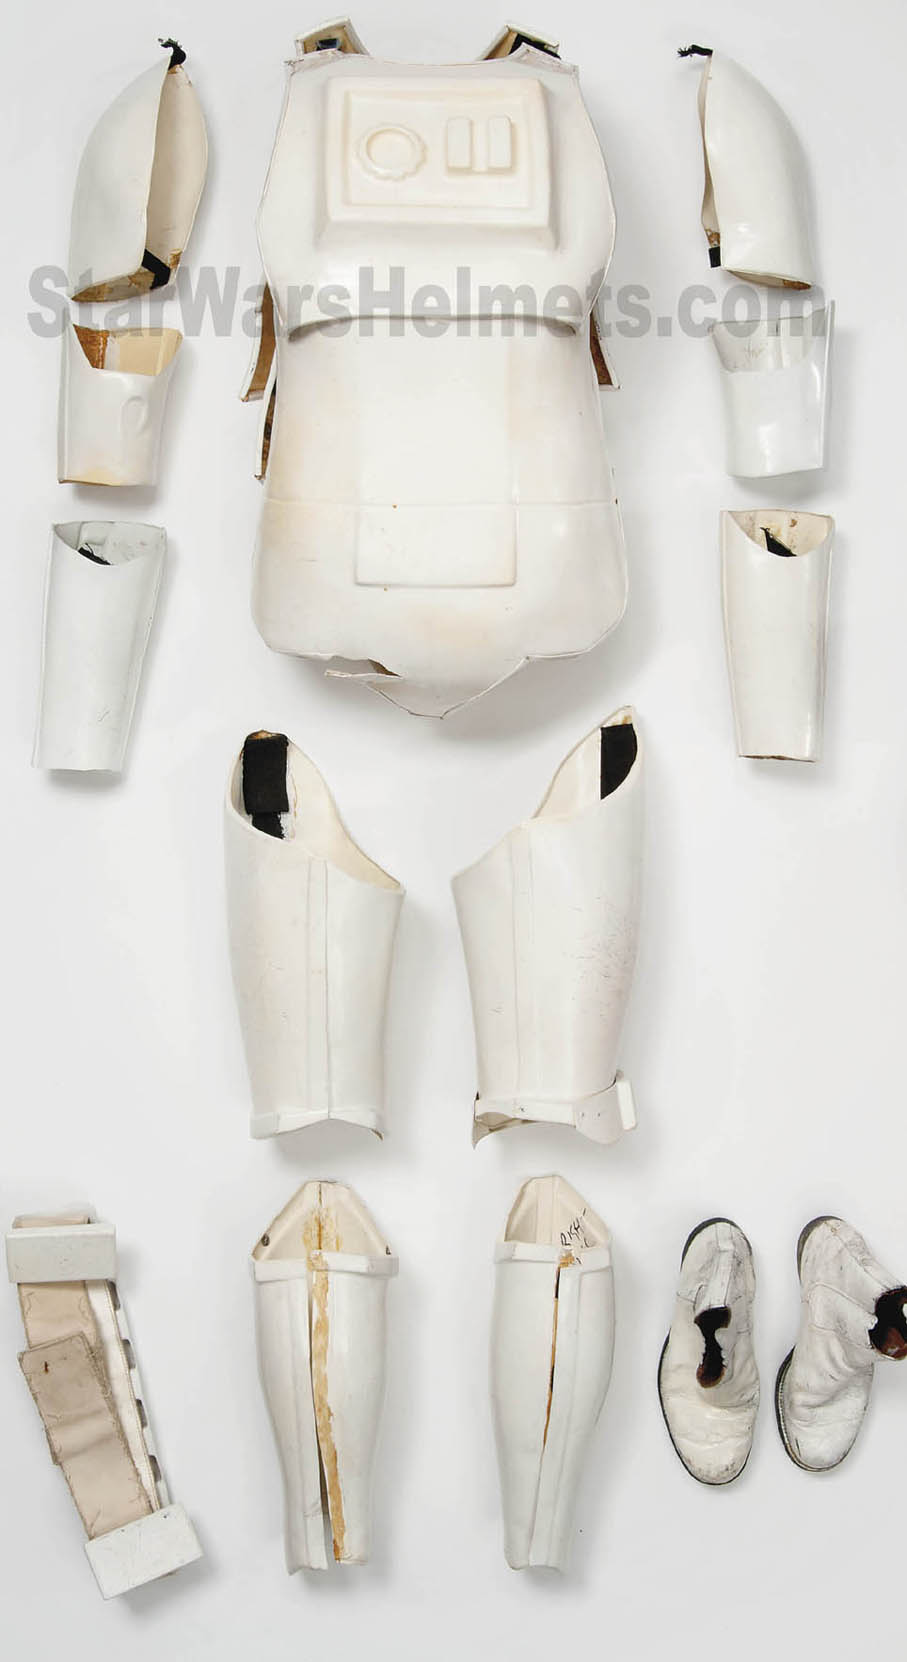
Back to Christies Auction, below the chest and back detailing showing the edging strips which were added to all the new armour for RotJ, with this ESB armour acting as a kind of prototype to the RotJ look. Rather than made of standard white ABS (like the ANH sets), this is made from Haircell ABS which has a nice white front side, however the back has a rough texture and is cream coloured.
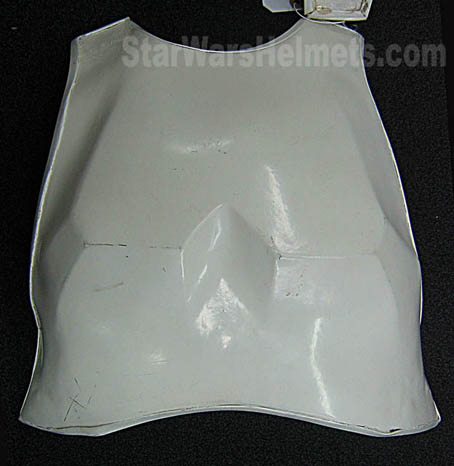
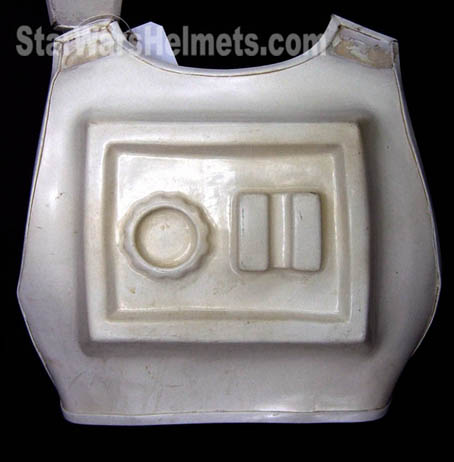
Next a shot of the Ab section, which appears to have been resprayed (at least in part) at some time. In addition, note the contrasting colour of the Haircell ABS's outside and inside surfaces. The texture is much different too from the ABS used in ANH which is pretty-much the same both sides. However for these armour pieces the outside is smooth but the inside quite rough - again a feature of Haircell.
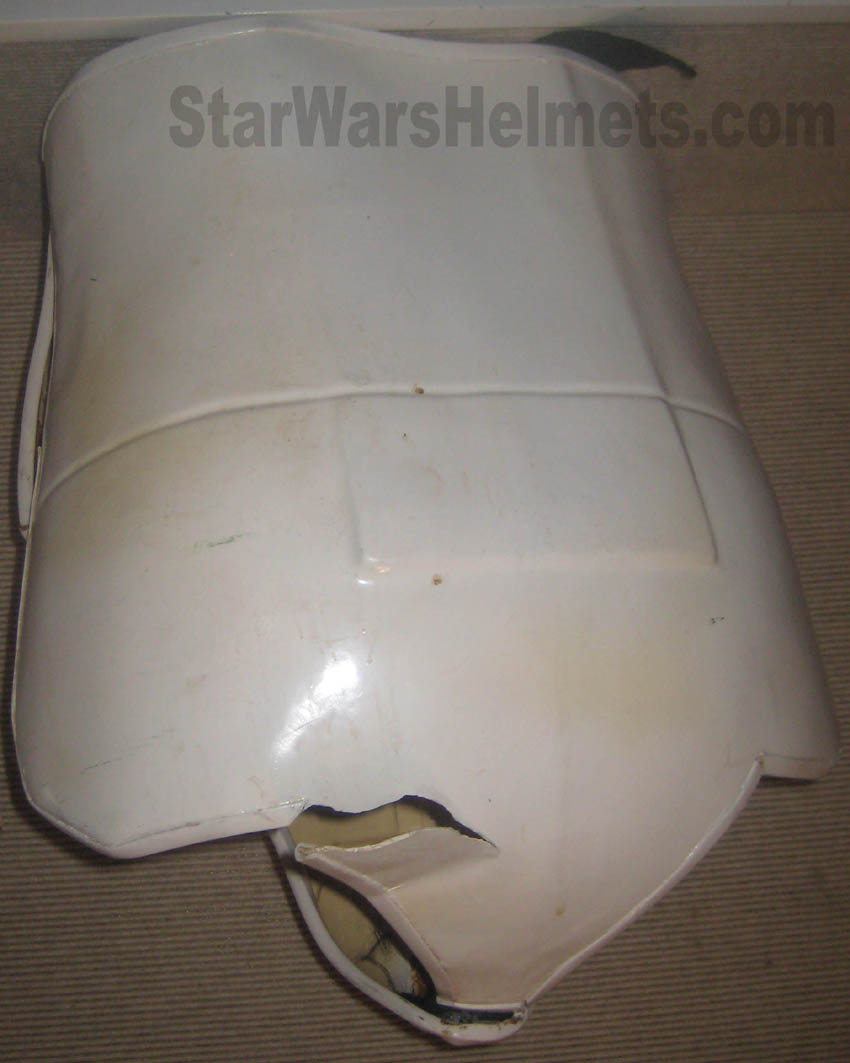
...and the rear of the Ab section. There's no cut between the an impolite person and lower back and apart from that tear the suit is still in very good condition with all the white trimming still in tact.
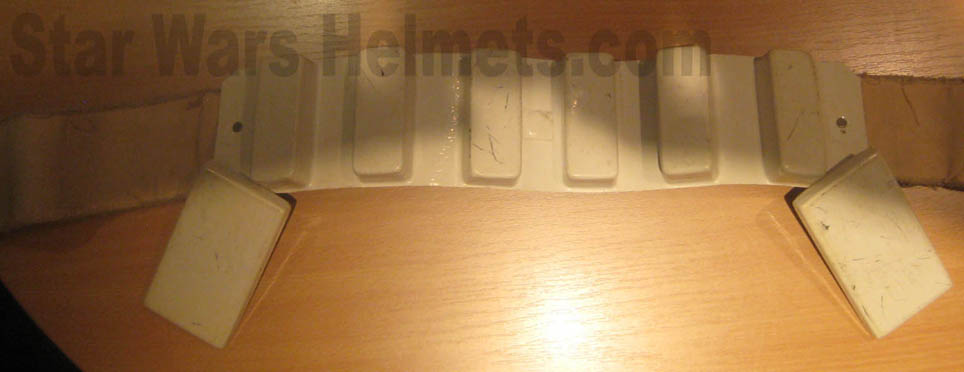
Next we'll look at the ANH belt....
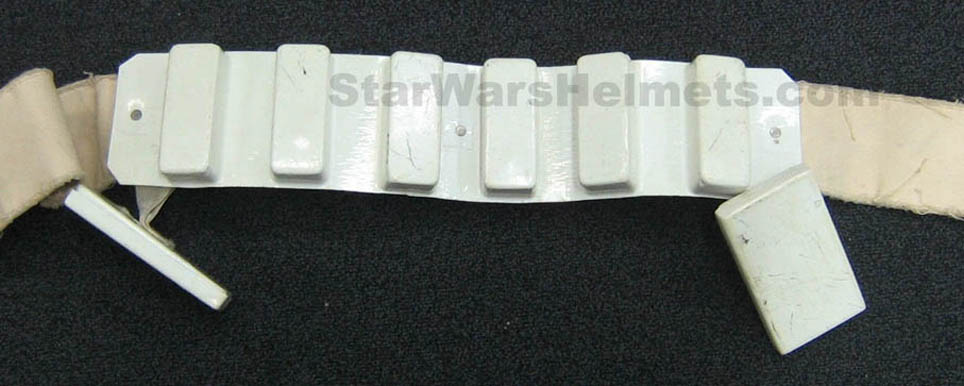
Above and below photos of the ANH belt. Its made from all white ABS (front and back) , bolted onto a canvas belt section with the boxes attached with white elastic strips.
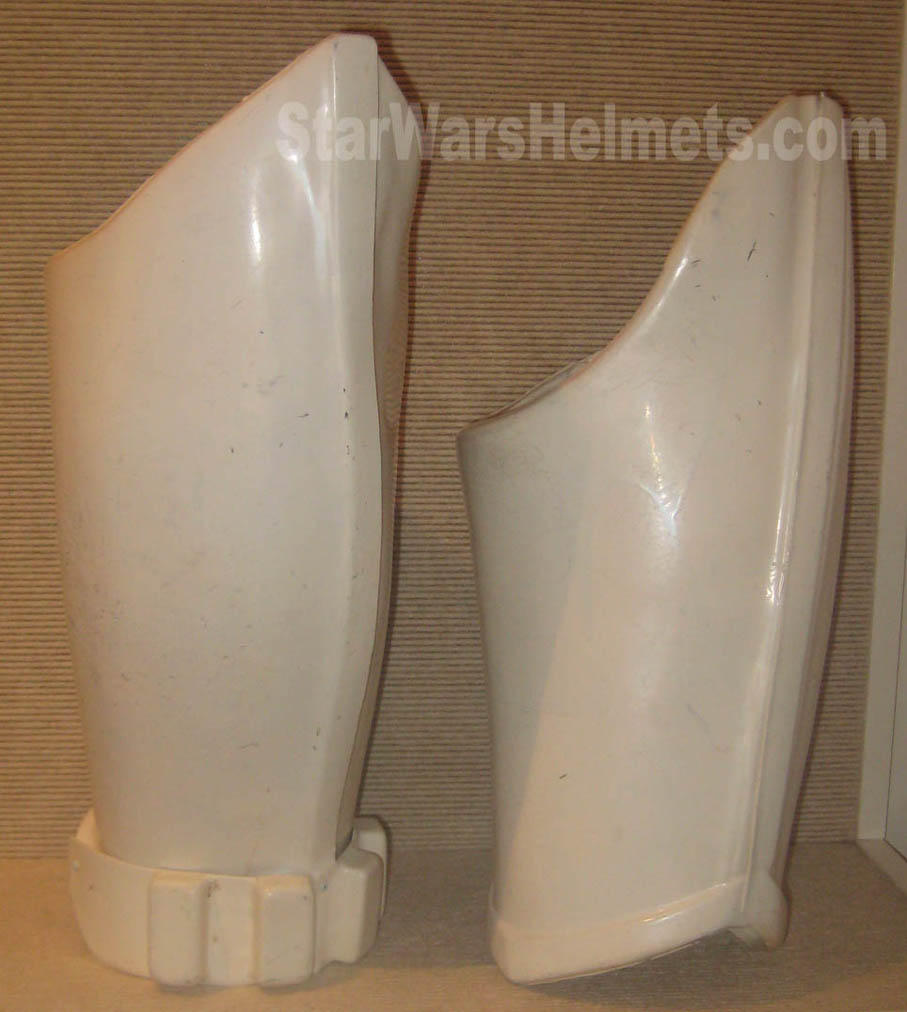
The bicep sections are very interesting since the one on the left is clearly ANH...
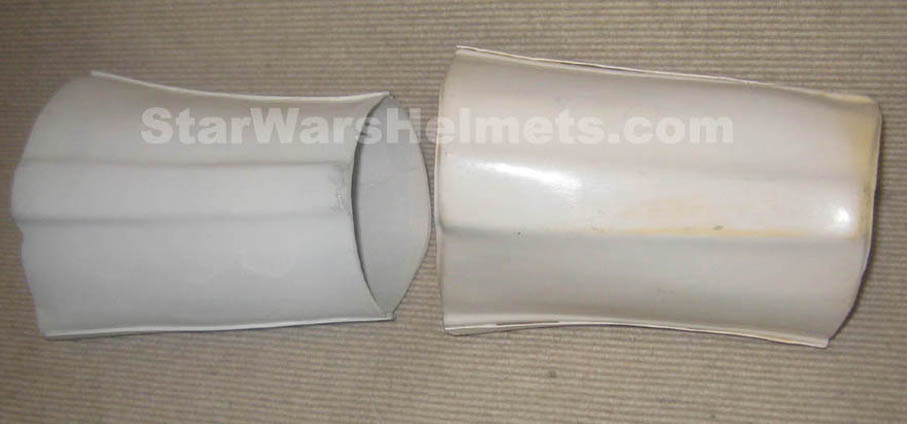
...whereas the one on the right is a ESB Mk 2 and made from Haircell ABS (again see the differing colour and texture of the inside surface)
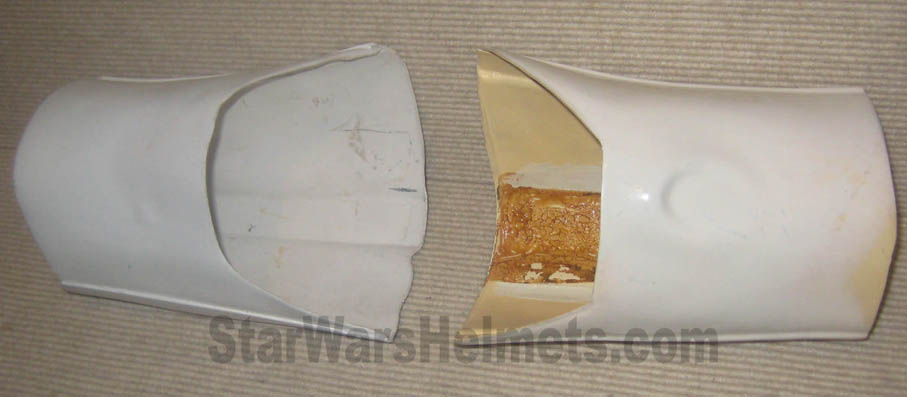
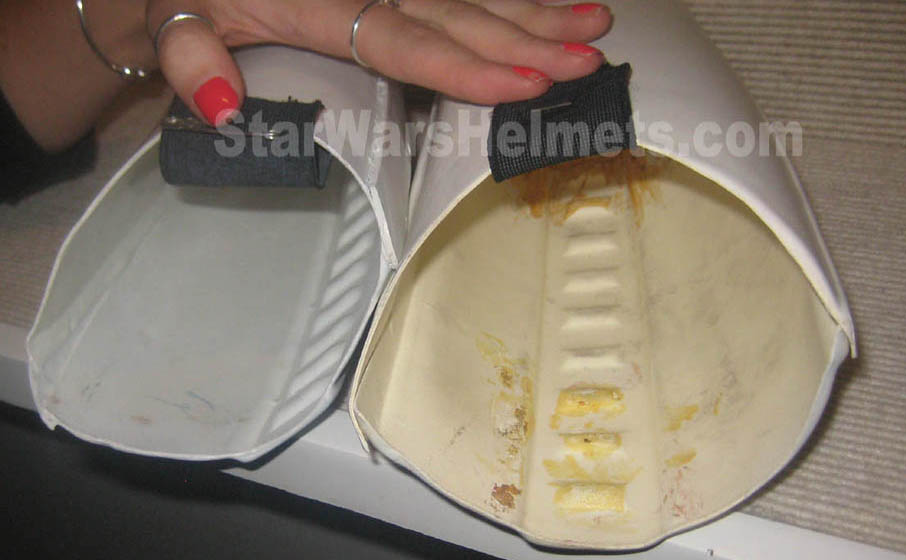
Next onto the forearms and again we have this ANH/ESB mix.....
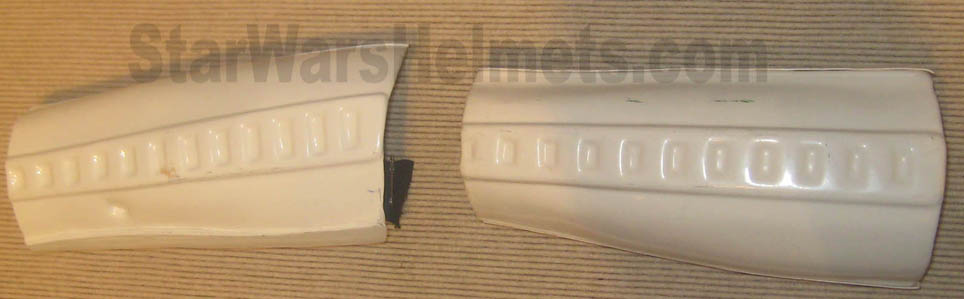
Above and below, ANH forearms on the left, ESB Mk2 on the right (for those who like to count, 12 on the ANH, 10.5 on the ESB)
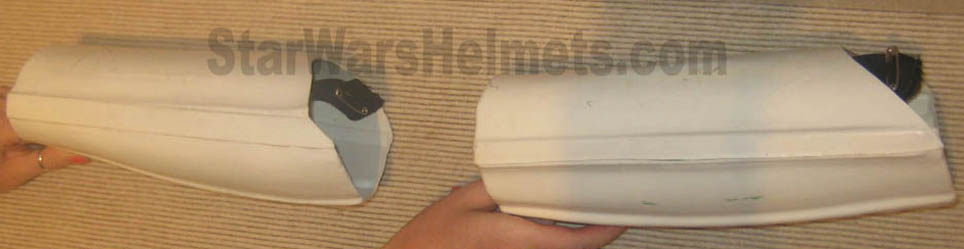
...Here's a good shot that illustrates the differences well. Note that the ANH forearm (left) has thick edging strips (e.g. at the 2 'o'clock position). The ESB Mk 2 on the right doesn't have edging strips and both semi-circle sections just overlap. Note also the difference in colour between the white ANH and the cream-coloured Haircell of the ESB Type 2
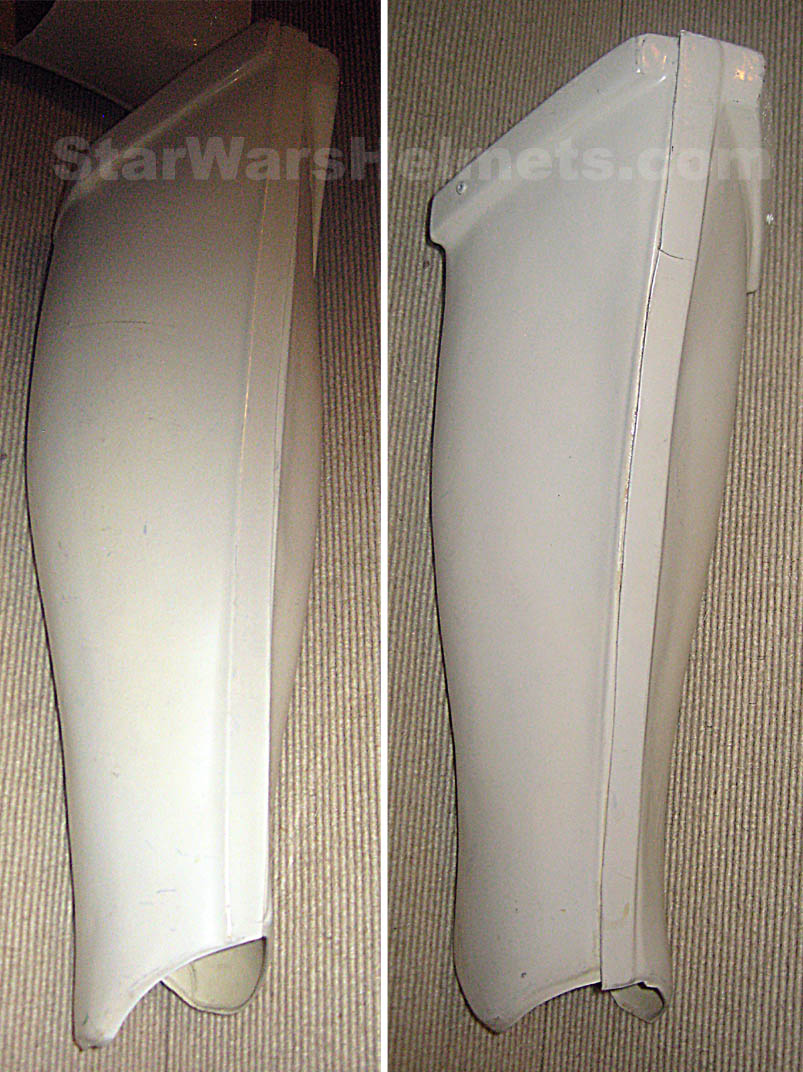
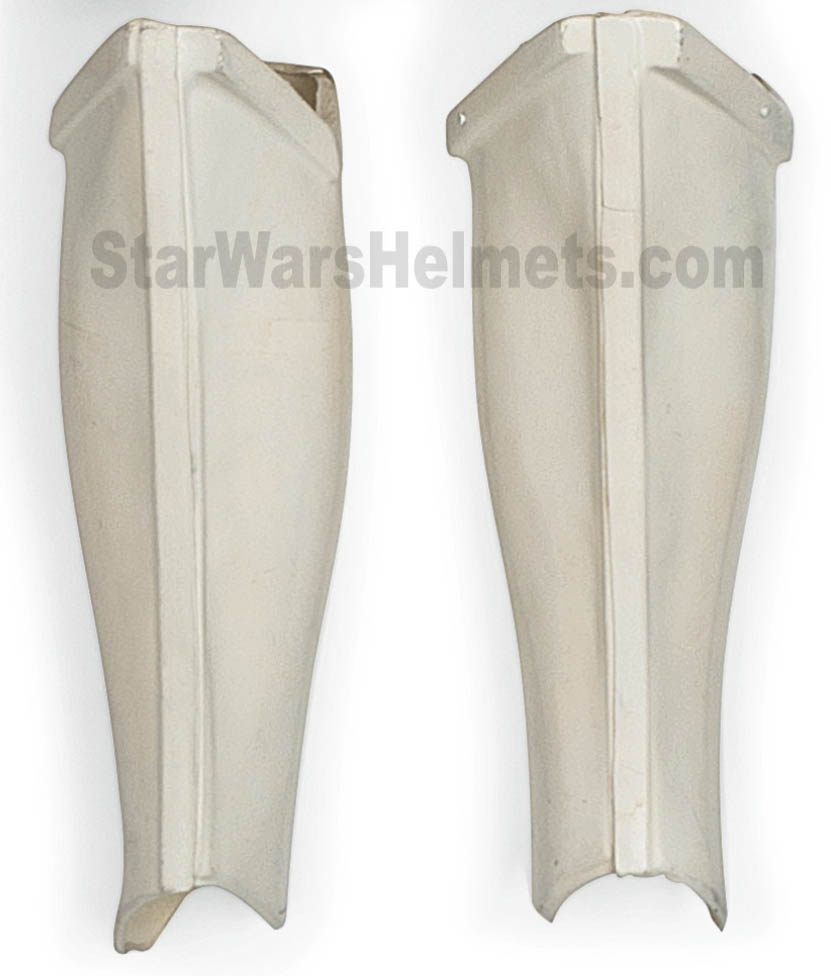
Below a shot of both calves with the right leg (as you're wearing it but left in the photo) showing the knee detailing
...and finally the shin sections
So in summary we have a wonderful piece of Star Wars history. Parts of the armour are production made (and most likely screen used) ANH Stormtrooper parts. Other parts appear to us to be production-made Empire Strikes Back parts (ESB Mk 2 ), which could be screen-used - however we just don't have necessary behind the scenes photos from the Bespin escape sequence to be able to verify this.
We KNOW John Mollo's team vac-formed additional parts (since they didn't have enough sets of armour to finish production), and we can be pretty sure that this is the suit seen with Mark Hamill at the ESB Premiere a few months later. What we cant say is whether this armour is actually screen-used since we cant tell from the few shots when all 10 or so Troopers were needed - even looking at the Blu-Ray release. If anyone out there has access to the Lucasfilm archive (or Gary Kurtz's negatives) and know of any better reference material then please let us know!
-
AP has thighs halves that are misaligned (one half is longer than the other). The left inner shin is a right outer shin. As far as I know AP hasnt updated these parts.
AP plastic is a cooler bright white where as ATA is a warmer off white color.
ATA helmet accessories are much higher quality (proper cast mic tips as opposed to faucet aerators and dark green welders lens as opposed to thin light green celophane)
-
Our squads Vader / Fett and Palpatine and a TX live in Abbotsford.
Get on to Badlands asap.I can help you with painting the helmet details or I can use decals that I have left over from other builds.
-
Agreed, timing is key for top coating. Follow the instructions for timing, temperature and humidity.
Personally, I don't use alcohol for anything other than cleaner paint residue that's rubbed off a blaster onto my thigh armor, or removing pencil marks from trimming. Alcohol leaves a residue or does something to the plastic to F*%$ the surface up, and paint does not bond well afterwards. Always wash with dish detergent (remember, that stuff was created to remove grease and fingerprints from dishes without leaving a residue) rinse and dry.
My brother was a professional autobody painter for many years, and painted many cars, bikes etc. so I learned all the finishing tips from him.
-
Anthony, welcome. Where are you from in BC? I am in Vancouver.
You should definitely sign up on Badlands.ca, your home garrison. You would be a member of the Outer Rim Squad which I am also the squad leader for. I am also the garrison armorer.
Most makers do not assemble armor, and it would be hard to assemble it to tailor fit. That being said, that's what garrison mates and armor parties are for!
I am 5 foot 8" and 150lbs, so not far off from you. Chances are, you will grow into your armor depending on how old you are.
I would also suggest looking at ATA armor as well, as it's the same general size as AP and might be more cost effective depending on the material (HIPS or ABS plastic). You can read up on all the makers in this thread here.
http://forum.whitearmor.net/index.php?showtopic=11538
You might also want to check out the Imperial Reception Center for more details on construction. Study up!
http://www.whitearmor.net/fisd/Tutorials
Good luck, and I hope to see you on Badlands.ca That's an order, trooper!
-
Nice work troopers!
-
I have used goo gone to remove adhesive, and it's fine if you wash it afterwards with detergent and water. Personally, I have never had problems with dish detergent. It's a good degreaser (removes film and finger prints) and any traces of oil. You have to be careful with other degreasers as sometimes they are oil based. This is the process I always use:
- spray in a warm / dry environment
- low humidity is best
- non windy
- out of direct sunlight (shade is best)
- in a clean non dusty area, no grass / dirt etc.
- sand the plastic (this creates tooth for the primer to bite) using a scotchbrite light pad
- wash everything with dish detergent, rinse and let dry
- do not dry with a towel or compressed air as both will attract lint
- use a tack cloth to wipe the armor before painting to remove any stray lint
- make sure the paint is room temperature
- shake the paint well
- I tend to use Krylon or Rustoleum (the "plastic for paint" stuff like Fusion is marketing BS and sticks no better to raw plastic than regular paint)
- stick with the same primer and paint brand (do not mix brands and do not mix enamel over or under lacquer)
- Prime the armor first (use white primer if you do not want to use grey)
- I do 3 light coats (as an indication, the first coat should not be opaque. Only after the 2nd or 3rd coat should the white be covered)
- wait 10-15 mins between each coat
- I would wait overnight before top coating
- apply a light coat of white (again, it will not be opaque, don't try to lay a heavy coat on, the first coat should be light)
- leave 10-15 mins between each coat
- do at least 4 coats
Let everything dry for 5 days before applying decals, or hand painting any details. This will ensure everything cures through.
I am guessing you maybe laid the primer on too thick and it did not cure through / bond with the plastic or the prep wasn't thorough enough. The paint bonded to the primer, then it flaked off. Also, 400 grit is actually a bit too aggressive, I would have used 600 (black sandpaper not wood type) or better yet a scotchbrite pad. You actually want a finer tooth than a rough tooth for paint on plastic.
-
Very sorry to hear, Mark.

My mom passed away in 2004 from cancer as well. Even though she was a fighter and battled for 18 months, it was a big impact on our family.
If I can offer a little advice, take your time. When my mom passed, I went back to work with only a few days off. I found my mind wandering and I lost focus on the tasks at hand. Work noticed and sent me home for a couple weeks to recover and even offered grief counselling. I took the time off and it helped a lot.
Take your time, don't be afraid to lean on friends and family and remember - this plastic stuff is just a hobby and for fun. Real life comes first.
-
If you need to polish your lid or armor I would do it before painting the details or adding decals.
-
Go get some lexan scissors for cutting RC car bodies. Found at hobby shops. Theres no need to use a dremel. Only thing I use a dremel for is the teeth, eyes and fine tuning the ears.
-
Trim notches in the lower edge on the back of the knee area. If you look at some reference pics, they did this on the original armor.
If thats still not enough, then consider trimming the thigh tops.
-----------
-
Welcome to a fellow Canuck! If you're ever in BC, give us a shout.
-
Abs is tougher for sure. But I have trooped in my HIPs TD more than my ABS TK and the HIPS has held up just fine. Depends on how rough you are and how well its assembled too, but I wouldn't discount HIPS if budget is a concern.
-
Heat up the E6000 with a hairdryer or heat gun on low, then run a flat chisel between the parts to pry them apart.
-
This seller has been discussed at length. Recast of AP and TE based parts.
-
A fiberglass recast of an FX helmet? Wow, this seller is grasping!
New Trooper under construction in Vancouver
in New Member Introductions Archive
Posted
Your mods are coming along nicely. Always nice to have another Vancouver based TK. Welcome to the FISD Steve! Looking forward to trooping with you!