Coolajxl[TK] Posted August 11, 2023 Author Report Posted August 11, 2023 Thanks y’all! So I measured and trimmed the right side to make it more even. That helped as well with readjusting and lining it up better with the middle cover strip of the shin. I’ve added the glue and clamps. As I’m writing this now, I’ve forgotten the tape for extra support I can add that later when I get home. I do have like 5 clamps on it so it’ll probably be fine. I also trimmed down and sanded the inner part of the thighs which helps significantly with reducing armor bite when I tried them on. 1 Quote
Coolajxl[TK] Posted August 14, 2023 Author Report Posted August 14, 2023 (edited) So I've made more progress tonight These aren't submittal pictures btw. Just wanted to get feedback on here. To be honest I was quite frustrated with how it turned out. Besides it being uncomfortable and very difficult to put on. It just feels and looks off. The shoulder bells seem to be too narrow for my arms and the upper arm armor. I'm guessing that because of the box it was stored in for who knows how long they were pressed together, is there any way to make the wider so they don't stick out as much? Edited August 14, 2023 by Coolajxl Quote
Coolajxl[TK] Posted August 14, 2023 Author Report Posted August 14, 2023 Basically, how far off am I from trooping? Quote
Coolajxl[TK] Posted August 14, 2023 Author Report Posted August 14, 2023 Also I realized after the fact that I forgot to put the thermal detonator on Quote
Chemi[Staff] Posted August 14, 2023 Report Posted August 14, 2023 You can try reducing the return edge of your shoulder bells and upper armor, this way they won't be so narrow. On the other hand, it will depend on your GML, but there is too much gap between the kidney armor and the abdomen armor. I would also fix the paint on the buttons, some joints and improve a little the placement of some parts. Reference images There are "missing pictures" of important things, such as the helmet, the TD, to be able to tell you how far off are you from trooping... You're almost there, Eric! 1 Quote
Coolajxl[TK] Posted August 14, 2023 Author Report Posted August 14, 2023 Hey Chemi! Thanks for the feedback! I'll defiantly sand down more of the return edge of the shoulder bell then, that should hopefully help. I agree that the buttons could use a lighter blue paint. I got the paint from another member who also had stormtrooper armor but when I put it on, it was defiantly a darker blue then the reference. And there are some silver button parts I know need to be painted white Also how would I close the gap between the kidney and abdomen armor? Also in the picture you circled in red, so when I put it on, the thigh armor was going over the sniper knee. How would I improve that besides raising the thigh armor because I don't think it can go higher. I'll also post some pictures now of the helmet and TD. I had put the TD on in a previous fitting pictures I posted, before I added the other parts of the belt though. Quote
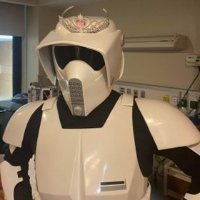
Coolajxl[TK] Posted August 14, 2023 Author Report Posted August 14, 2023 Helmet This came as is and I haven't done anything to it. I think it was an anovos built one. The previous owner added some padding and a battery pack and helmet fans. Quote
Coolajxl[TK] Posted August 14, 2023 Author Report Posted August 14, 2023 Thermal Detonator Also came as is and I haven't done anything to it. I wore it in a previous test fitting so I'll post that picture again. (I've done more to the armor since I took this picture, as seen above, just posting to show TD) Quote
Coolajxl[TK] Posted August 14, 2023 Author Report Posted August 14, 2023 Also a question, can I trim down/sand down the return edges of the shin armor? Quote
gmrhodes13[Staff] Posted August 14, 2023 Report Posted August 14, 2023 Your helmet will need a little work: Remove some of the grey from the mouth area. You may also want to reposition the brow trim, angles downwards. Helmet Frown is painted gray and does not leave the teeth area. A total of 8 cut outs in the teeth area of the frown are present. Hovi tips need larger wire. Also paint white inside and white on the rim 1. Hovi tip rims and insides must be white or painted white on the insides. 2. Screen must be a wide mesh. 3. Screen should be attached toward the tip and not recessed. Note: These are also known as Hovi-mic tips. That name derives from the originals, which had Hovi Mix PA2 embossed on them. Looks like you may have shins on the wrong sides, should close outside over inside. Normally some return edge is left but can be trimmed if you need it. Looks like your shins aren't closing flat, you may need to add some heat to get the cover strip to lay flatter when closed Quote
FN1313[TK] Posted August 14, 2023 Report Posted August 14, 2023 Can’t quite tell for sure on the pictures, but like Glen said, the shins may be on backward. There’s a specific curvature to most kits shins.You can see above how the inner shin has more of a dip inward in the curve following the natural calve muscle. The outer shin has more of a natural curve from top to bottom following the natural curvature of your calve/shin as well. Just worth double checking that.You can trim some of the return edge off. I wouldn’t trim all of it. Here’s mine for example prior to glue and sanding:Sent from my iPad using Tapatalk Quote
Coolajxl[TK] Posted August 15, 2023 Author Report Posted August 15, 2023 @FN1313 So I think the shins are fine? So from you picture you sent, look at the arrows I drew and how the left side of the right shin dips down, and the right side of the left shin is more flat. I believe my shins are the same? Quote
gmrhodes13[Staff] Posted August 15, 2023 Report Posted August 15, 2023 You will have to change over the coverstrips if that is your left and right shins, they have to close outside over inside, yours are opposite at the moment. 1 Quote
gmrhodes13[Staff] Posted August 15, 2023 Report Posted August 15, 2023 Also noticed you have some big connectors on your holster strap to belt Should be @8mm Quote
MaskedVengeance[Staff] Posted August 15, 2023 Report Posted August 15, 2023 Alright, Eric! First of all, big CONGRATS on making it this far! I know in an earlier post you were discouraged with the discomfort of the armor and overall look, but I think I speak for others when I say that you're looking great for a first-time TK builder, and with some tweaks here and there you'll be trooping in no time. I'm going to try to address the various questions I saw over your last several posts. First to address comfort. This is a TK suit we're talking about, not a stretchy spidey suit... it's never going to be super comfortable. However, there are several ways to reduce the clunkiness of it and attain manageable comfort. Two aspects to address are 1) the presence and reduction of return edges and 2) properly sized armor pieces. As you've seen several other troopers mention, there are quite a few places that turn edges can always be removed to maximize comfort. The tops of the biceps and thighs are two such areas. Nobody ever sees the tops of the biceps since they're obscured by the shoulder bells. Reducing the top edges of the thighs is purely a comfort thing, though some people like to leave some edge in order to maintain armor "thickness," so a hybrid execution is to completely remove the return edge from the inner thigh pieces and taper up to a thin return edge on the outer pieces. Removing the return edges on the bottom of your shoulder bells will also permit them to hug your biceps better and maybe even pull in closer to your chest armor. As for your particular armor, as it is, you also have quite a bit of return edge remaining on your forearm pieces, which definitely adds to their bulk. Reducing the edge thickness and possibly even sizing the entire forearm down (reduced circumference) may be helpful, but more on that in just a second. I know you're also seeking basic approval at this time, but if you do ever desire to upgrade to L2 you'll need to completely shave off the return edge on the wrist end of the forearms. Here is a photo of mine, and in case you're wondering, this style is screen-accurate to the suits used on the OT films. Now before you go an quickly take off all your return edges, do be aware that besides the appearance of thickness (like real armor), return edges can also benefit skinnier troopers by helping hold the armor in place. Think of it as "padding" in those circumstances. Joseph has an excellent thread called Return Edges 101. Check it out if you haven't already! As far as comfort via proper armor sizing, often we see troopers size their limb pieces, particularly arms, too large relative to their body. This might be at play in your case, but we'll need to be careful about evaluating and making any adjustments. Looking at these two photos of yours below, it appears that there ma be some spare room on the inside of your bicep pieces beneath your armpit. However, those biceps are currently sitting a bit low, so you'll first need to raise them so a better assessment can be made. In the second photo, on your right arm some misassignment can be seen between your forearm and bicep, which is indicative that there might be some extra room on one or both pieces. I say "might" again, because proper placement is first needed before a decision can be made. And finally, we can basically see through your left forearm piece, which means there's likely room to spare. Now that I've said all that about your arm pieces, another disclaimer like with the return edges. Another important aspect of armor sizing is proportion relative to other pieces of armor. By and large I think your limb armor is somewhat appropriately proportional to your torso, but there may be an allowance for some slight reduction if your arm size allows it. Keep in mind that resizing butt-joint armor pieces requires disconnecting at least one of the joints, trimming, then regluing, and I understand you may be wanting to avoid these backward steps. I see that you asked about how to keep your thigh armor from hiding the sniper knee plate, and there are two things to consider. First, you need to ensure that your shin pieces aren't riding up too high. From the photo angles you've shown us it's a bit hard to tell as we're looking down onto your leg pieces. We need a more leg-level shot to determine that. If your shins are riding up, you can consider adding velcro or elastic strips to your boots and inside of armor to hold the armor down. If the vertical placement of your shins is proper, you could follow the lead of some troopers and add some foam padding between the front top of your shin and your shin armor. This will help hold the sniper plate out and away from your leg, and hopefully in front of your thigh piece. And while we're on the topic of that specific leg piece, let's revisit return edges, since you've asked about that particular piece. Most troopers leave some return edge at the tops of shins since it's an area that is quite visible and the ridge is intended to look thicker than the rest of the piece. However, much like all limb pieces, if you find that you're having a hard time fitting into the armor, reducing the depth of the return edge could beneficial. The one place that I would say you could consider removing even more edge is right where your index finger is pointing in the photo below, but only on that left leg where the sniper plate obscures it. But I would only do that if you really need to leg room inside the piece to get the calf connection to close. That, plus be sure you've made a final decision on whether or not your shins are flipped. For reference, here is how I did my shins. Note that my shin armor runs tight due to the design of the armor producer, and it came with very little return edge, so mine is pretty minimalistic. Now onto the ab-kidney connection. As you're already aware of, as shown in the two photos below, there is a significant gap between your ab and kidney piece which would definitely need to be reduced for L2 and L3, and it will ultimately be up to your GML to decided whether it'd be impactful for basic approval per the CRL. Perhaps get in touch with them to inquire. Kidney plate shimming, as documented in the thread below would be the remedy for the current gap. https://www.whitearmor.net/forum/topic/47793-kidney-plate-shimming-help-needed/ In terms of your helmet, Glen has already given you some good advice. For basic approval you may not need to clean up the grey frown paint, but Anovos was notorious for that overspray, and it really doesn't take much to crisp up those lines with some mineral spirits and toothpicks. One last thing that I can't help but notice because obsessive about this particular topic... thermal detonators. Once again, it'll be up to your GML to decide for basic, but the control panel and belt clips should be touching at the bottom. Basically you can remove and reglue the panel a little lower, or perhaps the easier would be to unscrew the clips and remount them a little higher to touch the panel. Finally, in case you haven't yet seen it, below is a thread of resources that I compiled during my own build which I've published in case it can be of help to other troopers. You're doing GREAT, Eric, and I'm very excited to see you continue your build. Hopefully this extensive response of mine has been helpful, and not overwhelming. Know that we're all here to HELP you. Troopers helping Troopers. 2 Quote

Recommended Posts
Join the conversation
You can post now and register later. If you have an account, sign in now to post with your account.