shashachu[TK] Posted July 3 Author Report Posted July 3 Assuming this is accurate, looks like the screws should be unpainted? The CRL images have them painted so I was unsure. https://www.whitearmor.net/forum/gallery/image/3488-dsc00579jpg~original/?context=new Quote
shashachu[TK] Posted July 3 Author Report Posted July 3 And to answer my other question, IPA does not appear to be safe on the paint. I used 70% on a portion of the butt plate and it seems to have caused a haze or perhaps eaten away slightly at the paint. I'll respray that portion. 1 Quote
gmrhodes13[Staff] Posted July 3 Report Posted July 3 7 hours ago, shashachu said: A couple random questions for those with expertise: 1) Should I wipe the paint with something (eg IPA) before spraying clear? Since I'm using plastic polish, I'm wondering if it's leaving any residue. Should 91% IPA be safe? 2) Are the screws on the holster also supposed to be painted white or are they left silver? 1) I give everything a wipe with Prepsol which is a wax and grease remover, not sure if there's an equivalent 2) leave unpainted 2 Quote
ukswrath[Staff] Posted July 3 Report Posted July 3 7 hours ago, shashachu said: And to answer my other question, IPA does not appear to be safe on the paint. I used 70% on a portion of the butt plate and it seems to have caused a haze or perhaps eaten away slightly at the paint. I'll respray that portion. Well, professionals will hose everything down in a paint booth with filters, even the booth. That said, wash down your spray tent and whatever you're going to paint, then use tack or (cheese) cloth prior to shooting. Anything to keep the dust down. 1 Quote
shashachu[TK] Posted July 4 Author Report Posted July 4 5 hours ago, gmrhodes13 said: 1) I give everything a wipe with Prepsol which is a wax and grease remover, not sure if there's an equivalent 2) leave unpainted Thanks. I don't think I can get Prepsol but looks like there may be some other wax and grease removers I can try. I'm actually pretty curious about why I got that haze on my paint - I can't quite get good info about whether isopropyl alcohol should affect enamel paint like Behr; it seems like it shouldn't? it had been a day or so since I sprayed but I also wondering if maybe my paint wasn't quite cured? Otherwise I think I may just do soap and water to be totally safe. Quote
shashachu[TK] Posted July 6 Author Report Posted July 6 (edited) Had some nice weather today (usually my city is really windy and therefore dusty) so I took the opportunity to spray some more pieces. I did some belt and ab boxes, the TD plate, the portion of the butt plate that I wiped with IPA, a part of the TD which I had to sand down to fix a seam, one shoulder bell (not pictured) and the forearms. I got some pretty bad runs on the forearms which I'll need to sand out (was trying to spray closer to avoid orange peel and probably got too close) but I'm really happy with how seamless they look. Doing the second pass with milliput/filler primer really paid off. If you're curious what kind of stand the forearms are on, someone on my local buy nothing group was giving away a double guitar stand which I realized I could use for painting. :) No photos, but I also sprayed the calves and one of the thighs with filler primer to prep them for paint. It's slow going and I'm honestly dreading painting the helmet and also spraying the 2k, but I am inching towards the finish line. It is also good to know that even with paint, almost no problem is un-fixable. Edited July 6 by shashachu 3 1 Quote
shashachu[TK] Posted Wednesday at 12:33 AM Author Report Posted Wednesday at 12:33 AM (edited) I am slowly making progress on painting and priming. I might have to let go of perfection and decide what is 'good enough' or I may never finish the build. :) Besides the painting, though, I learned a new skill today - vacuum forming! I could definitely have just pasted a curved face shield piece inside of the helmet for lenses but I thought it'd be fun to try my hand at vacuum forming. I considered making my own, but I found this one from Etsy that was very inexpensive, even with shipping from Spain. https://www.etsy.com/listing/4452485131/vacuum-forming-machine-a4-vacuum-former The files I have come with a flat lens stencil as well as a 3D vacuum forming shape. However, it's not really designed for vacuumforming since it's the exact shape of the lens. So I first copied and pasted the lens shape a bunch of times in tinkercad and cut the bottom flat to fill out the inside of the lens, and printed it. I printed the lens itself upright for better quality: It still wasn't exactly what I wanted for vacuum forming, though, because there wasn't really going to be a way to attach the lens to the helmet itself since there's no flashing. So I used some EVA foam to build out the buck and made it slightly shorter than the lens so that when I pulled it, I'd have an edge that was inset that I could use to attach the lens to the helmet. I went to Goodwill this morning and found a cheap toaster oven which thankfully still worked, and coincidentally exactly fit the frame for the plastic that came with the vacuum former. The plastic itself I ordered from McMaster-Carr. Here is the video from my first ever pull, which worked surprisingly well: https://photos.app.goo.gl/BhXqtgQBVicZDv7eA However, the protective plastic melted against the EVA foam, so I pulled it again. The second time I removed the bottom plastic so it didn't stick to the buck, but the wrinkle pattern from the top layer of protected plastic caused defects on the lens, so I pulled it a third time, this time with both sides of the protective plastic removed. Third time's a charm! I am planning on dying the lens to darken it. Edited Wednesday at 12:35 AM by shashachu 3 Quote
gmrhodes13[Staff] Posted Wednesday at 12:38 AM Report Posted Wednesday at 12:38 AM Very nice, came out well, similar to how I've made some eyes and lenses, albeit I've just used a heat gun and brute force Quote
shashachu[TK] Posted Wednesday at 01:46 AM Author Report Posted Wednesday at 01:46 AM 1 hour ago, gmrhodes13 said: Very nice, came out well, similar to how I've made some eyes and lenses, albeit I've just used a heat gun and brute force Yeah before I got the toaster oven I tried to use a heat gun. It was difficult to heat it evenly but worked surprisingly well to just heat the plastic then stretch it over the mold with my hands. 1 Quote
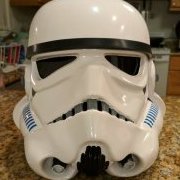
shashachu[TK] Posted 59 minutes ago Author Report Posted 59 minutes ago (edited) I haven't been taking as many photos because it's all just prime/paint/sand etc, but I've painted the calves, spats, thighs, and shoulders: I'm also fixing the last few imperfections in the chest and back: As well as priming the ab, biceps, and finally the helmet/snout: In non-painting news, I dyed the lens and it worked amazingly! I used one packet of iDye Poly, did the first dunk for 5 mins, then a second dunk for 2 mins. One of the lenses got slightly deformed because the water was a bit too hot, but it's thin enough that it can still be installed in the proper shape. (I'm sending one to @zediyeti because we are fellow tiny-TKs and our helmets are printed at 92% and 93% respectively). My grill has a burner so I was able to do it all outside and not risk getting dye all over our very white kitchen. I used these videos as guidance: Edited 58 minutes ago by shashachu 1 Quote
gmrhodes13[Staff] Posted 45 minutes ago Report Posted 45 minutes ago That worked out great, must admit I've never tried tinting acrylic, but think I'm going to have to give this a go now, luckily our haberdashery store carries that line of dye Quote
gmrhodes13[Staff] Posted 43 minutes ago Report Posted 43 minutes ago 14 minutes ago, shashachu said: In non-painting news, I dyed the lens and it worked amazingly! I used one packet of iDye Poly, did the first dunk for 5 mins, then a second dunk for 2 mins. One of the lenses got slightly deformed because the water was a bit too hot, but it's thin enough that it can still be installed in the proper shape. (I'm sending one to @zediyeti because we are fellow tiny-TKs and our helmets are printed at 92% and 93% respectively). My grill has a burner so I was able to do it all outside and not risk getting dye all over our very white kitchen. I used these videos as guidance: This would make a great addition to the How To area, when you get some free time Quote
shashachu[TK] Posted 30 minutes ago Author Report Posted 30 minutes ago 14 minutes ago, gmrhodes13 said: That worked out great, must admit I've never tried tinting acrylic, but think I'm going to have to give this a go now, luckily our haberdashery store carries that line of dye If it matters, this is PETG but I believe the package says it should work with acrylic as well. 1 Quote
gmrhodes13[Staff] Posted 27 minutes ago Report Posted 27 minutes ago 2 minutes ago, shashachu said: If it matters, this is PETG but I believe the package says it should work with acrylic as well. Awesome, thanks for the additional info Quote

Recommended Posts
Join the conversation
You can post now and register later. If you have an account, sign in now to post with your account.