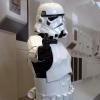
TheBlooperTrooper[TK] Posted April 19, 2017 Report Share Posted April 19, 2017 (edited) Basic Information: Name: Cameron Kraeger FISD Name: TheBlooperTrooper 501st ID: 82898 Garrison: Ohio Garrison http://www.501st.com/members/displaymemberdetails.php?userID=23877 Mandatory Information: Armor: AM 2.0 Helmet: AM 4.0 Blaster: Hyperfirm E-11 Optional: Height: 6'0 Weight: 170 lbs Age: 18 Boots: TK Boots Canvas Belt: Trooperbay Hand Plates: justjoseph63 Electronics: Aker wired microphone, Aker speaker, Icomm (From the voicebooster website), and Ukswrath's helmet fans (FISD). Neck Seal: Darman Holster: Trooperbay Full body without helmet front: Full body front: Full body back: Full body right side: Full body left side: Right side detail: Left side detail: Helmet Details: Front: Right: Left: Back: Aerator tip details: Lens backlit: Accessories: Ammo belt: Neck seal: Blaster left: Blaster right: Blaster rear: Thermal detonator: Action shot: (Will try and improve on this one in the future!) Interior strapping: Left side rivets interior: Right side closure interior: (Apologies for the excess E6000 / mess here) Cod rivet / rear plate exterior: Cod rivet / rear plate interior: Rear plate interior without the strap: Helmet "S" seal: Additional Information My helmet was used in a tutorial by Eric of Stormtrooper Ranch to help others assemble AM 4.0 Stunt helmets Edited April 26, 2017 by TheBlooperTrooper Quote Link to comment Share on other sites More sharing options...
ukswrath[Staff] Posted April 26, 2017 Report Share Posted April 26, 2017 Hey Cameron thanks for your patience, We'll be with you shortly. While you wait could you post a couple more photos for us. We need to see the armor inner strapping, the cod / posterior snaps and rivet and helmet "S" seal. Thank you Quote Link to comment Share on other sites More sharing options...
TheBlooperTrooper[TK] Posted April 26, 2017 Author Report Share Posted April 26, 2017 I've updated my original post and put the requested images at the bottom for reference! Quote Link to comment Share on other sites More sharing options...
ukswrath[Staff] Posted April 27, 2017 Report Share Posted April 27, 2017 Awesome thank you 1 Quote Link to comment Share on other sites More sharing options...
justjoseph63[Staff] Posted April 27, 2017 Report Share Posted April 27, 2017 Looking SHARP, Cameron, and great job with that AM kit! You will want to raise your belt a bit to where it touches the ab-button (or even overlaps it a bit). Also, I would remove the last of the return edge on the front of your forearms (inside the "bump") in the area shown below. See you at EIB soon and eventually Centurion! (Nice hand guards, BTW). 1 Quote Link to comment Share on other sites More sharing options...
TheBlooperTrooper[TK] Posted April 27, 2017 Author Report Share Posted April 27, 2017 Looking SHARP, Cameron, and great job with that AM kit! You will want to raise your belt a bit to where it touches the ab-button (or even overlaps it a bit). Also, I would remove the last of the return edge on the front of your forearms (inside the "bump") in the area shown below. See you at EIB soon and eventually Centurion! (Nice hand guards, BTW). Will do! Appreciate the tips! Quote Link to comment Share on other sites More sharing options...
justjoseph63[Staff] Posted April 27, 2017 Report Share Posted April 27, 2017 Will do! Appreciate the tips! Just noticed one other thing, Cameron.. The bottom screw(s) on your ears are Philips-head. They should be the flat-head like the ones above them. If you need to replace them, I can shoot you a set of the correct ones, no charge. If interested, just PM me. Quote Link to comment Share on other sites More sharing options...
TheBlooperTrooper[TK] Posted April 28, 2017 Author Report Share Posted April 28, 2017 Just noticed one other thing, Cameron.. The bottom screw(s) on your ears are Philips-head. They should be the flat-head like the ones above them. If you need to replace them, I can shoot you a set of the correct ones, no charge. If interested, just PM me. I think I actually have the correct screws in my spare helmet kit box, but thanks for the offer! Will swap them out before my centurion application No paint / paint pen to those screws right? Quote Link to comment Share on other sites More sharing options...
justjoseph63[Staff] Posted April 28, 2017 Report Share Posted April 28, 2017 All of them should be painted white. 1 Quote Link to comment Share on other sites More sharing options...
TheBlooperTrooper[TK] Posted April 28, 2017 Author Report Share Posted April 28, 2017 All of them should be painted white. My bad, will fix that as well! Quote Link to comment Share on other sites More sharing options...
ukswrath[Staff] Posted May 1, 2017 Report Share Posted May 1, 2017 Hey Cameron, thank you for your patience and EI application. CRL and EIB Application Requirements: All the required submission photos have been posted. Your armor displays all the necessary elements to qualify for Expert Infantry. Welcome and congratulations trooper! . Beautiful job on your build Cameron Other-Armor Fit/Assembly: In this section we review observations made by your fellow troopers and ourselves. Some observations may lead to suggestions to improve the overall look of your armor. If any suggestion affects any application, it will be listed separately in the above or below sections. Since this section is used to enhance to overall look of your armor we have a few requests. 1) As mentioned by your fellow troopers all three ear screws should be "V" head. Reference photo 2) Certainly not a requirement however, removing the extra return edge material on your back plate would help your armor look more accurate. This applies to the chest and posterior as well. Some vendors leave a good deal of return edge in areas which may look like it belongs, but doesn't. Reference photo 3) Back plate to ab alignment offset. Having three connecting points (Center, left, right) between the back plate and kidney will help ensure this area remains aligned. Reference photo 4) In at least one area your cover strip extend past the armor. We suggest you trim it back to help prevent getting caught on other areas. The right shin alignment, we're pretty certain this is just a photo issue but your right shin is out of alignment. Installing foam or velcro in the shin usually helps preserve alignment. 5) Posterior (butt plate) out of alignment and front lower corner should be trimmed. Both areas requiring some minor adjustments or trimming. The butt plate should follow the contour of the kidney plate and the corner (as illustrated) should have a 45 degree contour to it. Take a look at the reference photos we've provided. Reference photos Centurion Suggestions: In this section we may suggest recommended or required repairs prior to applying for the Centurion level, however the accuracy it is ultimately up to the trooper. We do our best to cover everything, but the more detailed photos that come with a level 3 application may reveal other items that could require change. There's one area that will require change to meet the level 3 requirements for your future Centurion application As per the CRL Ammo Belt level three certification (if applicable): Drop boxes are vertically aligned with the end of the ammo belt with minimal gap between belt and box. The drop boxes are to be aligned with the outer most edges of the waist ammo belt. The most common solution is to secure the drop box strap the the waist cloth belt. This will help keep them aligned. Reference photo Well that's it, thank you for your patience again. Make your corrections and we'll see you at Centurion. Congratulations trooper 1 Quote Link to comment Share on other sites More sharing options...
TheBlooperTrooper[TK] Posted May 1, 2017 Author Report Share Posted May 1, 2017 THank you so much! I'll get started on those fixes right away! Quote Link to comment Share on other sites More sharing options...

Recommended Posts
Join the conversation
You can post now and register later. If you have an account, sign in now to post with your account.