TK 2759[501st] Posted February 26, 2016 Report Share Posted February 26, 2016 Looking good so far! <br><br> Not sure I can help with sniper plate... Someone else may chime in here. I've seen all sorts of methods used though. Some use rivets, others use Velcro. I think riveting is most common though. Quote Link to comment Share on other sites More sharing options...
supernaut11[TK] Posted February 26, 2016 Author Report Share Posted February 26, 2016 (edited) Looking good so far! <br><br> Not sure I can help with sniper plate... Someone else may chime in here. I've seen all sorts of methods used though. Some use rivets, others use Velcro. I think riveting is most common though. Thanks, Dan! I appreciate that.. In regards to the sniper plate fitting, my issue is with how it lines up on the shin, or doesn't line up. In the last pic you can see how the outer half (screen right) has a lower angled mold ridge at the top than the inner half. This causes the plate to line up crooked. I'm just wondering if I paired the halves incorrectly or if this is normal. I think the overall curves of the shins all look right but I'm confused with the top of the left shin. I tried showing a pic of how the plate lines but it's difficult to show correctly with only two hands My brother is bringing his armor over later tonight to get some work done so maybe he can snap a pic of my dilemma! Cheers! Edited February 28, 2016 by supernaut11 2 Quote Link to comment Share on other sites More sharing options...
illusionz_09[TK] Posted February 26, 2016 Report Share Posted February 26, 2016 Use this video from TK1636 for doing the shins. If you add some abs strips behind the plate it definitely helps. thats what i did. Quote Link to comment Share on other sites More sharing options...
supernaut11[TK] Posted February 26, 2016 Author Report Share Posted February 26, 2016 Use this video from TK1636 for doing the shins. If you add some abs strips behind the plate it definitely helps. thats what i did. Thanks, David! I'll take a look. 2 Quote Link to comment Share on other sites More sharing options...
supernaut11[TK] Posted March 3, 2016 Author Report Share Posted March 3, 2016 Just a couple of things I think are noteworthry at this point.. First, after looking into things a bit more with the left shin, it was determined that the crooked alignment of the molded ridges at the top is normal. This will cause the sniper plate to mount crooked if you are to line it up with ridges. When I first noticed this, I tore apart both shins.. I was convinced I had them wrong. Not a terrible thing because one, I wasn't happy with the cover strips anyway, and two, this gives me the opportunity to try something with that left shin... I've decided to offset the halves by raising the right side up about 5mm to help level out the bottoms of the ridges that the plate wings will mount to. I've lowered it just a bit compared to what you see in the picture.. I didn't want to offset the bottom too much. As it is, this will require some trimming on the bottoms (ankles), but I figured any bit off offsetting will help when it comes to mounting the plate... We'll see Here's a mockup with plate taped down.. There's still a slight tilt but much better than without offsetting. Earlier I had mentioned the thigh halves being uneven.. One option was to just "hide" it with a cover strip and be done with it.. But I decided to bust out the sealing iron that I've had, buried deep in my hobby closet (It's actually an entire room but functions more like a closet), and see what kind of damage I could do... Here's the before. After some ironing.. If you haven't tried this before practice on scrap! I can't emphasize that enough.. Sacrifice scrap first.. Go slow and don't force it, let the plastic heat up and you'll feel it begin to give but don't hold it on any one spot, and take your time. It will roughen the plastic a bit so you will need to sand and polish if want it to match. And then it's just a matter of contouring the strip to match the curve. Maybe a tad more sanding but I'm quite happy with the results. 2 Quote Link to comment Share on other sites More sharing options...
TK 2759[501st] Posted March 3, 2016 Report Share Posted March 3, 2016 All is looking good from here! You're doing an awesome job IMO! 2 Quote Link to comment Share on other sites More sharing options...
supernaut11[TK] Posted March 3, 2016 Author Report Share Posted March 3, 2016 Much appreciated, Dan! I'm really looking forward to getting that ID! 1 Quote Link to comment Share on other sites More sharing options...
Pyrates[TK] Posted March 3, 2016 Report Share Posted March 3, 2016 Sweet work mate and graduation isn't too far away! 1 Quote Link to comment Share on other sites More sharing options...
supernaut11[TK] Posted March 3, 2016 Author Report Share Posted March 3, 2016 Sweet work mate and graduation isn't too far away! Aaron, you da man! 1 Quote Link to comment Share on other sites More sharing options...
Pyrates[TK] Posted March 20, 2016 Report Share Posted March 20, 2016 How's the build coming along for you and your brother mate? Quote Link to comment Share on other sites More sharing options...
supernaut11[TK] Posted March 20, 2016 Author Report Share Posted March 20, 2016 How's the build coming along for you and your brother mate? Hey Bud! Work is steady and coming along good. My plan is to have a well organized update soon (the build has been ALL over the place).. My brothers build is a bit behind mine because of his work but once he and I get to it, we should plow through his build and get him all caught up! Cheers, and thanks for asking! Outstanding work on your build, btw! 1 Quote Link to comment Share on other sites More sharing options...
Pyrates[TK] Posted March 20, 2016 Report Share Posted March 20, 2016 Awesome mate - slow progress is still progress and can relate to it being scattered at times - keep it up and wait to see the update 2 Quote Link to comment Share on other sites More sharing options...
Pyrates[TK] Posted April 6, 2016 Report Share Posted April 6, 2016 How goes the battle? Quote Link to comment Share on other sites More sharing options...
supernaut11[TK] Posted April 16, 2016 Author Report Share Posted April 16, 2016 How goes the battle? Hey Bud! The battle has been slow and steady... Only the helmet and belt are left! I've been doing a lot of work on my brothers as well and have just neglected taking pictures.. Well, maybe a few pics along the way but not much. But there WILL be an update! It was super cool to see you get your approval! Awesome build.. It's helped a lot of people along the way, myself included.. Congrats, man! 2 Quote Link to comment Share on other sites More sharing options...
Pyrates[TK] Posted April 17, 2016 Report Share Posted April 17, 2016 Hey Bud! The battle has been slow and steady... Only the helmet and belt are left! I've been doing a lot of work on my brothers as well and have just neglected taking pictures.. Well, maybe a few pics along the way but not much. But there WILL be an update! It was super cool to see you get your approval! Awesome build.. It's helped a lot of people along the way, myself included.. Congrats, man! That's stellar news - and many thanks my friend. I'm looking forward to seeing you two get your ID's - exciting times ahead 1 Quote Link to comment Share on other sites More sharing options...
supernaut11[TK] Posted July 10, 2016 Author Report Share Posted July 10, 2016 It's time to revive my thread! It's hard to believe it's been 4 months since my last update! It's been it's been a productive 4 months and I do have a few parts of my build plus the completion that I'd like to share. I'll pick up where I left off with my approach of offsetting the halves of the left shin to help line up the sniper plate. As it was, if you were to line up the halves, the sniper plate, (front view) would dip to the outside. The plate still needed a hot water bath to slightly bend the outside wing in just a bit to make the gluing and clamping easier. Gluing was still done in stages. First the middle, then the outsides. The arms went pretty straight forward. Forearms and biceps were joined together by gluing a strip of 1in. non-roll elastic along the inside, leaving about a 1in. gap at the elbow. A strip was then glued to the inside of the top end the bicep with a snap at the other end for the shoulder bell. I placed two male ends on the inside of the shoulder bell in case I needed to make adjustments. 1 Quote Link to comment Share on other sites More sharing options...
supernaut11[TK] Posted July 10, 2016 Author Report Share Posted July 10, 2016 AP's cut lines on the helmet and ears make this a very straight forward build. A note about Humbrol enamel.. stir the paint with a toothpick.. Then, stir it again.. And when you think you've stirred it enough.. stir it again. Then close the lid and shake it. Open, and stir again.. It brushes on much nicer if you do this. I started with the teeth (Humbrol #5). I believe this was the first coat. It may have been the second, I honestly can't remember. Ultimately I applied three coats. Allow plenty of dry time in between, at least an hour. The tear drops (I think that's what they're called), were a combo of free hand and stencil (the vent lines). First was a solid coat of black (Humbrol #21). It isn't necessary to paint solid black but that just me. Then the grey (#8) Same process for the back. Stencils were used for the vent lines here as well. Completed.. almost.. Lenses not installed and ear screws still need to be painted. For the vocoder I chose to use Humbrol#85 (satin black). Stripes are the stickers provided by AP. 2 Quote Link to comment Share on other sites More sharing options...
supernaut11[TK] Posted July 10, 2016 Author Report Share Posted July 10, 2016 Next up, the ab buttons. With painters tape, I made small stencils using my Ofna circle cutter that I bought several years ago for my lexan RC car bodies. I placed a piece of tape on a scrap piece of ABS to use a backing. First coat of Humbrol #8 (grey) and #14 (french blue).. Again, lots of stirring. After two coats. I purchased a set of hand guards from justjoseph and I think they look great! However, I wanted them to match the white of the armor so I chose to paint them with a white acrylic. It took at least three coats to achieve the look that I wanted but I'm pleased with the result. The paint is very flexible but will still crack a little. But hey, a little cracking just adds to the accuracy The guards were then glued to the gloves with E6000. 1 Quote Link to comment Share on other sites More sharing options...
supernaut11[TK] Posted July 10, 2016 Author Report Share Posted July 10, 2016 In order to make the holster approvable as an ANH, I needed to make an quick modification to the belt straps. First I cut down plain strips of leather to match the width of the black strips supplied with the holster. Black straps are removed and a length equal to the width of the straps are cut at the ends and placed over the screw holes on the holster. A leather punch was used to make the holes in the new leather straps. To be accurate, I will need to make some cuts on the body of the holster as well. It will pass for basic without these cuts so I'll worry about that later. 2 Quote Link to comment Share on other sites More sharing options...
Pyrates[TK] Posted July 10, 2016 Report Share Posted July 10, 2016 From MIA to back to the road to TK ID - great to have you back brother 1 Quote Link to comment Share on other sites More sharing options...
Pyrates[TK] Posted July 10, 2016 Report Share Posted July 10, 2016 Great work and mint job on that paint job! 1 Quote Link to comment Share on other sites More sharing options...
supernaut11[TK] Posted July 10, 2016 Author Report Share Posted July 10, 2016 Next up, the detonator.. The first thing I wanted to tackle was to get the end caps down to their proper length (20mm). Using a 20mm cover strip as a guide, I marked around each cap, taped off, then trimmed them down with a dremal and sandpaper. I then placed both caps on the tube and measured the overall length to determine how much of the tube needed to be trimmed. You can see that I needed to trim approx. 1/2 of the tube to achieve an overall length of 7 1/2in. 1/2in. trimmed off one end. I then placed both caps back on and measured. 7 1/2inches. Next step was to place the control panel on the tube so that there is an equal amount of space on each end, between the panel and each end cap. Then trace around panel and caps with pencil. Paint prep.. Areas that will be glued are taped off. I put the tape just slightly inside the lines to assure there will good paint coverage. I used a Testors rattle can for the paint. Once dry, the control panel was glued in place. Put the end caps on (Do not glue yet!!), put one of the metal clips in place, and mark the hole thats closest to the panel. Drill hole, remove cap and install. Now you can bend the clip to lay flush on the tube and mark the next hole for installation. Now end caps can be glued. Always watching 2 Quote Link to comment Share on other sites More sharing options...
supernaut11[TK] Posted July 10, 2016 Author Report Share Posted July 10, 2016 From MIA to back to the road to TK ID - great to have you back brother Thanks, Brother!! I appreciate the compliments.. There's more posts on the way. 1 Quote Link to comment Share on other sites More sharing options...
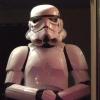
supernaut11[TK] Posted July 10, 2016 Author Report Share Posted July 10, 2016 I hope that there has been some helpful info in this build log. It's been such an incredible ride getting to this point and there's no way I could've done this without all the great people here on FISD. Thank you!! And as for my brother, he has his ID, too! DZ-11218.. Yep, a Tusken Raider.. He began researching it and the next thing you know, he completed a costume! He's about 1/2 way through his TK, so it won't be long till he joins us here on FISD.. And with that.. Here we go.. TK-11722, 501ST LEGION, STAR GARRISON, CENTRAL TEXAS SQUAD.. 1 Quote Link to comment Share on other sites More sharing options...
Pyrates[TK] Posted July 10, 2016 Report Share Posted July 10, 2016 Holy kwap brother!!! Freakin congratulations TK - 11722 and welcome aboard 2 Quote Link to comment Share on other sites More sharing options...

Recommended Posts
Join the conversation
You can post now and register later. If you have an account, sign in now to post with your account.