Feedback[TK] Posted July 26, 2015 Author Report Share Posted July 26, 2015 Thanks Mark, are you referring to the thigh or shin ? Quote Link to comment Share on other sites More sharing options...
ABS80 Posted July 26, 2015 Report Share Posted July 26, 2015 (edited) for both the thighs and shins but I can't see how you did the front of your shins, the front strip should be flush , basically you need to remove more material on each side actually same for the all the arm parts. Edited July 26, 2015 by ABS80 Quote Link to comment Share on other sites More sharing options...
Feedback[TK] Posted July 26, 2015 Author Report Share Posted July 26, 2015 Oh I understand what you mean, yes the strips are too long, I still need some finishing sanding to do so that will take care of the strips Quote Link to comment Share on other sites More sharing options...
Feedback[TK] Posted July 26, 2015 Author Report Share Posted July 26, 2015 Major setback today.... but thanks to Mark for calling me and explaining what he meant by his previous comment !!! I royally F%$*d up... Most of my butt joints are too wide, good thing he noticed it and THANK GOD for E-6000 !!! According to Mark, front butt joints need to be really narrow but the back can be wider if need be. Casualty report: -Biceps unglued, trimmed properly and one outside strip re-glued and curing -Front shins unglued, one was trimmed and the inner strip is curing -One forearm unglued one one side only, needs trimming to make it look like the other one. Unfortunately, a 5mm "step" remains -Thighs needs to be unglued (front only) and trimmed. I'll be honest... I felt for a moment, like shoving all the parts in a box and store it in the garage but I guess that this is part of the frowing pains to become a TK... I have to admit though, it looks way better the way I trimmed the parts now. I basically lost 2 weeks of work but better now then being denied my entry in the 501st !! Quote Link to comment Share on other sites More sharing options...
Feedback[TK] Posted August 1, 2015 Author Report Share Posted August 1, 2015 Almost a week since my mistakes... They are pretty much all corrected. I narrowed the trim in front of all the parts (and back when possible...) Today I spent most of my time removing glue residue, sanding and adjusting. I'm preet happy with the results... I still have my thighs that are drying and I have 2 more outer strip to install. My TD is almost done. Pictures hopefully tomorrow !!! Quote Link to comment Share on other sites More sharing options...
Feedback[TK] Posted August 3, 2015 Author Report Share Posted August 3, 2015 (edited) I told you I'd have pictures today, here we go !!! But first, I tried using boiling water to form some parts (shoulder straps,knee plate,thigh ammo pack) and it works well, you just have to be careful on the amount of time you leave the parts in the water... Butt plate with the webbing plates. I also glued a reinforcement plate for the 2 snaps. Shoulder bells with non-roll elastic and snaps installed kidney plate with some snaps, I have to do a muck-up with cardboard to cut the proper shim lenghts and then install the rivets and snaps. You can also see the ammo thigh pack and knee plate. Right thigh ready for the ammo pack that will be riveted later this week. Now the strips are the proper width, right Mark ? lol Left and right shins, they look different but it's the camera angle... The left one is ready for the EVIL knee plate. I expect a lot of cursing, waste of glue, premature aging and probably abuse of alcool during or after the procedure.... Left and right forearm, I trimmed as much as I could but I still have to fit in them !!! I will try to remove the ovalness (good word ??) with a c-clamp... New and improved biceps (just trimmed properly actually...) with one snap installed only. I'll see if I need the forearm snaps later. Another angle to show the cover strips Last outer strip drying on the left thigh... I know there are 2 loose magnets... Belt partially assembled, I used chicago screws for both the holster and ammo. I'll install the ab snaps and screw covers later. And...La pièce de résistance.....The bucket !!! Mark assembled it for me. The inside is painted black, the mic tips and hand painted decals are from trooper bay. The S-Seal is also on there. The electronics (fans,icomm,mic) are for later. I forgot to take a picture of my TD... Tomorrow maybe. I forgot... The rubber gloves are drying with the silicone handguards under a gallon of paint... Still a lot to do but with at least 12 hours working on my armor over the weekend I feel that I have accomplished a lot !!! Talk to you guys later !! TKTBA signing out Edited August 3, 2015 by TKTBA Quote Link to comment Share on other sites More sharing options...
Feedback[TK] Posted August 9, 2015 Author Report Share Posted August 9, 2015 Hey folks, my last update is over a week ago and I'll be honest I didn't do much at night. But now I'm on vacation and I'm planning on getting my armor to the finish line !! I started by making a To-Do list so I wouldn't forget anything... I alson printed the EIB and Centurion checklist to keep me focused. Enough talk, picture time !!! I just glued the snaps this morning, if possible I'm going to work on a garter system tomorrow... I installed the ammo box on the right thigh with split rivet, it went pretty smooth considering I boiled the ammo pack to shape. I measured 10 or 20 times, clamped, re-measured, clamp moved, re-measured, drilled pilot hole and took it from there... Always stressful to drill in the armor... Here's another view. Corners are rounded, the rivets will be painted white eventually. I install cardboard shims for measurements as soon as the ab plate is ready. Here's another view of the shims ready to be cut. Also, the 2 male snaps are installed on the butt Closer view of the 2 male snaps These little steps are part of an experiment to glue the sniper plate in place... The steps will serve as a bridge between the calf and sniper plate. I'm pretty proud of my foam inserts. I got them from a used T-Ball helmet at play-it-again sports for $10, I sliced them out and I actually had to cut the helmet in half to get to the bottom foam insert.... They are velcroed in place. Here's another view, I also added a nose bridge which is window weather stripping. It makes all the difference !! The helmet barely wabbles on my head !!! I glued the screen to cover the frown (after I took my picture) Chest, back and ab plate drying. I glued the shoulder straps, can't wait to see the result tomorrow !! I tried again to glue the handguards on the rubber glove but this time, I put my Goo-Gone bottle inside the glove. I also taped everything together. Alright, that's it for tonight, I spent a good 6-7 hours on it today...Time for a beer Quote Link to comment Share on other sites More sharing options...
ABS80 Posted August 13, 2015 Report Share Posted August 13, 2015 Keep up the great work, all is looking good and super neat! Mark (AP) Quote Link to comment Share on other sites More sharing options...
Spycee[TK] Posted August 13, 2015 Report Share Posted August 13, 2015 Looks good ! Be sure to not have oversized biceps. They must not be too large, it's ugly, :-) If they're too large they won't be parallel with your arm. Si ton biceps est trop large il va être croche sur ton bras, c'est laid ! Ya un paquet de monde qui font cette erreur. Moi j'ai dû enlever la partie surélevée arrière de chaque biceps, et maintenant ça fit comme un gant. Et aussi il me semble que ton ammo pack sur la cuisse droite devrait être plus bas, genre riveté plus haut sur la pièce pour le faire descendre. Mais bon si personne d'autre ne t'en parle ne stresse pas trop avec ça, c'est ptet juste moi qui est difficile :-) Quote Link to comment Share on other sites More sharing options...
Feedback[TK] Posted August 14, 2015 Author Report Share Posted August 14, 2015 Alex, je suis pas certain de bien comprendre, as tu une photo pour me montrer ? Quote Link to comment Share on other sites More sharing options...
ABS80 Posted August 15, 2015 Report Share Posted August 15, 2015 (edited) Pat, Before drilling or cutting ect.. study my build photos or movie suits photos carefully, your rivets on the ammo knee should be very close to the upper corners yours are way too low, If you need new knee ammo let me know. Mark (AP) Edited August 15, 2015 by ABS80 Quote Link to comment Share on other sites More sharing options...
Feedback[TK] Posted August 24, 2015 Author Report Share Posted August 24, 2015 Alright...back to work...vacations are over !!! I did some work here and there. I'll post pictures tonight. Thanks to Alex for the glue tip (handguards) and to Mark for pointing out another mistake I made (now fixed). The assembly is 99% finished, I just have to paint the ab buttons, I found a 0.50" scrapbooking punch that will doing the job of making masking tape template. I also need to glue the belt buttons and install the ab snaps for the belt. The boots are on their way (Imperialboots) and I'm now in the fitting stage of all the parts with straps. I should be ready for Halloween after all..... At least 501st ready.... I still need an E11 and I still need a fan and voice amp setup but that might wait for this winter since money doesn't grow on trees.... Pat signing out Quote Link to comment Share on other sites More sharing options...
Sly11[Admin] Posted August 26, 2015 Report Share Posted August 26, 2015 Hi Pat, this goes back a few post to the one with your thigh shot with the uneven bottom alignment. I think it is the thigh your ammo pack covers. Just a recommendation as that part that sticks down may catch on your undersuit. Consider taking the return edge off that area and apply some heat to it and carefully bend it back . This is just to even it up. You can then reduce the new return edge you would have created. If that makes sense. Sent from my iPad using Tapatalk Quote Link to comment Share on other sites More sharing options...
Feedback[TK] Posted August 31, 2015 Author Report Share Posted August 31, 2015 Finally.... I hope ! I know... the boots are on their way... a couple of parsecs away... I didn't re-attached the holster yet. It's not perfect but I'm pretty happy with the results so far. Thanks to all of you guys who helped me in the last 2 months !! I also did 2 things I haven't seen anywhere yet. Let me know what you think !! 1- I was fed up with the kidney plate that was flaring out all the time. It was worst with the belt... So I heat bent the kidney plate inward and the ab plate outward. It was perfect without the belt but still flaring out with the belt. I decided to add these little tabs ( 2 on each side ) to lock the 2 in place. If it's OK (EIB and Centurion approvable) I'll paint them black so they won't be seen. 2- The butt plate is a big pain in the....butt It's always flaring out and rwally, it looks like shucks.... So I decided to use velcro inside the belt and on the butt and kidney plate. That way the belt joins the 2 together and it seems to work for now.... Let's see with some trooping !! The tape is to indicate where the belt goes so I can position the velcro correctly. Comments welcome !!!! Tango Kilo Quote Link to comment Share on other sites More sharing options...
ABS80 Posted September 1, 2015 Report Share Posted September 1, 2015 great job! actually the belt doesn't go over butt plate, just sits above were butt/kidney are separated. Quote Link to comment Share on other sites More sharing options...
Feedback[TK] Posted September 1, 2015 Author Report Share Posted September 1, 2015 It looks like hell though.. The butt plate flares out too much for my liking but if need be I'll do it Quote Link to comment Share on other sites More sharing options...
Feedback[TK] Posted September 5, 2015 Author Report Share Posted September 5, 2015 OK, these are not armor pictures but while I'm waiting for my boots, I decided to pick up a 50 gal. tool chest and paint it. Nice sunny and warm day in Pincourt so the drying time was drastically shorter !! I did the whole thing in 3.5 hrs. Next, I have to get decals made. I was thinking of Imperial Cogs, my TK ID and the Canadian Garrison logo, Imperial Fortress Logo and the FISD logo. Quote Link to comment Share on other sites More sharing options...
68Brick[TK] Posted September 6, 2015 Report Share Posted September 6, 2015 That bin looks pretty sharp! I might just borrow that idea. Quote Link to comment Share on other sites More sharing options...
Feedback[TK] Posted September 6, 2015 Author Report Share Posted September 6, 2015 Please do, I dis it too !! Quote Link to comment Share on other sites More sharing options...
Feedback[TK] Posted September 6, 2015 Author Report Share Posted September 6, 2015 This morning I painted the tool's chest little brother... and started to equip my ETK (Emergency Trooping Kit) based on Chookaboom's. I have a few things left to buy to complete my ETK. Here's a few pictures. Quote Link to comment Share on other sites More sharing options...
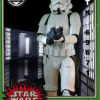
Feedback[TK] Posted September 6, 2015 Author Report Share Posted September 6, 2015 Everything fits !!! Only missing my E11 and the boots.... Quote Link to comment Share on other sites More sharing options...

Recommended Posts
Join the conversation
You can post now and register later. If you have an account, sign in now to post with your account.