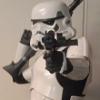
rhapsodyred99[TK] Posted October 7, 2012 Report Posted October 7, 2012 (edited) Hello all, I got an untrmmed RS PVC suit at the start of the summer and have been slowly but surely building it. Here are some pics of my first full suit up, and considering I had zero experience building armor, much less trying to make it movie strapping accurate I think I did ok. There are a few problem areas I see, namely the shoulder bells are a little far from the chest straps, but I am somewhat muscular in the arms/chest area and have wide shoulders, which makes sitting them closer to the chest tough. I am not sure they can go closer they are pretty much tight on my shoulders now. Also there is a large space in the back plate and kidney plate, but because I am 6 foot 1 that was the best compromise I could arrange. I think I am going to have to live with the gap. And the next thing I see is of course the spaces between the ab and kidney, but considering I weigh 230 pounds they are not going to close unless I shim. Anyway wanted to post up a few pics so I could see what else I need to work on and perhaps hear some ways to do it. Thanks! Edit: Can only upload theese two pics, Ill have to get post the others on a service and link em sorry! Edited October 8, 2012 by rhapsodyred99 Quote
Valgars[TK] Posted October 8, 2012 Report Posted October 8, 2012 The experienced folds are going to want to pics from the side arms raised but I think it looks pretty darn good myself. Quote
rhapsodyred99[TK] Posted October 8, 2012 Author Report Posted October 8, 2012 (edited) ---------- Ok was able to get into Photobucket and upload some more pictures. Thanks for the kind words Valgars! Edited May 16, 2022 by gmrhodes13 link removed no longer working Quote
Locitus[Admin] Posted October 8, 2012 Report Posted October 8, 2012 Very good considering that you are a little bit larger than what it's intended for. Try to adjust your strapping to tighten the chest/ab overlap so that the chest can't move up on top of the ab. You always want those to overlap, even if only by 1 cm. And don't forget to paint all screws and rivets white (except the crotch rivet and butt plate snaps). Quote
rhapsodyred99[TK] Posted October 8, 2012 Author Report Posted October 8, 2012 Thanks Mathias, Ill tighten the chest elastic, as I see what you mean, hopefully that will take care of the riding up issue. I wanted to get all the fittings done prior to painting the screws/rivets because I figured in taking the armor on and off repeatedly I would just knock the paint off, but ill paint them prior to official submission to the 501st. I also notice that the butt plate seems flattened in the back picture. it is not contoured to my body. you can actually see the edge of it sticking out on the front picture I am thinking of forming a thin piece of metal to the contour needed and gluing it to the inside to make it more form fitting. What do you think? I think it may have flattened out from the months I have left it on the floor with the front weighing down on it. I am afraid to take a heat gun to it to try and reform it... Quote
Locitus[Admin] Posted October 8, 2012 Report Posted October 8, 2012 Ah, yes. Wait until you're happy with the fitting and then paint. The RS butt plate is really flat. It's a "flaw" from the armour it was moulded from being stored the way it was for 35 years and the mould taken from it not getting adjusted to compensate for it. But yeah, warm water or other heat if done with care could help in turning it back to its intended shape. Quote
rhapsodyred99[TK] Posted October 14, 2012 Author Report Posted October 14, 2012 (edited) Ok I have made a few changes, namely tightening up the chest and ab elastic, and adding a curve to the butt plate. I also added an ESB holster. Sharp eyes will notice a hyperfirm ANH blaster in it, but a RS Pugman Cast will be there soon. I am also getting parts from Tango'd Fett to add to my Doopy to make it a promo blaster I may pop in there instead. Another note, the helmet decals are from Tropperbay, and are too small for the RS lid. RS is still perfecting their ESB decals and have promised me a set as soon as they have done so. I also used non traditional gloss black paint on the frown and vocoder, because with the shiny PVC I thought it looked better. I also plan to stitch the handguards down to some silk liners and to paint the rivets. I weither need to add some frown mesh or wear a balaclava since you can see my face. I have not decided yet which. Anyway How Did I do? And now for some Obligatory action shots.... ----------- Edited May 16, 2022 by gmrhodes13 link removed no longer working Quote
captsafe66[Admin] Posted October 14, 2012 Report Posted October 14, 2012 Looks Great!! You may try putting some foam at the top, front of your shim to keep the sniper plate away from the thigh, it also will help to keep them from rotating while trooping. Quote
rhapsodyred99[TK] Posted October 15, 2012 Author Report Posted October 15, 2012 Ill give the foam a try as I did notice the sniper plate kept wanting to go under the thigh. Quote
rhapsodyred99[TK] Posted October 18, 2012 Author Report Posted October 18, 2012 (edited) Well I sewed the hand guards onto some silk glove liners last night and finished painting the screws and rivets. I made the sewing of the hand guards alot harder than it actually was. Once it dawned on me to turn them inside out and put the handguard inside the glove to hold its shape it was super easy. Turn the glove back rightside out and you are done. ---------- Edited May 16, 2022 by gmrhodes13 link removed no longer working Quote
Clamps[TK] Posted October 18, 2012 Report Posted October 18, 2012 Have you applied for your 501st membership? Question: are those hooks or velcro holding the shins closed? Seeing an ESB has me excited as I am almost done with my ESB mods to m ANH kit so I can submit to my GML. Quote
rhapsodyred99[TK] Posted October 18, 2012 Author Report Posted October 18, 2012 In the process now. I wanted to get my gloves stitched up and the rivets and screws painted. Also decided to finish out my Doopy into an ESB build, instead of using the ANH Hyperfirm. I know for basic membership that stuff was not important but I figured I waited this long ya know? Hopefully by this weekend I will have the gun finished and can officially take shots for approval. Those are hooks holding the shins closed. I tried to go 100% original strapping for this RS build, the only non original bit is the frown mesh I put in because I hate balacavas. I also did the green film for the eyes in ANH style (attached to the ears instead of using the tire repair goop sticks to hold them in like ESB) but thats on the inside of the lid so not noticeable. Quote
Clamps[TK] Posted October 18, 2012 Report Posted October 18, 2012 Hooks are nice, I have not seen many photos from that angle, so I was not sure if I was seeing it correctly. in my ANH bucket I attached lens to ear screws, wish I hadn't as those were such short screws it was a PITA. for my ESB bucket I used Black Gaffe tape. not sure if I will like that or not, but we'll see. Good luck with your approval! You'll be official in no time sir! Quote
rhapsodyred99[TK] Posted October 18, 2012 Author Report Posted October 18, 2012 (edited) I almost bought some of this that the Queen of Handguards, Sonnenchein AKA Karin pointed out in another thread here: http://www.whitearmo...__fromsearch__1 which would have made my lid look like this: But instead mine looks similar to this: I had originally planned on this being an ANH build, but the shiney PVC just reminds me more of cloud city than the banged up ANH armor, but at that point I had already assembled the lid. Just don't tell her I put in frown mesh! She is DEATH on that! Edited October 18, 2012 by rhapsodyred99 Quote
Locitus[Admin] Posted October 18, 2012 Report Posted October 18, 2012 But the black sticky stuff is correct for ESB. Isn't that what you're making? Quote
rhapsodyred99[TK] Posted October 18, 2012 Author Report Posted October 18, 2012 Sigh, You are right of course and why go 99% and leave the eyes ANH... Ill stop and grab some tomorrow, not like its a hard change Quote
Locitus[Admin] Posted October 18, 2012 Report Posted October 18, 2012 I'm sure both methods were used, but at least we know this method was used for certain. Quote
rhapsodyred99[TK] Posted October 19, 2012 Author Report Posted October 19, 2012 (edited) Well I stopped at the Wally world and picked up theese this morning: I know they are not 100% the same thing, but they are very close (and having used them to repair a tire before I can attest to thier ability to stick to plastic, pulling them off the plastic backing is a chore). I noticed GMK says they have been in business since 2006 so I am guessing they are not the 100% original either. Ill pop these in tonight and see what I think. Oh and a picture of the frown mesh I put in (I know I know not original but i REALLY hate balaclavas) and the shin hooks if someone is interested: Edited October 19, 2012 by rhapsodyred99 Quote
rhapsodyred99[TK] Posted October 20, 2012 Author Report Posted October 20, 2012 (edited) Ok so I have done all I plan on doing to the armor for right now. I still need to work out if I want to go EIB and Centurion since I do not think I have the skill needed to pull off shims well. Here are the final suit up pictures as I submited them to my GML: Armor: RS PropMasters Belt: RS Propmasters (clothears costumes) Neckseal: Trooperbay Holster: Neokerberos Blaster: Doopydoos (M19 scope by TKleper) Boots: TK Boots Undersuit: Eastbay Height: 6'1" Weight: 230 lbs Guy in the last shot looks thrilled doesn't he? Edited October 20, 2012 by rhapsodyred99 Quote
rhapsodyred99[TK] Posted October 26, 2012 Author Report Posted October 26, 2012 (edited) Just wanted to post a few picks of my Doopys, with scope rail made by me, and Excellent M-19 Scope cast by TK-Leper The great thing about his scope beyond the sharpness of it, is the fact it comes brass colored so it was super easy to do a light coat of paint over it, which made it look like the paint was being worn down, and then scrape off the paint in stressed areas revealing the brass color making it very realistic to my eyes. My goal with this doopy build was to make a trooping blaster that did not require a ton of time to assemble and detail, as when something inevitably happened to it, I would be exponentially more irritated the more time I spent. With that goal in mind I did no modifications to the doopy to make it more realistic other than dremel out the lumps of resin in the front and put real bolts there. I also elected to not put the cocking handle or a spring there partly because It helps with the "Not A Real Fire Arm Officer" look and also because I could totally see that small resin handle snapping off easily. I tried to only do a really light weathering pattern, and yes I know a real Sterling is not silver steel underneath, but I wanted the weathering to be noticeable, and the dark metal of a real sterling is actually pretty subtle, so I used flat steel as a weathering color rather than the more appropriate gun metal color. Anyhoo here she be I call her "Betsy": Oh and edit: I got the scope targeting cross hairs from here: http://www.whitearmo...printout-image/ Thanks BillHag Edited October 26, 2012 by rhapsodyred99 Quote
rhapsodyred99[TK] Posted October 29, 2012 Author Report Posted October 29, 2012 (edited) Well the suit is approved, now its just on to waiting for the Email with my number! Edit: TK11038 Baby! Edited October 29, 2012 by rhapsodyred99 Quote
rhapsodyred99[TK] Posted July 11, 2013 Author Report Posted July 11, 2013 Just thought I would stop by and mention this guy went on to become this (no NOT the Tusken! ) As this was my first build, I had made some mistakes, that thankfully the use of E6000 on the suit allowed me to correct as I got more experience, and getting dirty helped the rest. I use my TM suit (with an RS Lid) as my ESB now. BEFORE: AFTER Looks better no? Quote

Recommended Posts
Join the conversation
You can post now and register later. If you have an account, sign in now to post with your account.