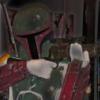
TK-6202 Posted July 23, 2012 Report Share Posted July 23, 2012 HI guys! Me and a friend ordered 2 ATA helmet kits a while ago, and we've just started to build them. Since this is my first time building an ATA helmet, I think it was best to be very cairful with the trimming, best to take little to less then a little to much. Anyway, we making test fits to see how much to trim, and now I've just found out how big gap it is between the back and front part (where the ears are suposed to be). I'm not sure if it's allways like this or if I've trimmed to much, or if it all will come together when I glue/rivets them together? Ofc I will trim more on most of the helmet, but before I will I just had to ask why this it is looking as it does??? Quote Link to comment Share on other sites More sharing options...
Locitus[Admin] Posted July 23, 2012 Report Share Posted July 23, 2012 That's normal. It'll fix itself once you put the ears on. Quote Link to comment Share on other sites More sharing options...
matt black Posted July 23, 2012 Report Share Posted July 23, 2012 You do indeed have more to trim off from the cap and back. Give this section a good read as there are many ATA build threads with lots of good pictures http://www.whitearmor.net/forum/index.php?showforum=6 Also, look at the gallery in the top tab bar for some good screen used helmet pictures. Quote Link to comment Share on other sites More sharing options...
gazmosis[501st] Posted July 23, 2012 Report Share Posted July 23, 2012 A good referrence point on how to align the cap to the face is by using the temple trapezoids as a location marker. The front of the trapezoids should match up with the rear of the eye opening. Also I, as many others will, recommend placing your brow trim in place. This will assure you have a good fit to the faceplate and this will help you to determine how much/little reveal you want on your brow line above the eyes. Also, drill your mounting holes in the cap/back first. once you are aligned on one side, mark through the cap hole onto the faceplate. Drill that out and fasten it temporarilly with a screw/nut. This will allow you to position the other side correctly. You may need to actually pull the cap over to get the gap between the brow trim and faceplate completely removed. Once you are positioned correctly and your brow sits even across the eyeline, mark your hole location. Drill that out and use another screw/nut combo to temporarilly fasten the cap and face together. Now you can check that you are TOTALLY HAPPY with the cap location on the face. If not, you can make small adjustments to the holes in the face or cap until you get things PERFECT. Once things are PERFECT, then rivet your cap and face together permanantly. 1 Quote Link to comment Share on other sites More sharing options...

Recommended Posts
Join the conversation
You can post now and register later. If you have an account, sign in now to post with your account.