
Mr V
-
Posts
77 -
Joined
-
Last visited
Content Type
Profiles
Forums
Gallery
Articles
Everything posted by Mr V
-
Excellent! thank you good sir. I did a search on my forum name but nothing came up so assumed it had all been filed away. Cheers!
-
Hi, i have been MIA for a while. My build threads are missing since the sites upgrade. Any ideas what has occurred here? Thanks.
-
Thanks Troopers! I appreciate you noticing the extra detail.
-
Completed! I did some serious weathering with some Mig pigments and Gameswork shop paint being "Boltgun Metal". An undercoat of brass paint for the scope enabled me to sand the top coat black back to reveal the brass underneath. E11E11E11
-
I never notice that! Yes, the key is to cradle the helmet so your hand can paint comfortably.
-
Scope before and after-now time to paint and weather.
-
Got the counter attached and the scope in place. I made some little metal contacts for the Counter. -Not sure if they are film accurate? All additional nuts, screws, and other "bits" now in place so ready for a coat of paint over the weekend. I made a basic stand with some aluminium rod and mirror perspex-except it lists to the side due the all the "extras" being located on one side but should be an easy fix.
-
Hengstler Counter time. I wanted a dial on my counter so trashed a $2 skipping rope for the dial and found another to get the six rows of digits.Got handy with the resin and reverse molded a box to match the original, linked my number dials with a small pin, sanded some perspex for the cover and cut a top that will house everthing. Completed. The button does not work but the numbers will spin randomly.
-
Ring done. Did a reverse cast and destroyed a coat hanger for the cause.
-
Life keeps conflicting with my Star Wars obsession.Anyway. Power cylinders completed. Got some nice red cord from Spotlight that seemed to match old coated electrical wires. Fuses hot glued in and left some wire so that i can key this thing into the Magazine top.The basic mods are going a little OTT. Thought i would rebuild the sight. I need some plastic and found... a fork. Carved this into my sight fitting and got a small hex screw and a bolt thread for the sight. Cut some aluminium for the sight hood. Textured the top by giving it a sharp crack with a sledgehammer and file for the imprint.
-

Request your Centurion Certificate here:
Mr V replied to justjoseph63's topic in Request Centurion Status
Paul Vezgoff 42145 Centurion A4 Tony http://www.whitearmor.net/eib/certificates/42145-centurion.png -
TK-42145 Requesting (ANH Stunt) Centurion Status (RS) [380]
Mr V replied to Mr V's topic in Request Centurion Status
Thanks Very much!! Im super proud and excited. Next troop i will hold my head high! Yeah hah -
End caps are now on the cylinders. I got some red cord and some small resisters for the detailing at the back. Filling. sanding, filling. Dremel time for the flashing. I made the rail from some steel rail (Bunnings) 2.5mm thick and 20 mm wide. With the angle grinder, using a cutting disk, i scored along the front bend to give a nice sharp bend.
-
R & D, You can find him on FB. Based in Australia. Even with postage, with the exchange rate it might be a good deal for you?
-
This will be a pretty short build thread because of the most awesome build threads already out there. I will be doing some basic mods to my R & D resin blaster. For those wanting the bible of blaster builds check out this reference guide. Part authored by one of our very own Garrison Troopers "Sith Lord".https://www.whitearmor.net/forum/topic/32111-fisd-e-11-blaster-reference/The R & D blaster below. I have already removed the top rail that the scope will sit on. The cast has good detail and is pretty light compared to a droopy version.I decided to start with the mysterious power cylinders. Its about the only part from the E11 that cannot be decisively identified. Last guess is they are from old WW2 radars.https://www.whitearmor.net/forum/topic/17306-e-11-power-cylinders-research-thread-renamed-from-3-central-fuses/Sheet aluminium- nice and soft to work with.Three central capacitors from tube aluminium and melted rubber and caps. The final bracket bent into shape.Slots were cut into the tubes for the wings to insert into for additional strength. Tubes were then hot glued with a brass wing detail added. For the end caps i heated some styrene and pressed it over the tube.
-
TK-42145 Requesting (ANH Stunt) Centurion Status (RS) [380]
Mr V replied to Mr V's topic in Request Centurion Status
Good point! Here they are; -
Hello Tony and Andrew, Please consider my application for Centurion Status. Basic Information Name: Paul Vezgoff FISD forum name: Mr V 501st Member Page: http://www.501st.com/members/displaymemberdetails.php?userID=22255 501st ID: TK-42145 Garrison: Southern Cross Garrison (Australia) Build album: https://www.flickr.com/gp/152422872@N02/79SN7q EIB link: Mandatory Information Armor Maker: RS Propmasters (Self build) Belt Maker: Canvas Belt (Self build) Blaster Type: E11 3D print Hand guards: Latex (Self cast)
-
Request your EIB Certificate here:
Mr V replied to justjoseph63's topic in Request Expert Infantry Status
Paul Vezgoff TK-42145 EIB Letter Tony http://www.whitearmor.net/eib/certificates/42145-eib.png -
Fantastic news! My RS kit is a dream come true. Thanks to these detailed forums and the contributors that post build threads, it makes life a whole lot easier.
-
Decided to update my images. Took some beef of my biceps and they feel much better. Made a shorter elastic between forearm and bicep. I tried to adjust my shoulders as best as possible but as mentioned earlier i have crooked shoulders.
-
Mworm1974 Requesting Pre Approval Review (RS ANH)
Mr V replied to Mworm1974's topic in Request TK Pre-Approval
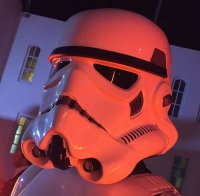
Looks great. Well done on the hand painting of the helmet. -
Thanks for the feedback. I have one leg longer than the other which makes my shoulders crooked. I didn't want to cut the bridges at different lengths. Ill see what happens but i would rather not cut them.
-
Basic Information Name: Paul Vezgoff FISD forum name: Mr V 501st Member Page: http://www.501st.com/members/displaymemberdetails.php?userID=22255 501st ID: TK-42145 Garrison: Southern Cross Garrison Approval album: https://flic.kr/s/aHskyaRUiT Build album: https://www.flickr.com/gp/152422872@N02/79SN7q Mandatory Information Armor Maker: RS Propmasters (Self build) Helmet Maker: Canvas Belt (Self build) Blaster Type: E11 Hand guards: Latex (Self cast)
-
Completed suit! now for the EIB application..
-
TK-42145 requesting access. https://www.501st.com/members/displaymemberdetails.php?userID=22255 http://www.501scg.com/scg/member.php?action=profile&uid=883
