
Mr V
-
Posts
77 -
Joined
-
Last visited
Content Type
Profiles
Forums
Gallery
Articles
Everything posted by Mr V
-
Thanks Frank. Got it sorted now. Made my shin connectors today. Only a minor bleed due to the needle. [url=https://
-
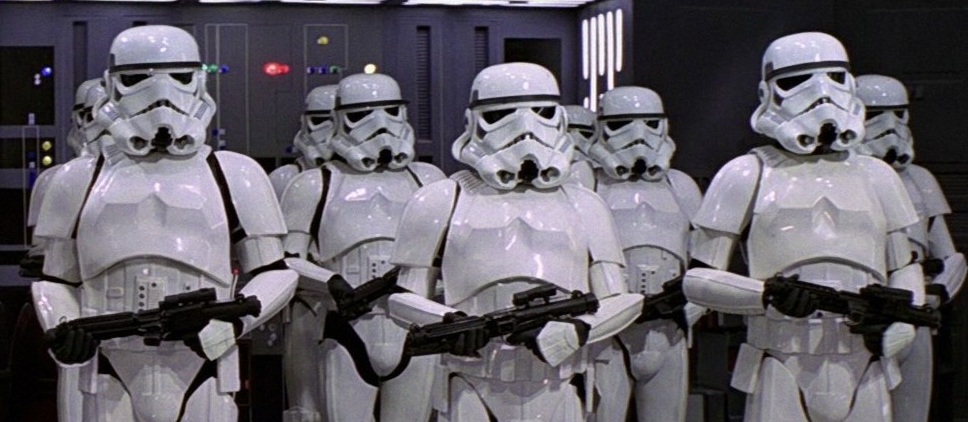
And the decision is.....frayed edge. i freeze framed the scene where the TK is facing Liea after being stunned. There is a good close up of the waist. It is not 100% in focus but it certainly looks frayed. Thanks for all responses.
-
Time zone difference is great! i go to bed posting a question and all the answers are there in the morning! thanks guys. I think i will give the frayed edge a miss. This is my design drawing. The canvas will be rolled 3-4 times and a sheet of plastic inserted for the holster to attached onto (reduce sag). TK belt construction
-
Hi all, i am just about to make my canvas belt but need to finalise some details. The Rs original suit belt appears to have a frayed edge, top and bottom, I had asumed this was from age. Some of the newer troops out there have nice new belts, with a slightly frayed edge. So.... do i fray the edge? Also the stitch type seems to be just a straight stitch along the top and bottom? any feed back welcomed.
-
Quick design sketch for the belt construction. I also scaled up the original RS belt on my ipad and matched it as best as i could with some canvas. The weave seems pretty close. TK belt construction Canvas belt original
-
You are correct ^^
-
Hi Chris, No answer.. but from looking at the Centurion photos, image 3 is correct. I just need to trim the Ab section. Completed the drop boxes today, whilst waiting for more magnets to arrive. Drop box construction
-
Scoring and snapping the ABS sheets for the cover strips. Iv got to say RS have provided plenty of extra ABS for the kit. I tried experimenting with gluing the cover strips first and the back strips as well. No difference really. I think if i did them both at the same time quality would suffer. ie glue everywhere. The larger image shows the asymetrical nature of the hand sculpted world of ANH. Love it.
-
-
Thanks. They do look good. Its the main reason why i have to move on from my FX kit. Shouting out for help here. So do i cut where the blue arrow is (Ab section) or do i cut the Kidney section (red arrow). Cutting in thees places i lose my return edges....Or do i go with number 3 as most of this area is covered by the belt. The good news is i dont need shims on the sides so pretty happy about that.
-
Admin: Please delete this thread as i have re-posted in the correct section.
-
Actually the washing was completed. Thats what gave me the peg idea
-
Good news. Thermal detonator today. BOOM. Straight forward jobs today. Cover strips attached to the biceps and made up some snaps. I have used marine snaps as they are very good quality.
-
I will not be showing every edge i trim and not sure where to start so have started with some of the smaller pieces. I love my wonky RS kit. I knew what to expect and it is more important to me to have something based on an original suit than a sanitized version (but i do like those also, just had to make a choice). In terms of strapping i will be using snaps for durability. I am not convinced that brackets are a good long term trooping option. Ab buttons were pretty straight forward. Gave the corners a bit of a sand mainly because everything else on the kit has rounded corners or edges. From there i am contemplating the shoulder bells. I think these measurements are correct. But i will not be cutting these until the torso is complete as i want minimal black showing between the shoulder and chest.
-
From building my FX kit i learnt the following points; 1) Refer to forum. 2) Measure twice cut once 3) Dont use a strong glue that will melt your ABS. 4) Refer to forum. I always start a project by making up some reference sheets i can easily carry around. Sheet 3 will be my helmet sheet (TBC).
-
Straight forward jobs today. Cover strips attached to the biceps and made up some snaps. I have used marine snaps as they are very good quality. Untitled
-
Good news. Thermal detonator today. BOOM. Untitled
-
Yes i know that is an original but it is only one of 50 that were hand cut and assembled. The first image is from a Hero suit. The images you show here there is no consistent width, anywhere. Anyway if the image is in the CRL (and is listed as a completed CRL) then i would hope it will not affect my application??
-
I would have to argue based on screen caps from the film and our own CRL that the border is next to nothing? TK_anh_stunt_ab
-
I will not be showing every edge i trim and not sure where to start so have started with some of the smaller pieces. I love my wonky RS kit. I knew what to expect and it is more important to me to have something based on an original suit than a sanitized version (but i do like those also, just had to make a choice). In terms of strapping i will be using snaps for durability. I am not convinced that brackets are a good long term trooping option. Ab buttons were pretty straight forward. Gave the corners a bit of a sand mainly because everything else on the kit has rounded corners or edges. Ab buttons by From there i am contemplating the shoulder bells. I think these measurements are correct. But i will not be cutting these until the torso is complete as i want minimal black showing between the shoulder and chest. IMG_5227 by
-
From building my FX kit i learnt the following points; 1) Refer to forum. 2) Measure twice cut once 3) Dont use a strong glue that will melt your ABS. 4) Refer to forum. I always start a project by making up some reference sheets i can easily carry around. Sheet 3 will be my helmet sheet (TBC).

