


Dracotrooper
-
Posts
766 -
Joined
-
Last visited
-
Days Won
5
Content Type
Profiles
Forums
Gallery
Articles
Media Demo
Posts posted by Dracotrooper
-
-
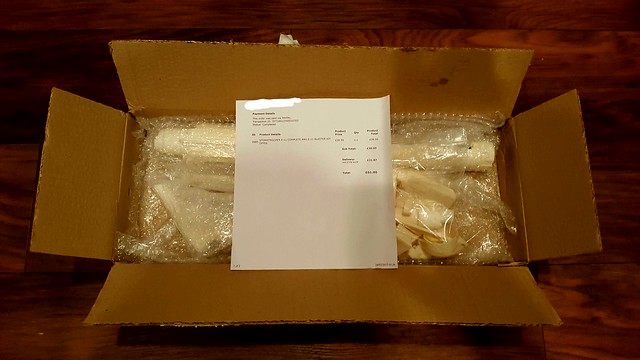
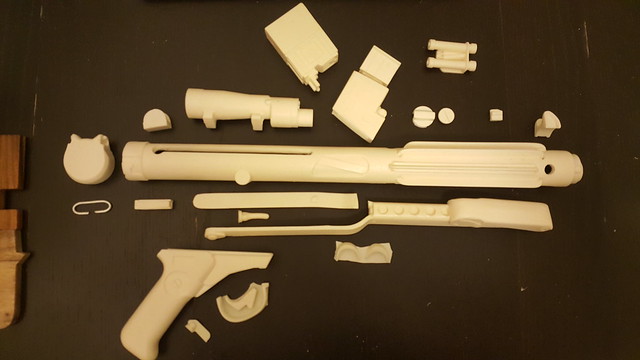
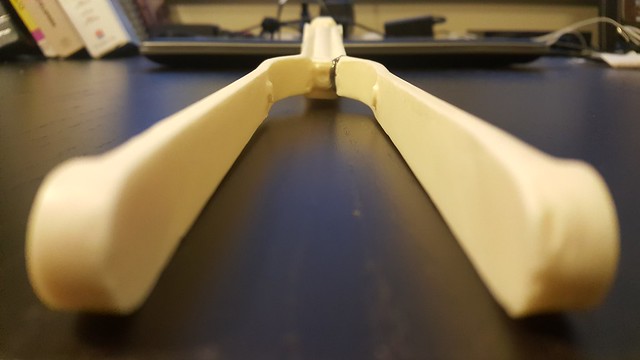
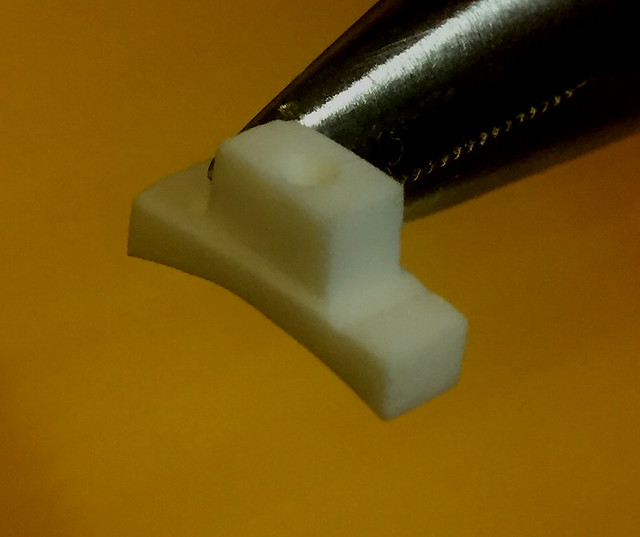
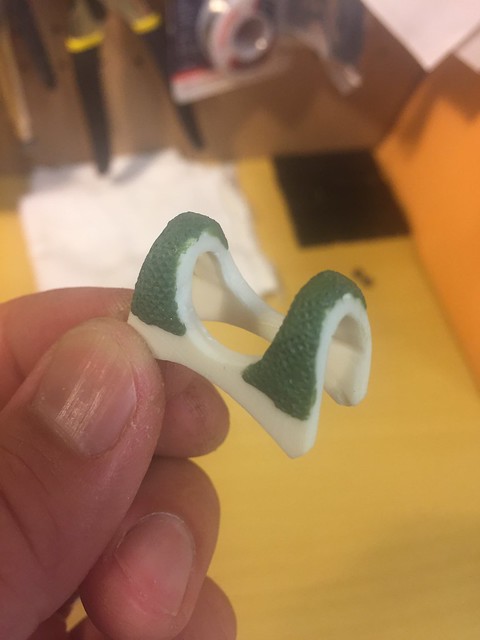
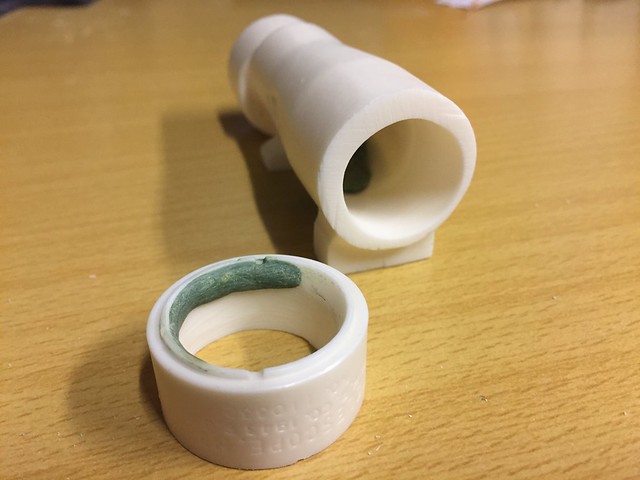
This picture says it all! My SBB in all it's glory! Wooh, it was a good month of waiting which isn't so bad at all considering it came from the UK. For my E-11 Blaster, I decided to go with a Doopydoos Full Resin Kit. All parts were delivered but the folding stock - wishbone had a piece broken off.
This is my first blaster build. First time also working with Resin. I am going for good level of screen accuracy, battle worn and as realistic as possible, especially as it pertains to the SMG part. I will be making a ANH version of the E-11.
To bring the blaster to the next level, I am complimenting the doopydoos kit with T-jay's Completion set, and Chris's 3D printed parts. Although originally looking to get Steve's magazine replica some time in the future as well, it will be a toss between it and Robert's magazine, as the latter is hollow and I may need room to put electronics. One huge addition I am absolutely to-the-moon-and-back about is installing Paul's fully wired and ready to install BlastFX - electronics that will bring the E-11 Blaster alive with lights and sound. This latter addition will be a dream come true; order made to arrive late October 2017. As for instructions, I am relying heavily on the E-11 Blaster Reference Manual. Thank you thank you for all the authors involved in this valuable document - gives us newbies a solid step forward.
My timeline for completing the blaster is likely a year or so into the future. I am just out to revel at every detail, enjoying small advances every day. With E-6000 as my CA of choice and allowing for green stuff to fix mistakes with that cure time of also, 24 hours, I need all the time in the world anyways.
Also, I'm not going on any particular order. Generally speaking, I will be putting the SMG portion together first then, move to the E-11 parts following, but not in every case necessarily. Also, I will seemingly leave component parts 'incomplete' and jump to another component part. So in short, my build will not be done in orderly fashion.
Well, without any further due, let's begin!!!
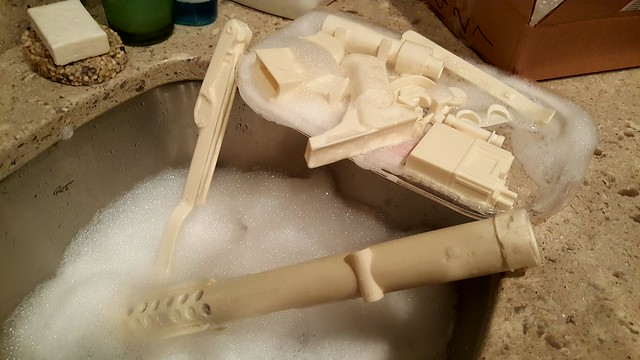
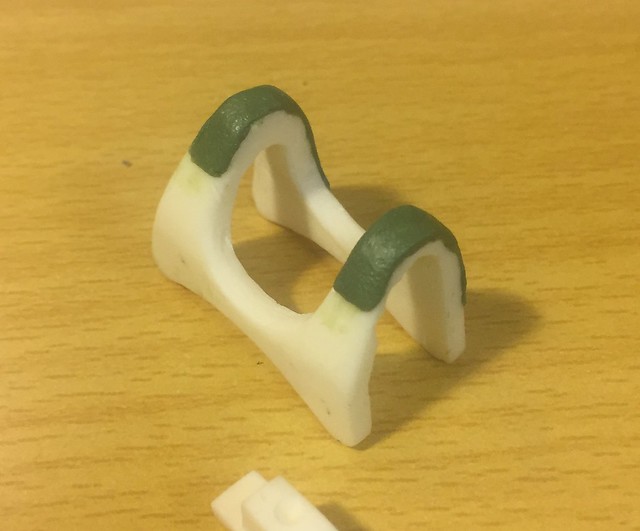
After a nice wash to get rid of fine resin dust and left over release agent chemicals, I proceeded to sand down the two ends of the broken part to get ready for applying the reinforced epoxy.

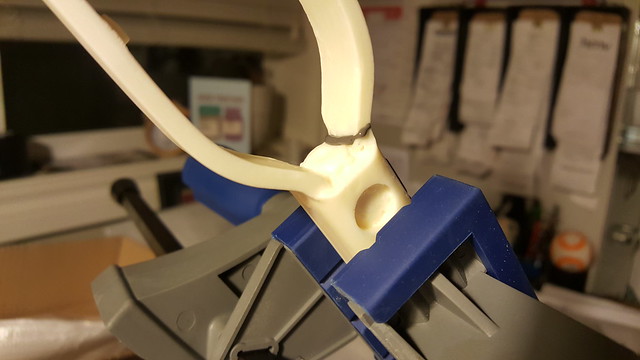
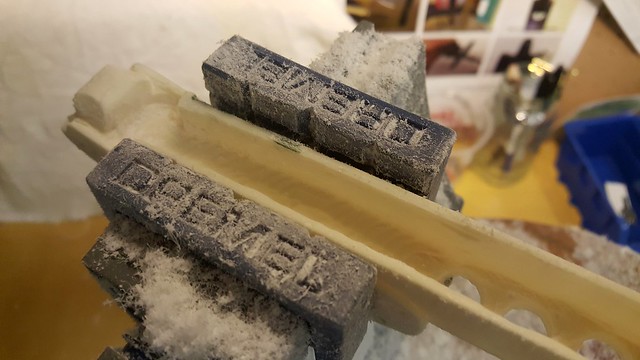
I then placed the entire folding stock / wishbone piece on my vise. I placed Popsicle sticks to fill the void between two forks of the wishbone and held them together with tape. After having the epoxy settle while the piece was on an angle sitting on my vise, I felt the epoxy was starting to harden, although really, it was just a short while, so I positioned the piece vertically, so to use gravity for better surface area contact between the resin parts and the epoxy.
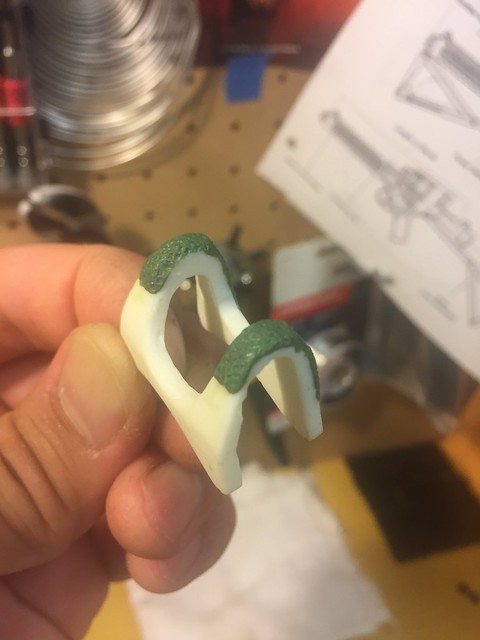
After cure, all is well! The forks sit evenly between themselves - Yes! Just need a little sanding down of the left over epoxy around the seams which I'll do later when I tackle that piece.
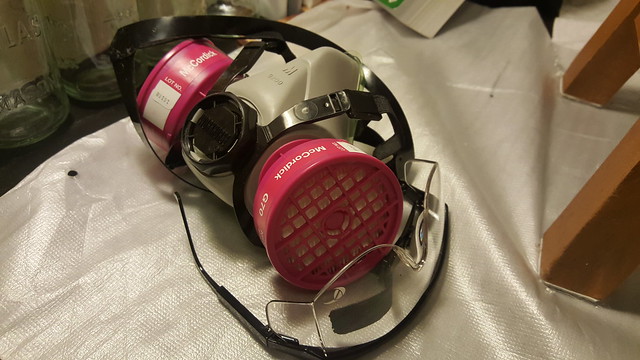
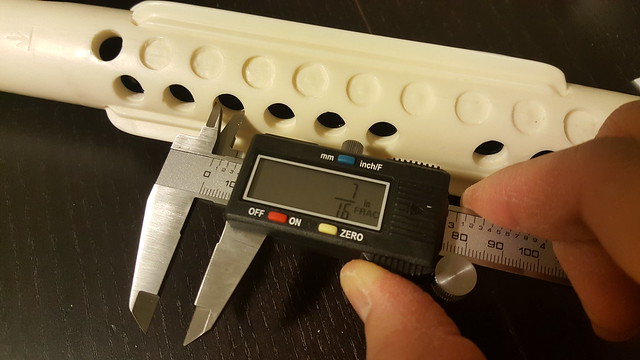
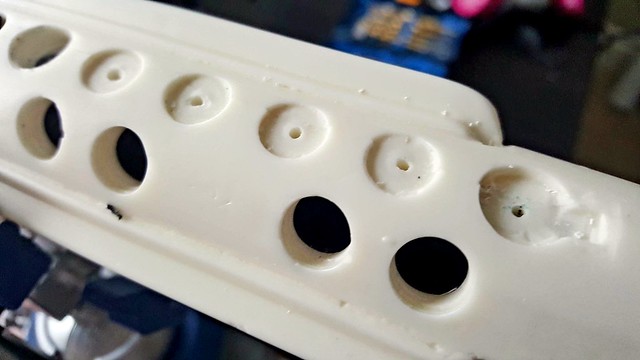
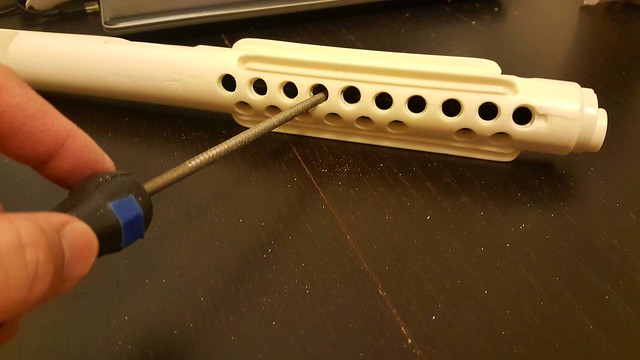
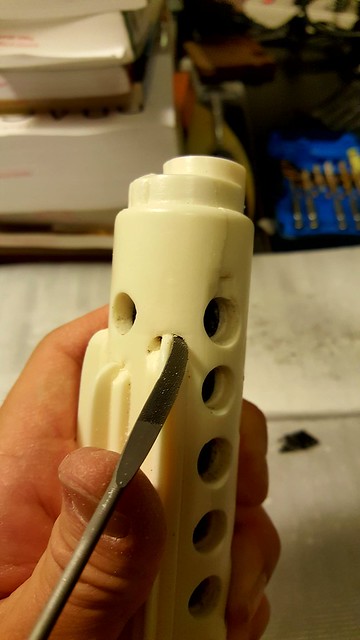
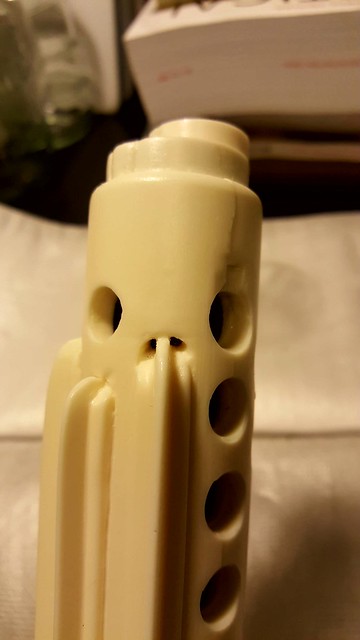
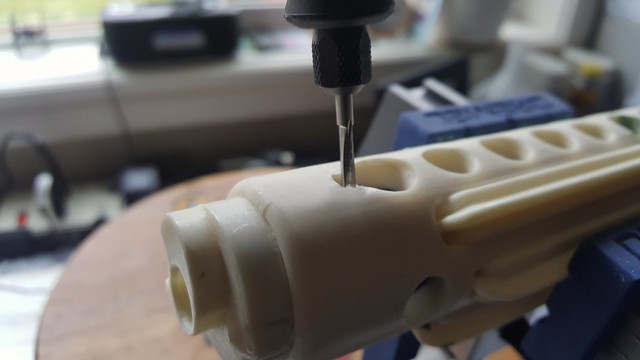
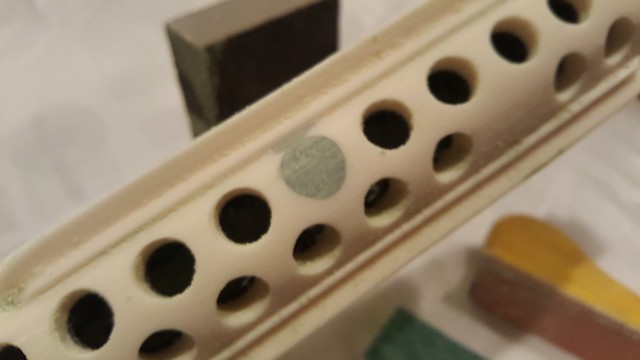
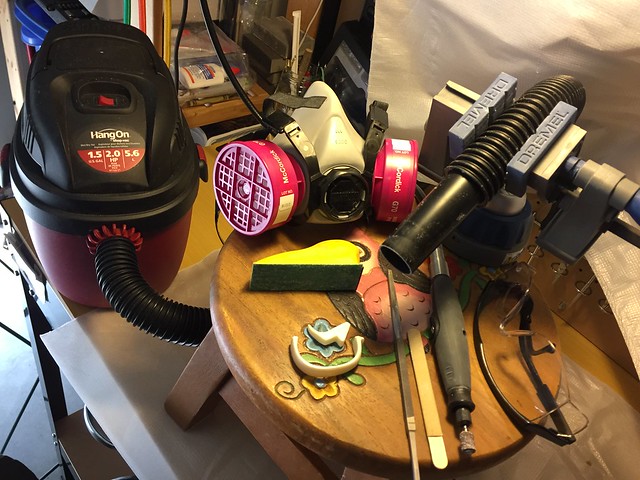
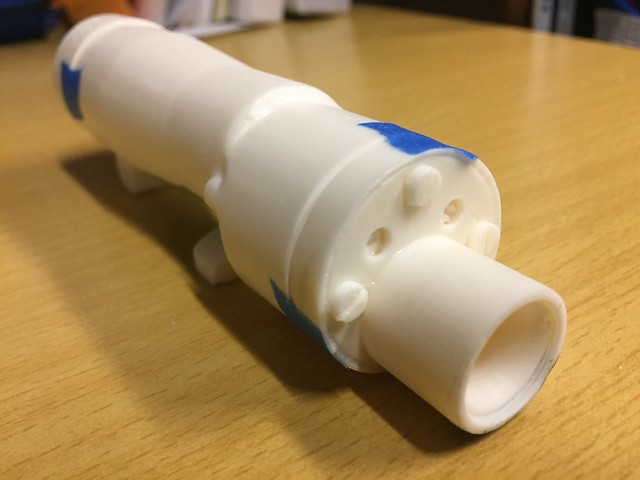
Here, I drill all holes in the Receiver tube. Before getting into details, want to emphasize how fine the resin gets when you're killing it. Highly recommend, as it was highly recommended to me, to use a proper respirator and safety glasses. Nothing beats safety and ensuring for good health!
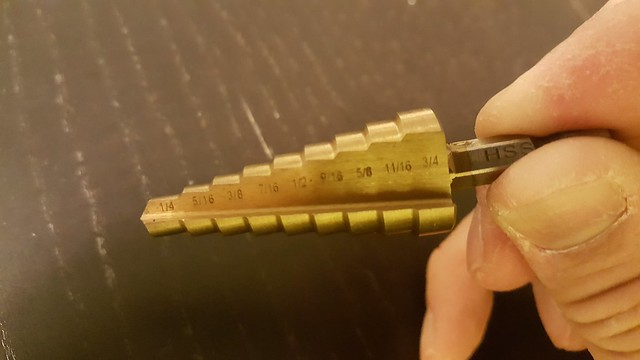
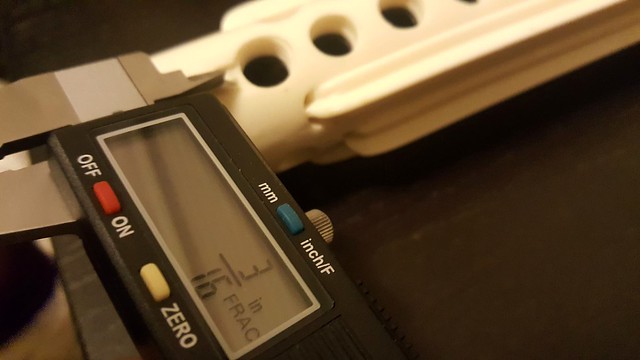
So I began by measuring out the existing holes made by Doopydoos using my precision measuring tool and came out with 7 / 16 " and was delighted to see a matching step on my step drill - bingo!
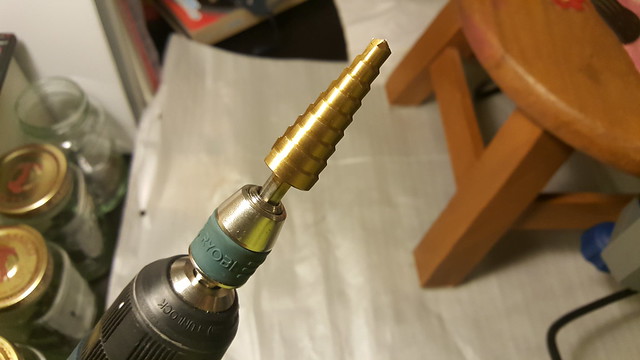
I then used my kids crayola crayon to mark the center of the to-be-cut holes and placed the receiver tube on my vise trying to keep it as horizontal as possible, trying to eliminate any tipping and rolling etc. As for the drilling, I tried to keep it as vertical as possible and let the drill do it's work.
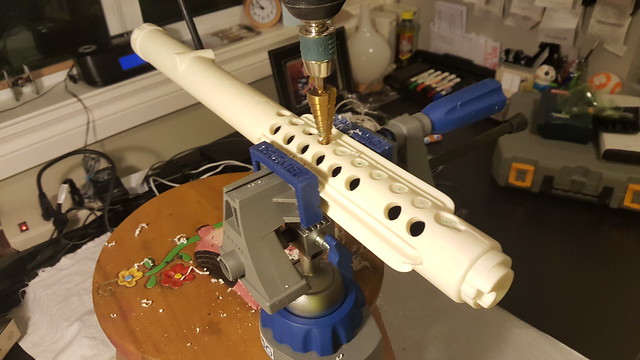
It took a while, especially when you hit the inner metal tube. I was afraid to go too far so, as you can see, I didn't go all the way to the 7 / 16 " mark, afraid I would over-rotate and make a large gaping hole! It was difficult to see how far I drilled too with all that swiggly resin coming about from the drill process.
I will need to go back with some fine precision to get it just right. Better to proceed with caution right?, then have nothing to work with and sorrow. I will need also to finish drilling the rest of the holes, which, hopefully, I will be brave enough to commit to the 7 / 16 " mark more firmly.
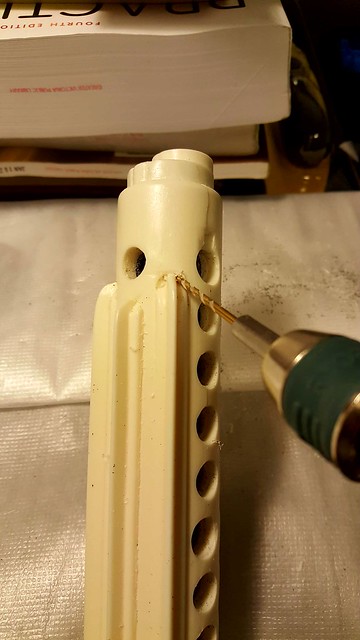
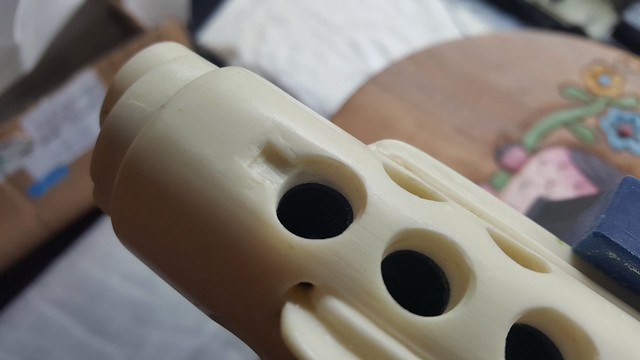
Here is finer detail showing the work more clearly. I am happy to have made it this far though as I try to be as systematic as possible, wanting to have a clean build with as few mishaps as possible.
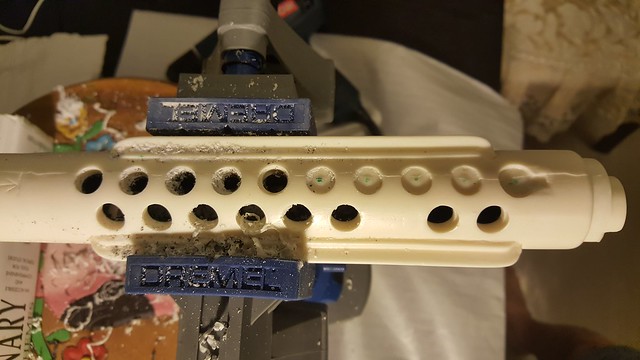
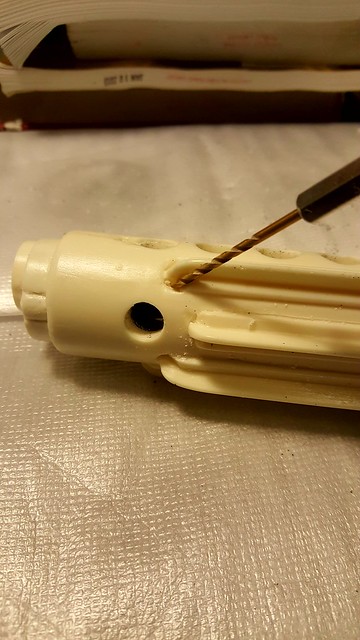
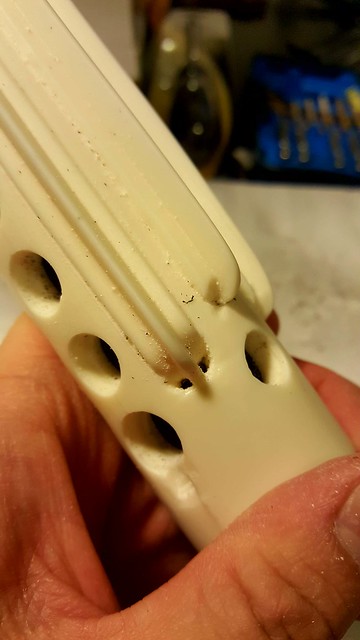
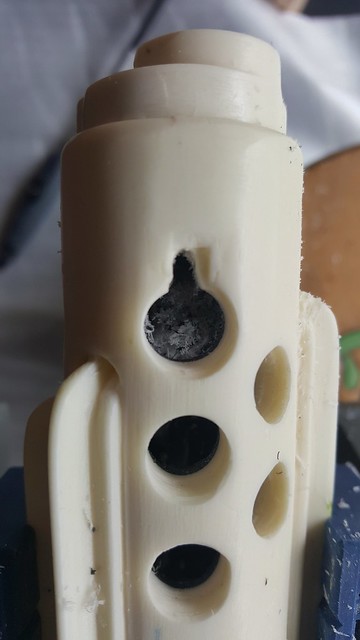
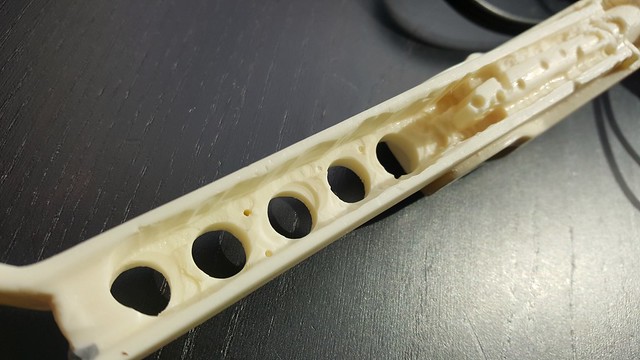
I proceed with finishing off drilling the remaining holes of the receiver tube. After marking the center of the holes, I created pilot holes and proceeded with using the step drill bit this time around. This just gave the step drill more grab and helped me have my holes more aligned. If you noticed, my first set of drilled holes had one that was pretty off!
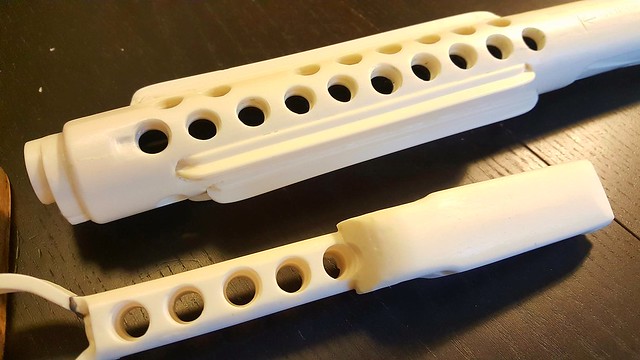
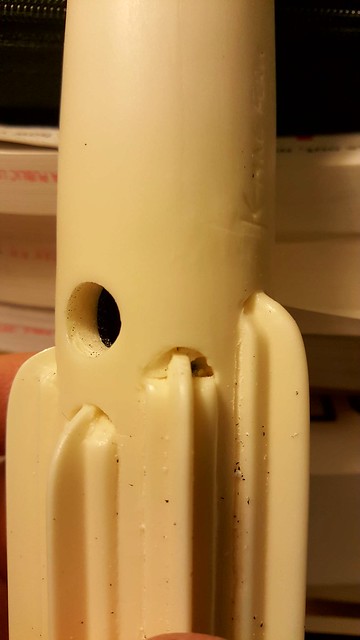
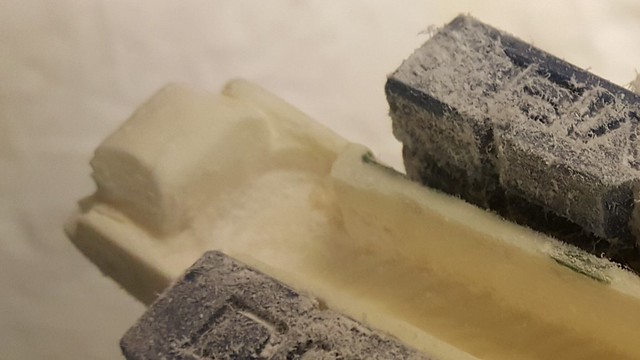
Here's the piece after drilling. As you can see, I still have the folding stock notch that still needs to be cut out. Oh and yeah, I went a little trigger happy with my drill and tackled the holes on the underbelly of my wishbone. I also will need to do some modeling with 'green stuff' to fill out the handle piece I mangled. This complicates things for this piece, especially about the extension tube which I destroyed, but I will get around to addressing these later.
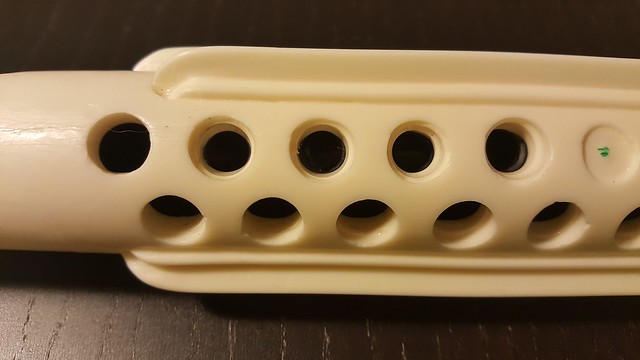
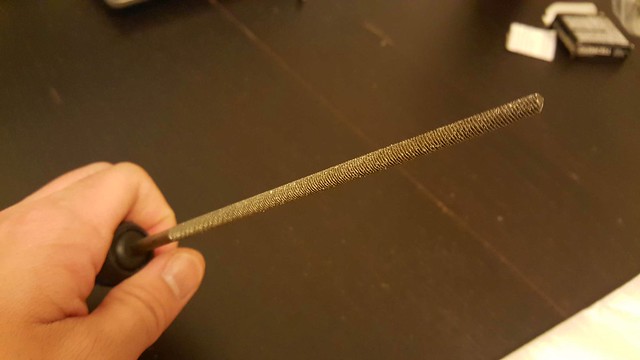
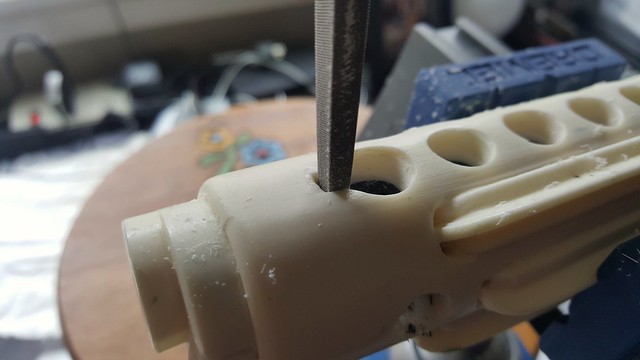
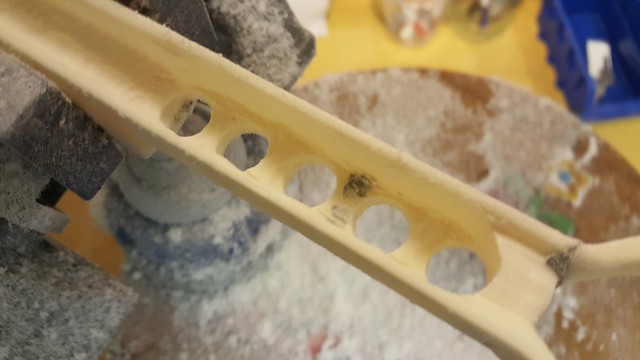
I picked up a 6 in. Round Bastard File (the weirdest of names) to help sand down the uneven inner parts of the drilled holes.
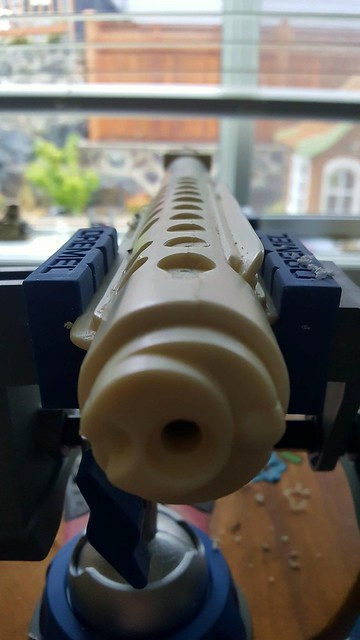
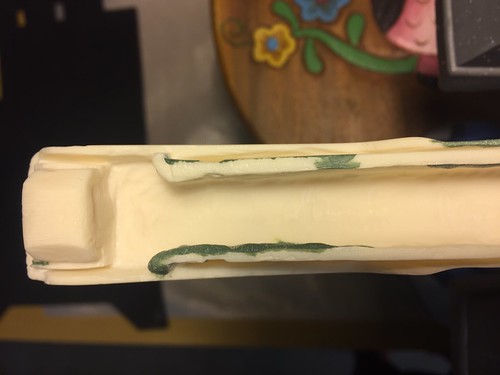
While sanding, I noticed that Doopydoos leaves allot of resin where the T-tracks meet / grab onto the receiver tube. The holes on either end of the tracks are filled with excess resin which obscures and takes away the kind of detail I want.
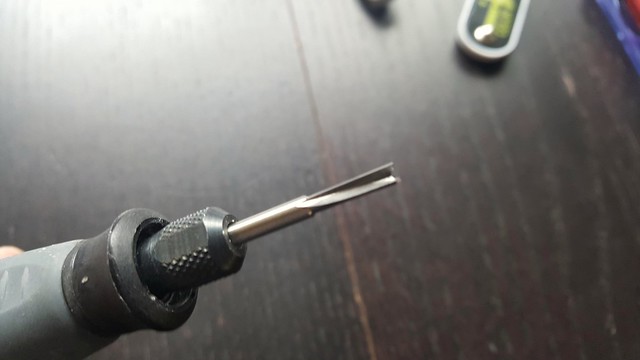
To open up the T-track grab holes, I first drilled...
... and then used, what's called a Riffler file to get at shaping out the hole. I learn something new everyday. It says they are made for woodworking, but it is working fine so far. They're pretty tiny tools that come in many sculpting forms. The one I chose is curved on the outside and cornered on the inside. I am hoping the curvature will help me shape the hole and the cornered part of the file to give me the angle I want for shaping the T-track part.
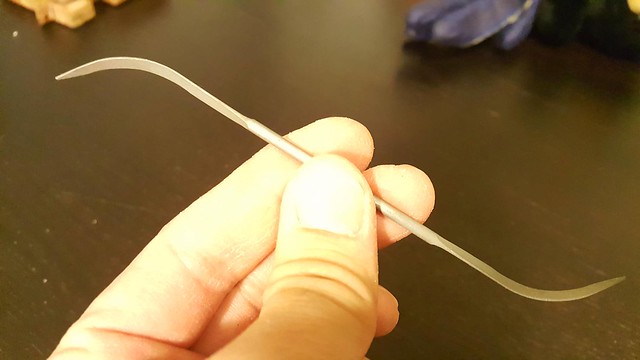
Here's the cornered part of the Riffler file tool I just mentioned.
Here's the tool getting at the T-track part...

...and now the hole curvature part.
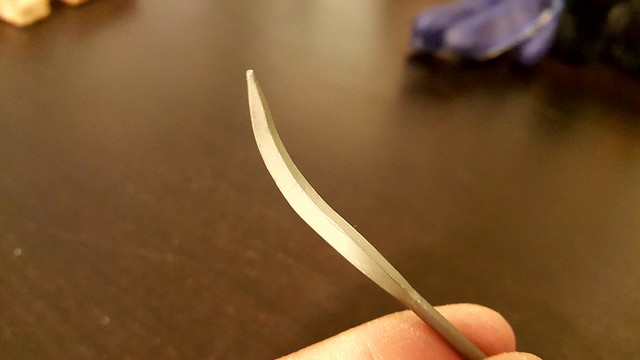
Here's the T-track grab hole the way I want it. I think the cut out / file will get cleaner as I work the other holes.
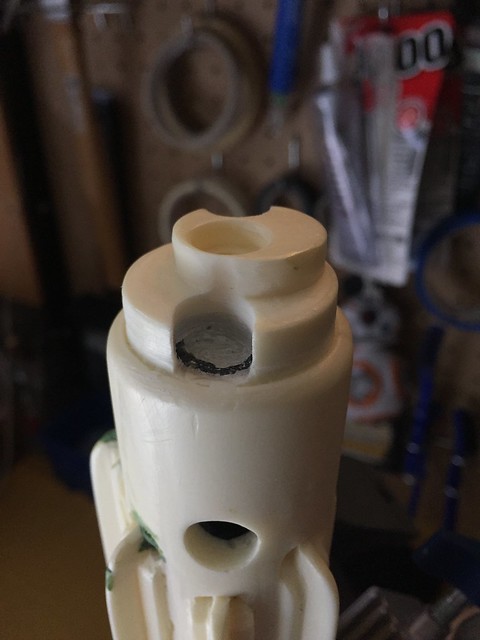
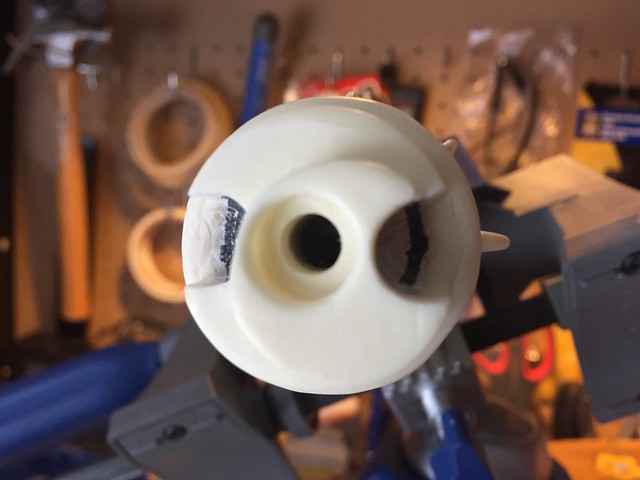
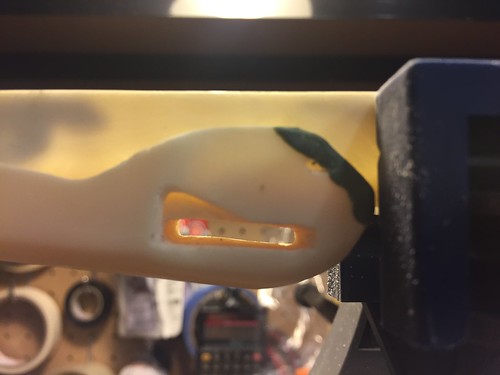
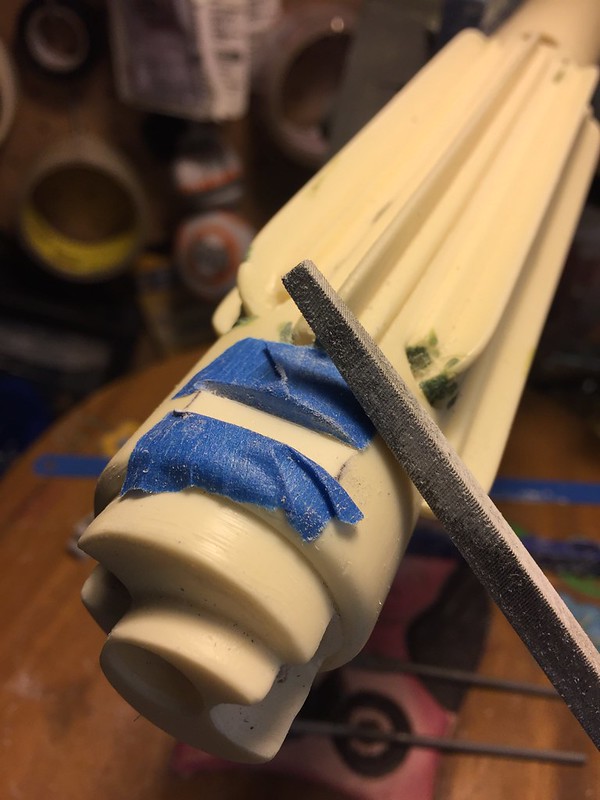
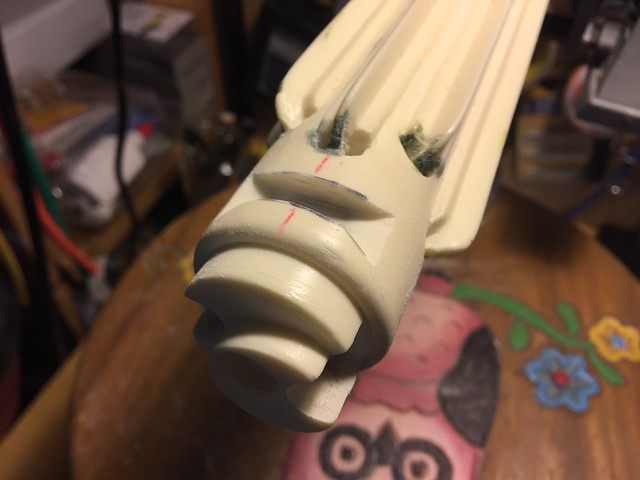
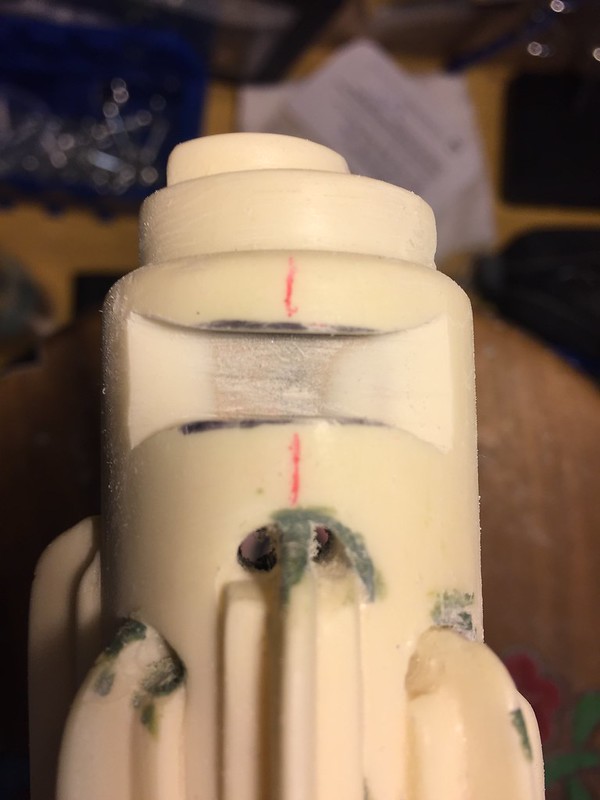
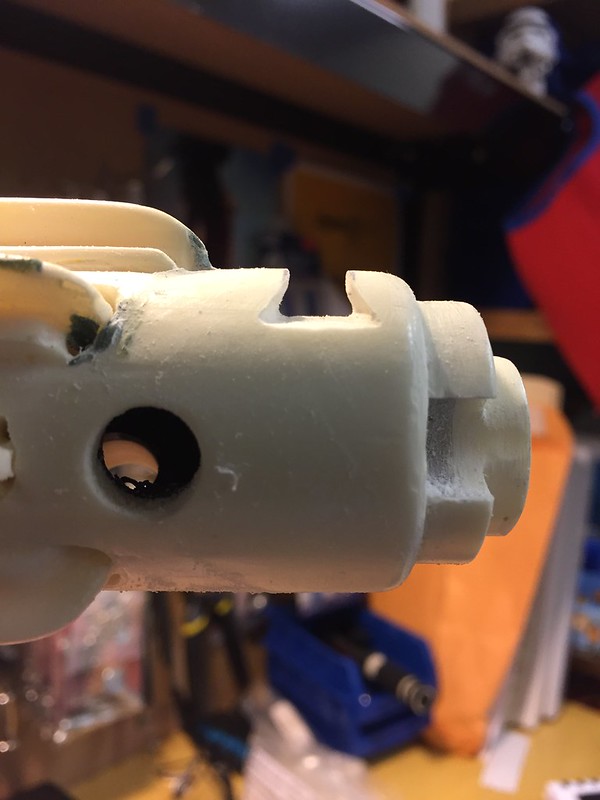
The vent hole notch is now cut out and I've managed to patch-up a vent hole that was quite off. Hollowing out the folding stock was quite a bit of work as you will see.
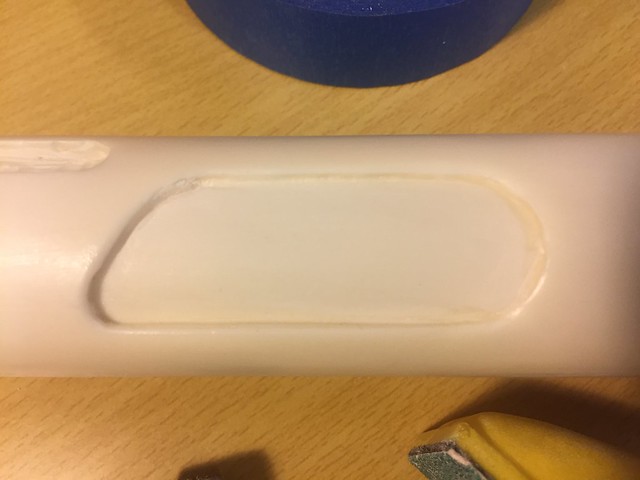
Receiver Vent Hole Notch
Precision measured the notch to be 3/16" and applied a 1/8" router bit to my Dremel 3000 and put it to task. Followed up by using a square file to get it clean.
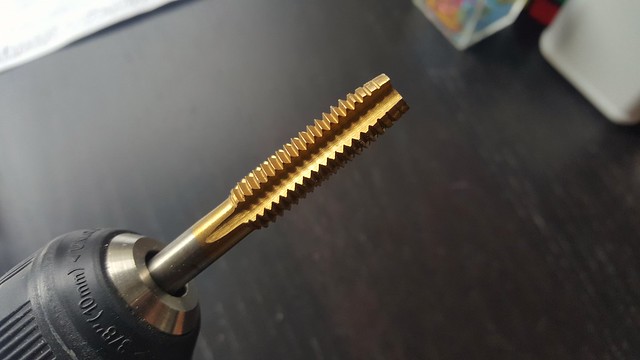
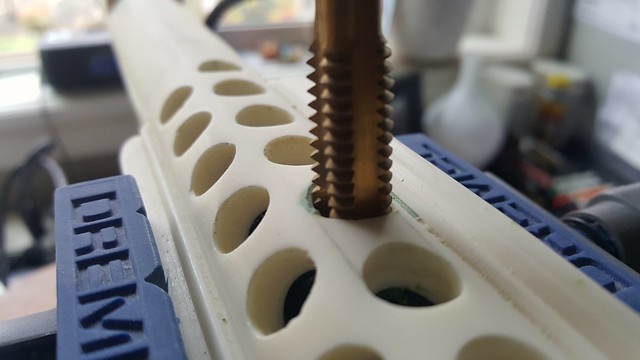
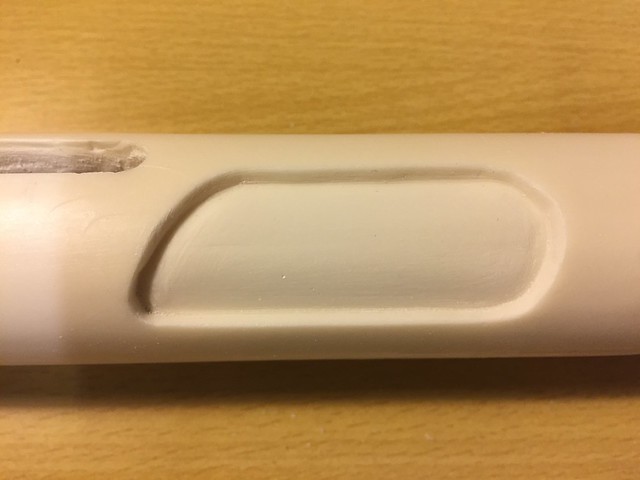
Redo of Vent Hole
Used a 7/16" thread-cutting tap to carve out a portion of the vent hole. Then proceeded to fill entire hole with green stuff. I let the green stuff harden over 10-12 hours to be safe. Then I drilled through once again and followed through with a sanding file. Now, the vent hole is the right size and in the right place, mostly - it's now to my liking.
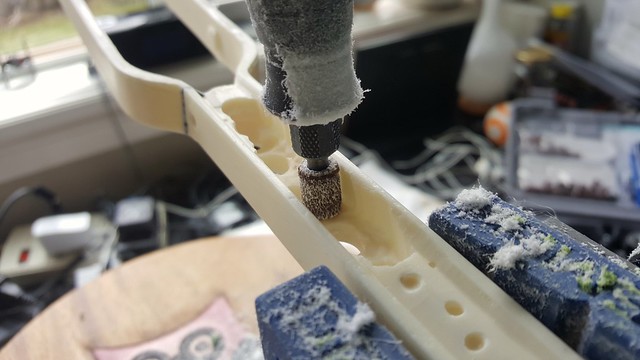
Hollow out Folding Stock
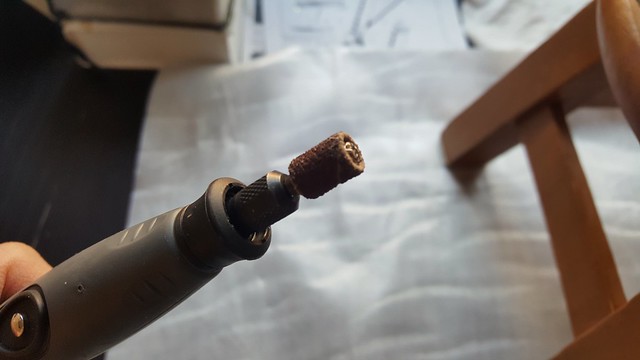
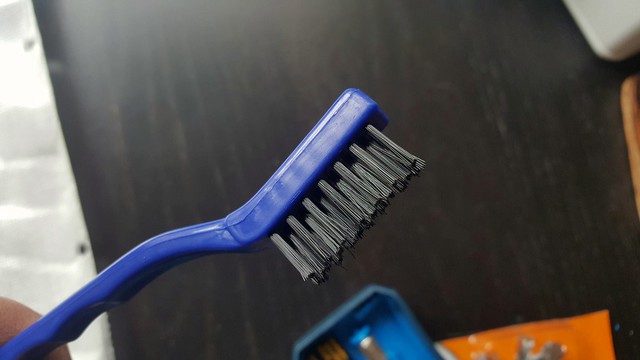
Used 1/4" 60 Grit Sanding Band (Dremel 430) at medium then high speeds, ranging from 30,000 to 35,000 RPMs. Before I knew it, resin dust was spewing into the air. SO glad I have a good quality respirator because there was a lot of resin dust by the end of the task. My little nylon brush came in really handy to brush away dust between sanding sessions. I managed to hollow it out in about 1/2 hour. I will need to go back to lightly sand to get it just right.
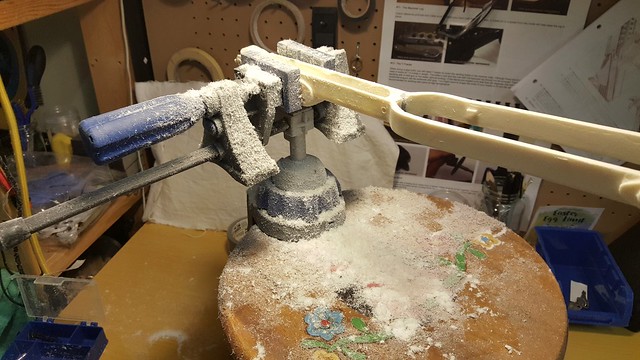
Finally set-up my workshop - here's my set-up for resin work for use of my dremel and for manual handheld sanding.
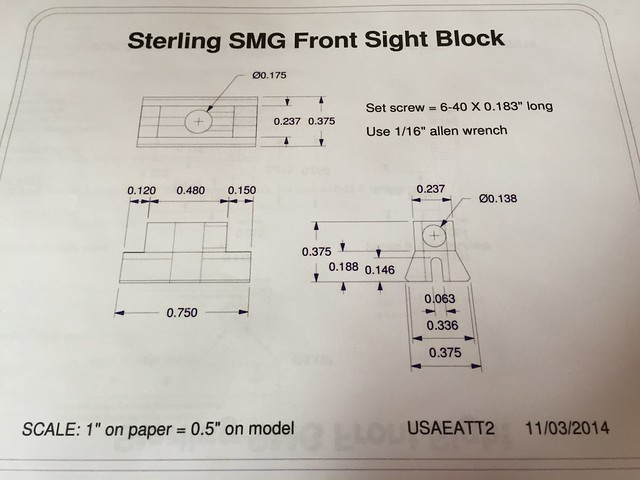
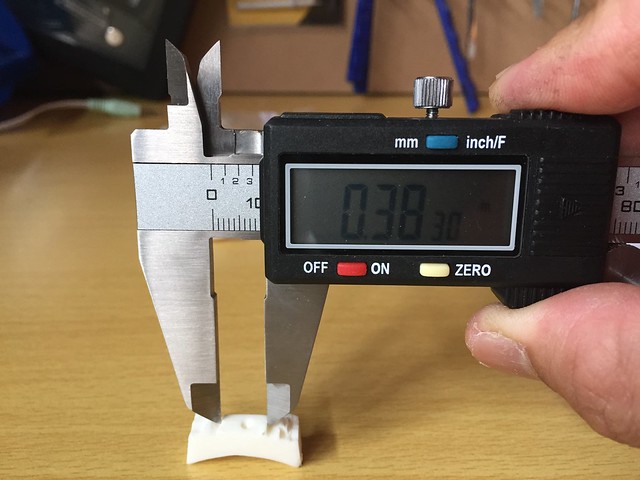
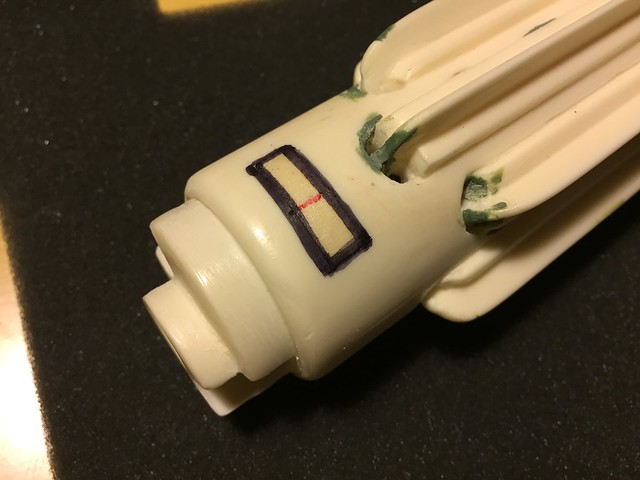
Progress on front sight. I precision measured a dimension on the block and compared that measurement with the real sterling dimension from the E-11 Blaster Reference guide. They don't match up. I gather, generally speaking, doopydoos somehow reduced the scale of the thing? Think will likely need to eye-ball it to get it to proper shape.

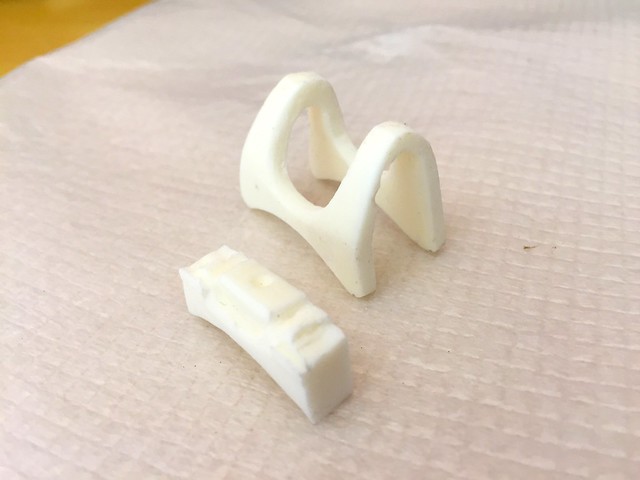
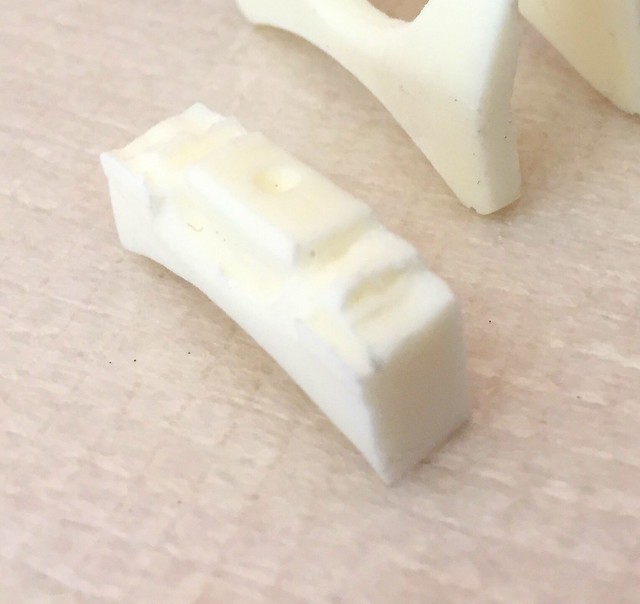
I came away quite literally, 'short' on trying to make due with my Doopydoos front sight block. Having filed it to shape it,it came out really small! Don't think any pin is going to fit inside let alone a grub screw! Order for Chris's 3D printed part happened real soon after this!
In this test-fit pic, the block does look reasonably well but definitely, still on the small side.

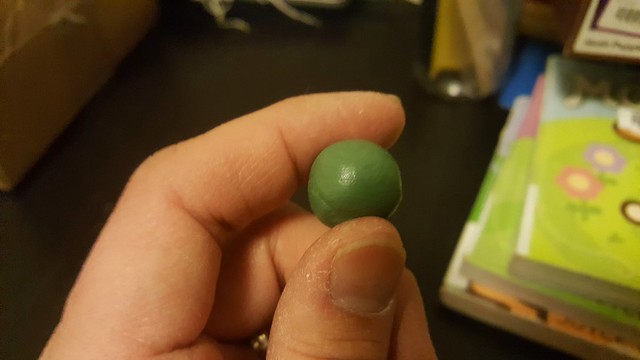
I did do good on texturing the appropriate parts of my front sight though, like that of the original sterling - green stuff applied and patterned.
Green stuff applied
Knurling pattern source
Pattern applied
Pattern applied to back
I then removed the strip on the bolt and also made that part of the receiver tube more pronounced. Doopy's resin blobs for screws were also removed.
Strip removed
Edge enhanced
Resin blobs for screws
Left blob removed

Right blob removed
Proceeded to hollow out the outer edges of the bolt, I've gone and recreated the plunger and extractor. I'm happy with it mostly, although still lacking in size and detail but I like it enough to move on. When my completion kit arrives, I have to follow through with putting in the strip that diagonally runs across it. As I don't have a letter and number stamp set to put in the serial number thingy on the bolt, that will be a much later addition.
Plunger & Extractor
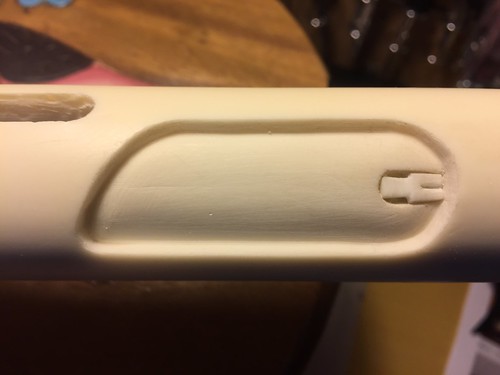
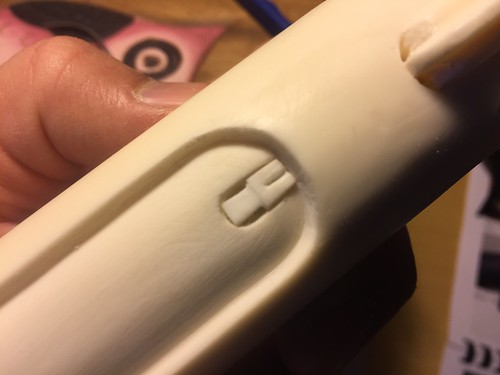
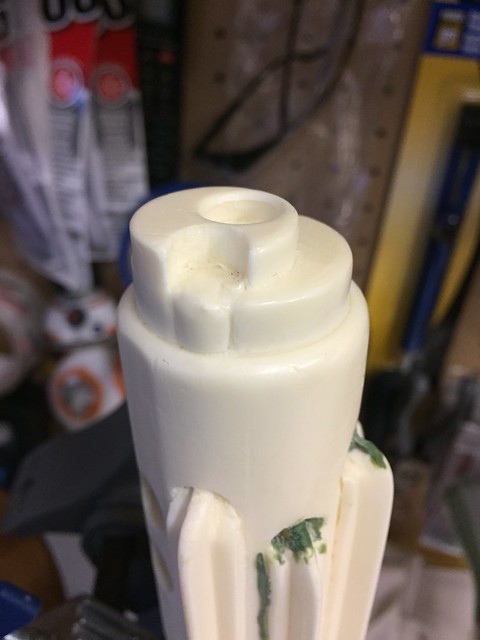
Did more detail on the folding stock. Having hollowed where the rod sits a while back, today, spent the time to add realism to the piece. Carved in and around individual pieces that make up the folding stock to add realism by making it look more like movable parts. There's a ton of 'green stuff' where I was too generous using the Dremel. Still need to follow-up to sand those parts down.
Folding Stock

I was careful not to hollow out too much of the opening so to reveal the latch inside.
Proceeded to work on magazine power cylinders. I just took out the central capacitors with my dremel.
Original power cylinder
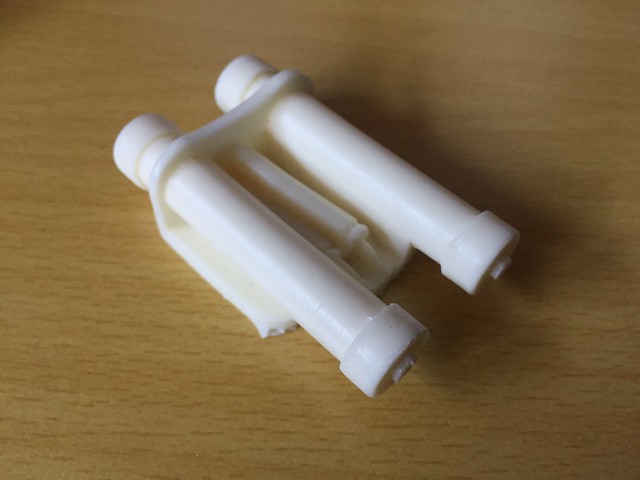
Close up of central capacitors
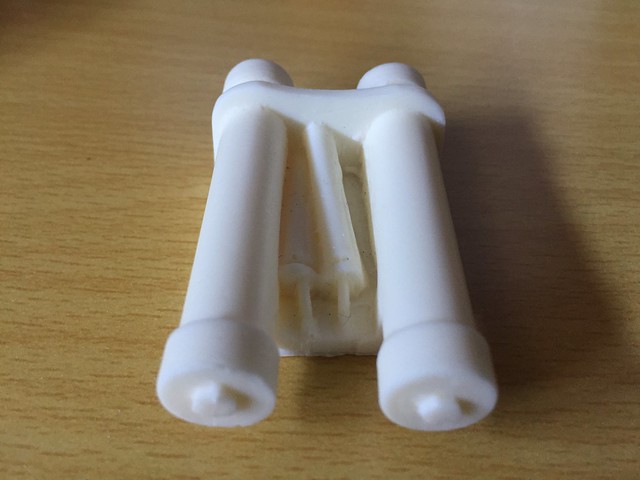
Central capacitors removed

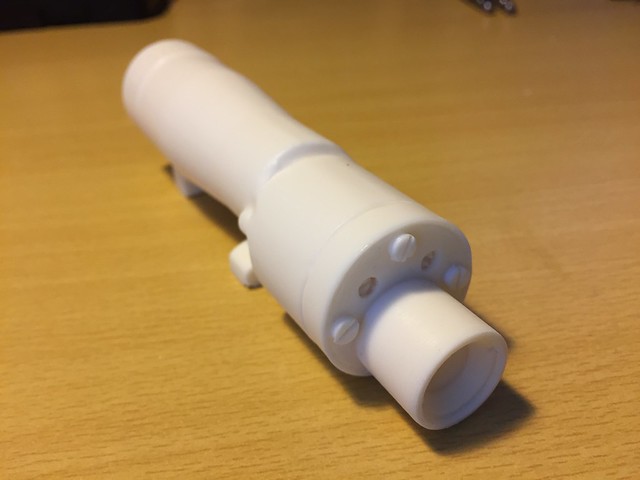
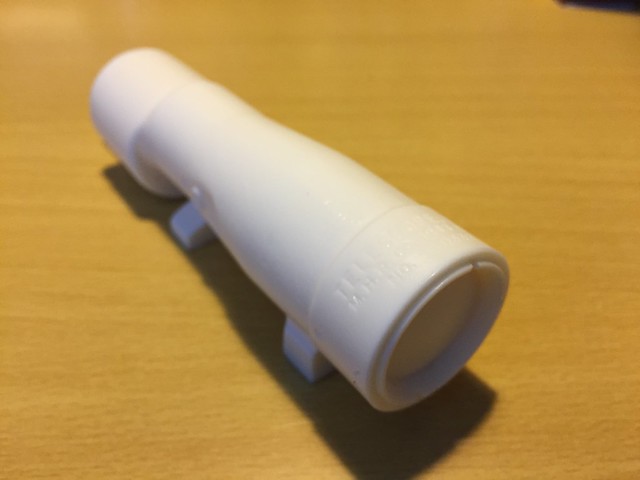
I proceeded to tackle a rather significant component of the E-11 Blaster - the m38 scope. I've managed to use spade bits to hollow it out and made some front and end cuts. I've purchased a monocular and will place it in the inside. With the scope being hollowed, I'm hoping the light coming through to the inside will make the monocular functional. Lenses will be placed on either end of the scope as well - with it's concave shape, this will help with drawing light in. A third glass-like disc will also be placed near the large lens end of the scope to reveal graticulars, cross-hair thingys, you know, for aiming at those rebel scum!
Original m38 scope - front assembly end
Original m38 scope - large lens end
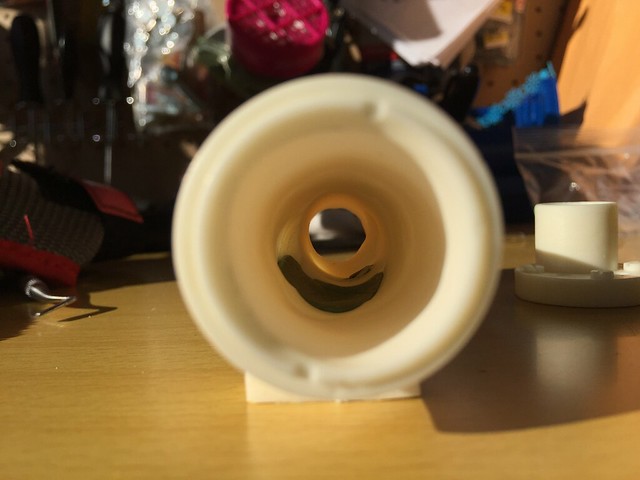
I uses spade bits to get the job done. 1" (25mm) bit was used to begin hollowing at the large lens end. 3/8" (10mm) bit was used to begin hollowing at the front assembly end. I tried to be as tactful as I could to progressively move to smaller bits as I proceeded deeper into the scope from the large lens end as you need to take into consideration the narrower contours as you get further in. If you do make a mistake as I did, not tapering in far enough, it's nothing green stuff can't fix.
Hacksawing to remove large lens housing

Front assembly end - lens housing removed
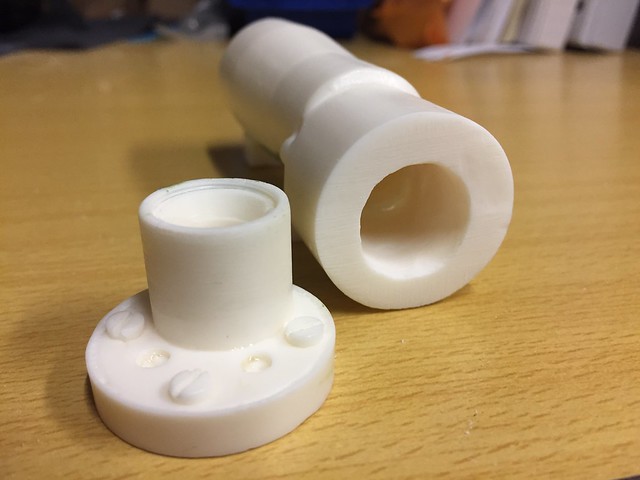
large lens end - lens housing removed
Reassembled scope - front assembly view
Reassembled scope - large lens view

I was eager to get started as ordered items from Shapeways arrived in the mail recently. I now have a true replica of the sight block and pin. With this piece in my possession, I proceeded cautiously to carve out a 'dove tail' channel that will hold the sight block. Having cut-guides put in place, I proceeded to cut out the channel using a hacksaw blade, and using a square and mostly a triangle file to get it to shape. I dare not use a dremel or I would have messed this up really bad. Applying intricate filing and allot of patience paid off. Although the block sits a little loose on the channel than desired, it's nothing green stuff can't fix. I'm overall quite happy with the results.
Sight block position template

Outline of template
Template removed

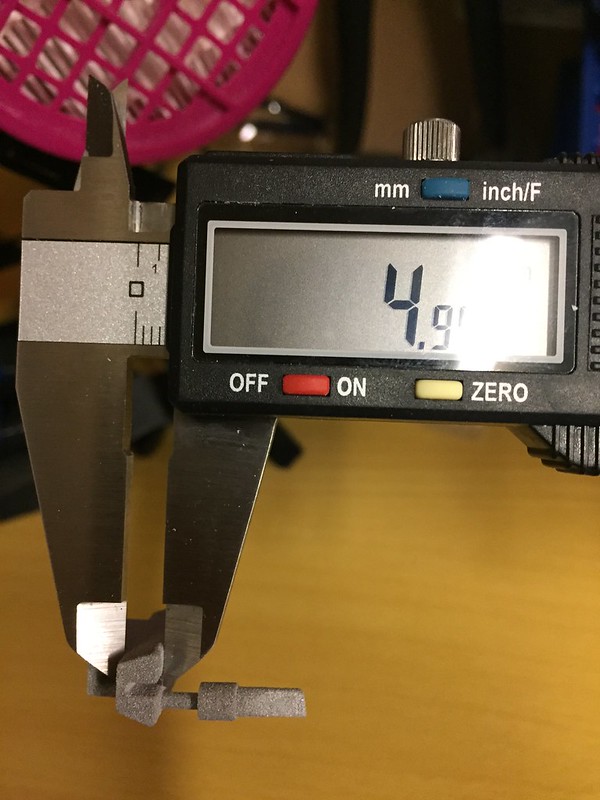
Precision measure for depth of dove tail channel
Hack sawing is the first go

Square file to retain hard edges at 90 degrees

Masked hard edges so I don't widden top edge of dove channel
Finished dove tail channel
Top view of finished dove tail channel
Side view of finished dove tail channel
Sight block with pin, test fit on finished dove tail channel
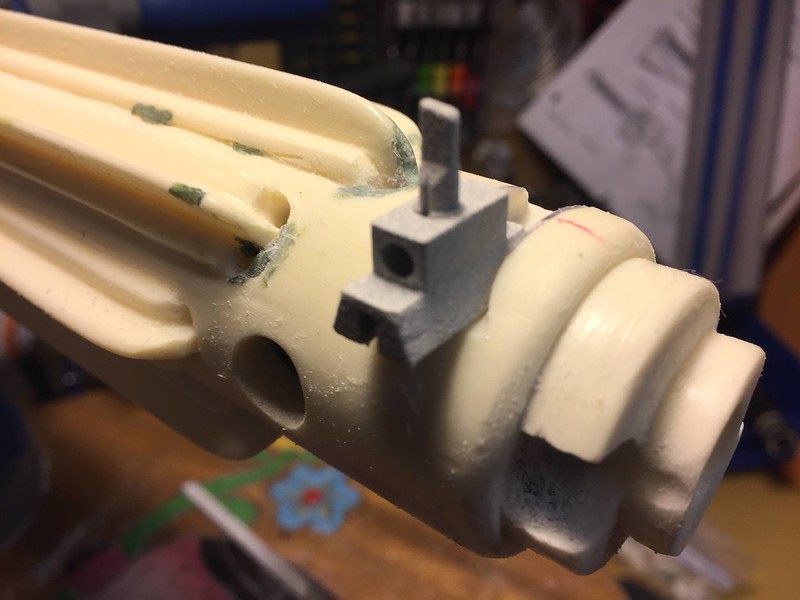
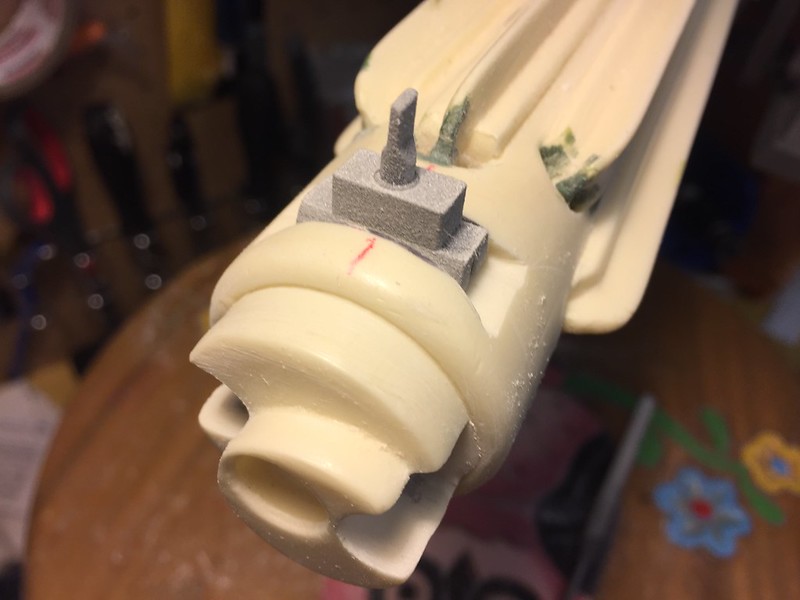

Side view of front sight installed

Thanks for reading! Any and all comments welcomed.
-
 9
9
-
-
I caught word of this at my local garrison. I contacted the owner and although he expressed appreciation of my concerns for the future of his company, he neither confirmed or denied anything about the future status of it. I think if anyone thinking of purchasing, does so sooner rather than later, he'll continue offering his fine boots for sale. Thinking more like bumps on the road with more knock-offs flooding the market.
-
I found this post by Pandatrooper very helpful to understand the assembly process:
https://www.whitearmor.net/forum/topic/14806-how-to-assembling-ata-abs-helmet-1/
Wish you all the best on your build!
-
What an accomplishment, your blaster looks amazing!
-
19 hours ago, tennantlim said:
Thanks Germain!
1. Semi gloss black base coat and light weathering with silver guilding wax (like Rub and Buff). Seal with clear coat. This will show through the "openings' of the wrinkle layer later.
2. Brush and dab on toothpaste on areas where you want the base layer to show through. Allow to dry.
3. Spray a light but thorough coat of wrinkle paint. I use VHT Wrinkle Plus. Allow 48 hours to dry.
4. Use a dishwashing scrub and remove the toothpaste under running water. Now your blaster smells fresh and minty!
That's it!
I now have a more thorough look at your paint job with this post, appreciate your methods even more. Will study your HOW-TO intensely.
-
Your build is coming along beautifully! I am so envious of your electronics.
Me too - this blaster is definitely going down as one of the greats.-
1
-
-
Wow! Nicely done! Convincingly weathered and gritty looking, I like it.
-
1
-
-
superb! superb! expected nothing less...until the next time you chime in, cheers!
-
Thanks
I know very little about electronics. Lots of google and burned electronics.
Sounds like you had a good test environment - how invaluable to explore circuit design, I will follow suit one day
-
It is my dream to one day do a build with electronics - thanks for sharing, awesome work!
-
What a phenomenal addition to your already awesome gun rack build, although it brought it's unique challenges - I'm sure you will have a working solution soon! Following =)
-
Wish you all the best on your build! Good to know Anovos is upping the quality although their wait times are much longer than the rest.
-
Giving a shout out here from the West Coast of Canada - Outer Rim Garrison. Armor looks great! Congratulations on being approved!
-
Great to know! Thanks for the heads-up - gonna get back on tapatalk now

-
1
-
-
You've sourced excellent material for the build and extremely happy for you. I can really appreciate them as your superb photography skills really bought out the beautiful craft of the individual pieces. I too don't have a TK armor to build just yet but have decided to build the E-11 first. Wish you all the best!
-
such a beautiful purchase - awesome detailed pictures - thank you!
-
You make a good point about mentoring - have not thought of that until you mentioned it. ps - great picture - 1/2 picture!
-
Hello from Canada! - great to get connected with your build thread Alay and yes, I was able to see your AP holster picture, thanks for the heads-up you gave earlier. Wish you all the best on your re-strapping
Sent from my iPad using Tapatalk
-
1
-
-
You're certainly not alone, I'm right there along side ya. I have no order date in sight but get on the forum every day!
Sent from my iPad using Tapatalk
-
1
-
-
Thanks for thus awesome tip!
Sent from my SM-G920W8 using Tapatalk
-
Pandatrooper does an absolutely amazing job with these videos - very systematic with great attention to detail.
-
I am welcomed ScaryGuy / Zarlon =)!<br><br>
CrookKight - thanks for pointing me to these forums. They will most definitely give me a strong foundation going forward.<br><br>
I've decided to go for the AP derived TK armor. This version more matches my body type (5'11", 185 lbs, 34" waist) and I'll save on the Canadian dollar. I plan to make the purchase come Spring time. In the meantime, I am sourcing tools / supplies for the build as well as developing an understanding about how the armour pieces are assembled. I'm trying to get a good understanding about the strapping system. Does someone have a good graphic so I can see the intricacies of it? I would appreciate this very much, and have one more entry to my Build binder, getting thicker and thicker!<br><br>
Jesse
-
Thanks ya'll for the sincere welcome. I will most definitely check out the getting started threads! Looking forward to connecting with you in the forums
-
Hi there Stormtrooper enthusiasts! My name is Jesse shouting out from the Candian West Coast! I am a 501st member with the Outer Rim Garrison. I've connected with the quality folks at my local Garrison and look forward to connecting to the larger Stormtrooper collective - here's to good time ahead! I'm the kid drawing Darth Vader in my art book in grade 1. I remember such wonder seeing the speeder bike chase! I love marvelling at the cinematic wonder of flying starships, wonderfully crafted villains and heroes of the Star Wars universe. Speaking of villainy, I've been a long time fan of the Stormtrooper. After hitting numerous forums on costuming, from cardboard to pepakura builds, I finally decided to go by way of purchase of the screen accurate ABS plastic armoury, and desire to seek 501st legion approval in the not-to-distant future. My cardboard armour just didn't cut it! Haha! My motivation is to connect with Legion members, and in concert, be a witness to my kiddies as I carry out charitable events. SO SO looking forward to times ahead! Jesse
Doopydoos Full Resin Kit WIP + Tino,Chris + more, Additional Parts
in ANH BlasTech E11
Posted
Haha, hey thanks! I'll keep up the good work
There's much joy in this blaster build that's for sure Addertime - great to know my efforts are paying off - thanks so much for the support
haha, oh really? I thought that would be the go-to finish because the front sight block is a metal SMG piece. Thinking the metallic finish will be nice during the painting phase - yeah, you should totally add a markup now! Lastly, fabulous 3D printed pieces Chris. I'm extremely happy with my delivery set!
Thanks Tino for your words of praise, it really means allot. Next update available soon! Until then")