


Dracotrooper
-
Posts
766 -
Joined
-
Last visited
-
Days Won
5
Content Type
Profiles
Forums
Gallery
Articles
Media Demo
Posts posted by Dracotrooper
-
-
DANG YOU, Jesse! I have completed 3 DD resin builds, getting more accurate each time (with Tino's kits) but you have inspired me to start another one! BTW, if it helps, Danny (Ripper_L) has just updated the photos on the E-11 Blaster Reference thread, which should really come in handy.
https://www.whitearmor.net/forum/topic/32111-fisd-e-11-blaster-reference/
Ah, so I made the love of the build contagious Joseph - exactly my plan! Thanks for the bump about the reference photos
-
Wow, wow, wow!! Say no more. :-)
Sent from my iPhone using Tapatalk
.
-
Hi all,
I've made significant progress on the folding stock over the weekend. Happy to say I am well on my way to making the latch for the folding stock fully operational. I've borrowed much of the know-how from T-jay's 2nd E-11 Build on FISD.
Having already hollowed out the folding stock; I proceeded to hollow out, let's call it the front end retainer, which is that part that holds the inner rod at the front end. Discovered 6" is sufficient and purchased the correct bit extender size. Used a 3/8" spade bit to make the hole.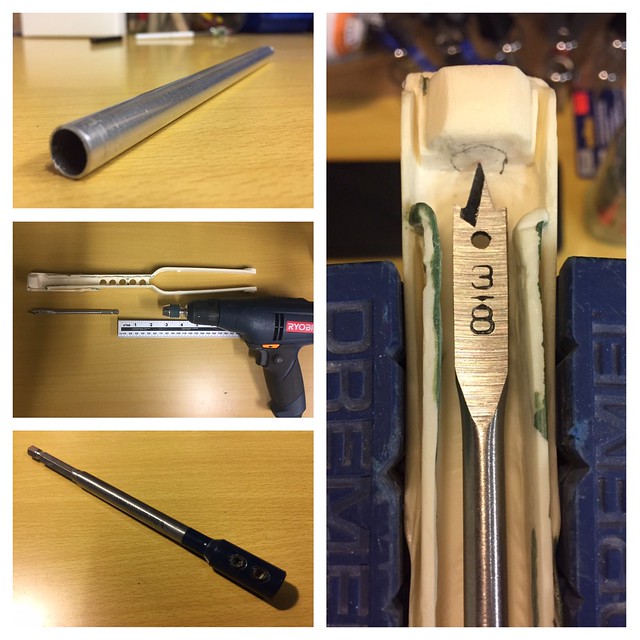
The hollow aluminum rod was drilled at the end, width wise to make way for support pins. The other end was trimmed to length to match support pins through the stock cube. Pins were cut to recommended lengths (30mm for the front and 20mm for the back) from the solid 5mm diameter aluminum rod.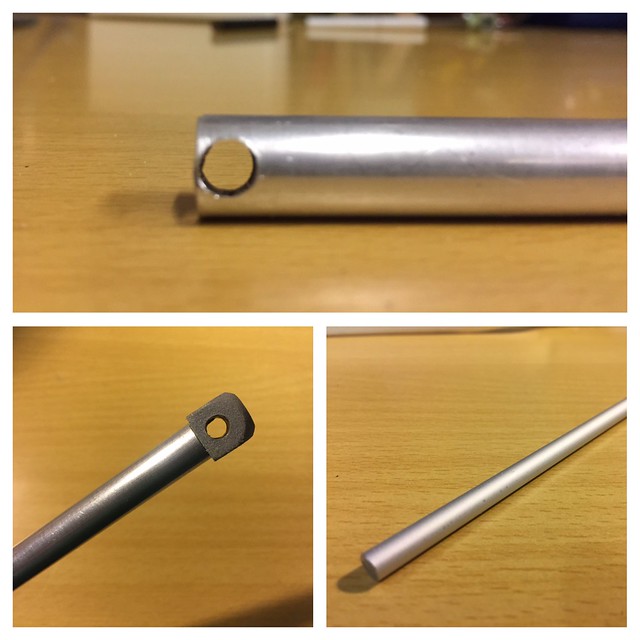
Front end of folding stock drilled through with 3mm drill bit then a 5mm drill bit to prepare for pin installation.
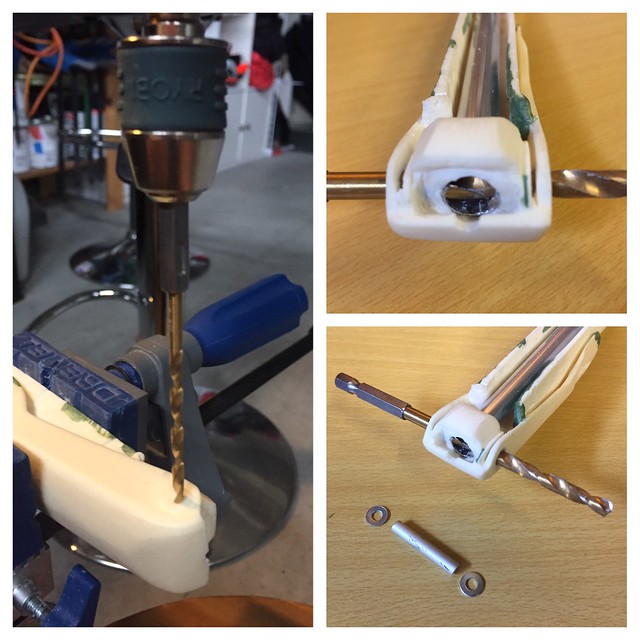
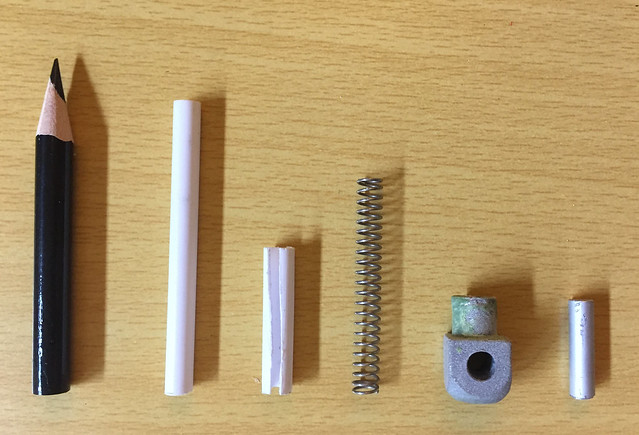
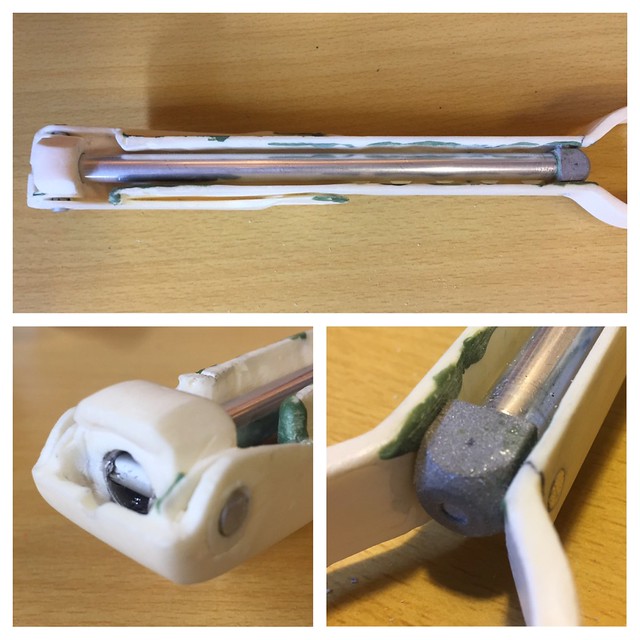
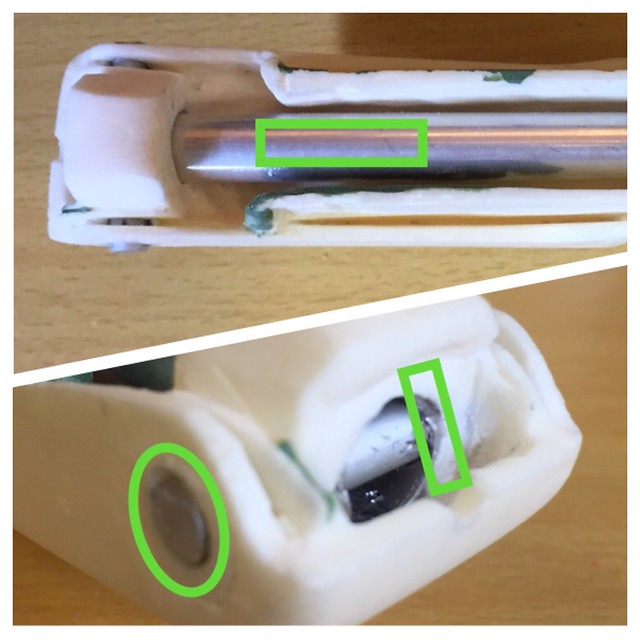
There are quite a few components sourced and revised to make the latch mechanism work. A hollow styrene plastic tube at 5mm diameter was used to link the pencil to the spring coil. 30mm piece of styrene used to support spring against plastic tube. Length of components revised according to the recommended lengths and further confirmed by test fitting.
Here's is a close-up of how the individual components worked together to form a functional latch.
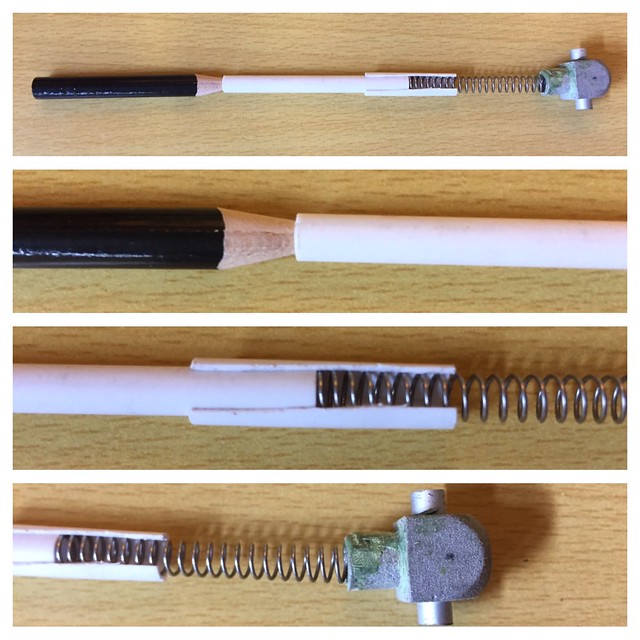
Here's the fully installed folding stock rod with functional latch components installed and pins in place.
Here are some more details to come. The latch opening needs to be created and the latch itself needs to be created and installed. The 'washers' at the front end also need to be revised and installed along with the support piece that runs down the front.
I had quite the ride putting this part together! Felt like I was doing open heart surgery for a bit lol I have to give a shout out to Tino for his detailed build; thank you thank you for your contributions to the forum; I would not even have dreamed of such a mod let alone do it, with out your enthusiasm and technical documentation. Three cheers for Tino!
Jesse-
 2
2
-
-
Oh, so so insightful fellas, intrigued and following closely

-
1
-
-
You have major innovative talent here by sourcing ready owned material to improvise - great approach
I'm reminded to think along these lines -
1
-
-
Nice work so far on the stock
- find this part of the blaster quite time consuming. Steady as it goes as you work out more detail. You're farther than me on the trigger group, sure you'll hear from others soon -
1
-
-
Saskatoon? cool! I'm here at the Westcoast. Welcome to FISD!
-
1
-
-
In the future, I have to get one of Roberts magazines too, as I am needing to store the electrical components of my build - genius idea to put in slides, I will borrow this idea!
-
1
-
-
Just realized this: I had meant to type "...hate to C-O-C-K the bolt back...", but it was changed to weenie!
I built a F-11D with electronics! You can see my build thread here:
Haha, ok - no build thread though for F-11D, forgot to put URL? -
Your endeavour to scratch build an E-11 based on said parameters is an ambitious one. Love your drive and thinking out of the box, you're trail blazing here that's for sure. Only way I can see helping is providing you companies that have online ordering with international delivery, have to do some digging.
-
2 hours ago, tennantlim said:
On one hand, I can't wait to see how epic this will look when it's completed. On the other, I am enjoying your progress as you address each detail with precision and fantastic craftsmanship. Absolutely follow-worthy.
Thank you Tennant for the affirmations of a quality production. You and others are really cheering me on now. I will seek to keep the show going with little intermission

-
I just hate to weenie the bolt back and see an abyss in there.

Abyss = room for electronics, maybe not in this case, for your next build !
!
-
Great build so far Jesse! And I also love the digging out the tiny spaces where the t-tracks go in!
Following
Thanks! I'll keep it going removal was a must or they would've driven me crazy lol
-
Interesting to see the inner components of the magazine - getting details tight for SMG part, your blaster is getting even more real....anticipating next update
-
1
-
-
6 hours ago, Twnbrother said:
Looks like you are off to a great start. I will be following
Thanks for the support! - appreciate it Mike
-
3 hours ago, pwhitrow said:
Just to add my two penny and self promote, I recently released BlastFX (weapon electronics for various blasters) on my page facebook.com/trooperamp and an accompanying mini sight display. Feel free to check them out and use the Send Message button to chat directly if interested.
Paul will answer any and every question you may have about his modules, and do so in record speed. I've recently purchased one for October delivery - looking forward.
-
1
-
-
In-coming....another WIP update:
Inner bolt clearing strip
I went and studied the correct location of the clearing strip on the inner bold with FISD E-11 Blaster Reference as my primary source. I then etched in the location using a pencil and measured out the width of the strip along with the approximate length of the strip. The width measured 6mm and the length measured approximately 50mm. I then followed these dimensions and cut to shape on a 1mm thick plastic piece using my lexan scissors.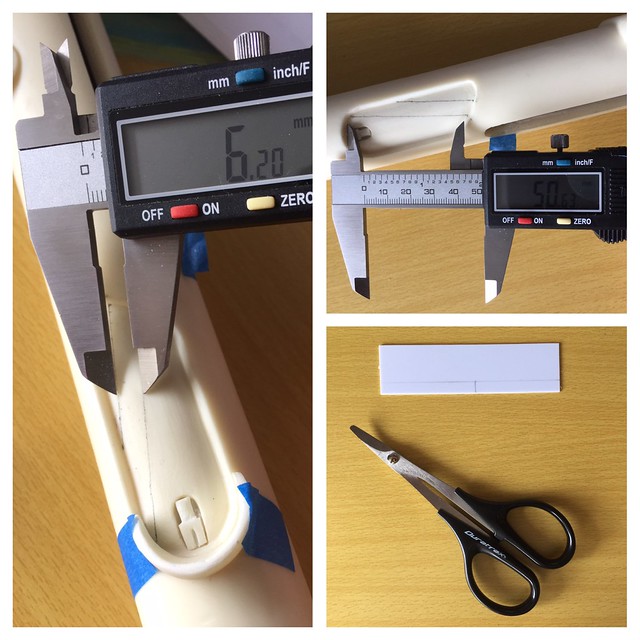
I then proceeded to go at trimming the ends of the cut clearing strip. It was a bit tricky trying to gauge where to cut, especially when putting it against the curved inner bolt. After eye-balling it the best I could, the ends were cut and then I proceeded to shaping it. I heated the strip using my heat gun. At high setting, the 1mm thick plastic became pretty maleable, pretty quickly so I pushed it against the inner bolt over the templated part of it. I used the middle portion of my long nose pliers to push down on the strip. After some trial and error, I did manage to twist the strip to form along that part of the inner bolt.

Here, I go about gluing the clearing strip to the inner bolt. I created a glue applicator using a piece of armature wire and used a piece of this kind of wire to rough up the glue-side of the strip to prepare it for adhesion. The CA of choice is E-6000. I figured using it would give me more know-how when I do use it to build my TK armor in the future. With the clearing strip glued in place, I used a clamp to keep things together for the curing process. Also, I felt I needed to use the popsicle stick method to fill the void between the outer receiver tube and the top of the clearing strip.
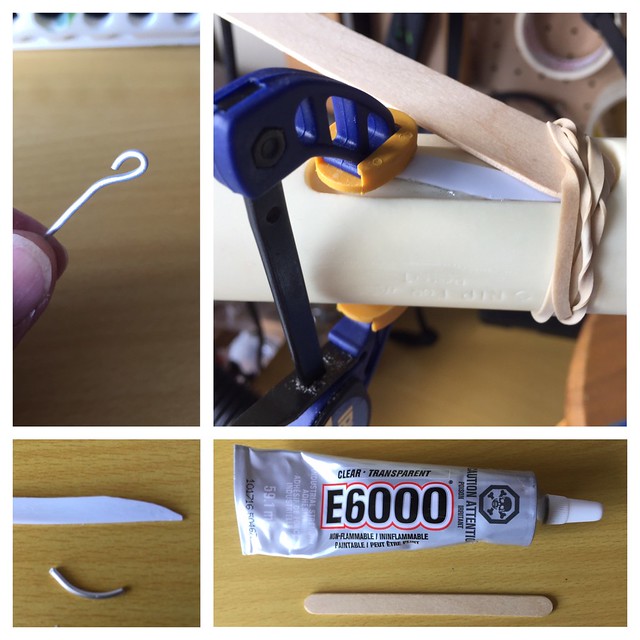
Here is the clearing strip as it should be after gluing. I will check in 24 hours how it dried.

Thank you once again for reading, cheers!!

Jesse
-
6
-
-
I am speechless Corey. I have no solution for you but can only feel your pain - hope your order gets resolved soon.
-
Great progress Dan
awesome!-
1
-
-
Here's how my end cap came in the mail - no modifications. I hope my use of shadow accentuates the curves on the piece for you.


Have fun and hope this helps some -
14 hours ago, Bulldog44 said:
Dovetail slot perfectly executed!
Thanks Brian! Tino gave me a heads up it will be a nice challenge. Thanks Chris for your detailed 2015 post on adding this modification because it helped me set the stage for this success! My preparation work is identical to yours; from picture to picture!
14 hours ago, Dark CMF said:Amazing start!
Your attention to detail and next level of clean-up on the kit are going to make for a very special piece when you finally complete it.
I will be following your progress. Stupendous work so far, and I love your take no prisoners approach. There are - as I love to tell people getting into this hobby - very, very, very few things that you do, that cannot be undone, and nearly all of those are driven by removing too much material. Your use of the green stuff to make those small repairs should help a lot of other new builders in the future to realize this.
Keep at it!!Wow! To hear directly from you Tim! It is an honor!
 Building/ creating the E-11 invokes so much of the brain for problem solving to reach that end goal as it pertains to your personal level of screen accuracy, realism and minutia of design detail - I come at it as having a finished blaster with 3 parts resin and 1 part green stuff and the pride that comes with having reflective thought on every square inch of it. Thanks also for your encouraging words, I will keep to task all the more
 ")
-
1
-
-
Hi all,
mmmmm gummies. The arrival of Tino's completion set continues to satisfy
 Everything arrived in good order!
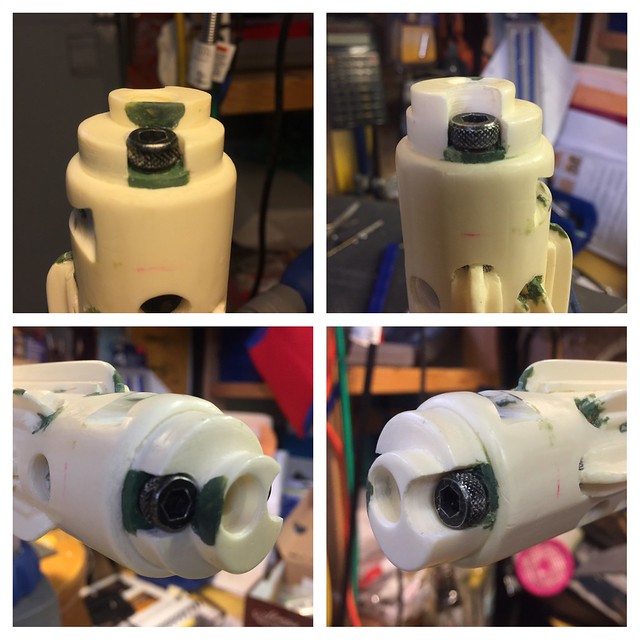
I happily went on to install the front knurling pattern screws on the muzzle. I noticed after installing the screws that they sat a little low to my liking. Confirmed by pictures of Sterling submachine guns and using Aaron's Blaster Compendium, that the screws are elevated a bit. I created a platform like part for the screws to sit on and am quite happy with the results. Installed cross hatch patterned muzzle screws with allen wrench over top green stuff for correctness.

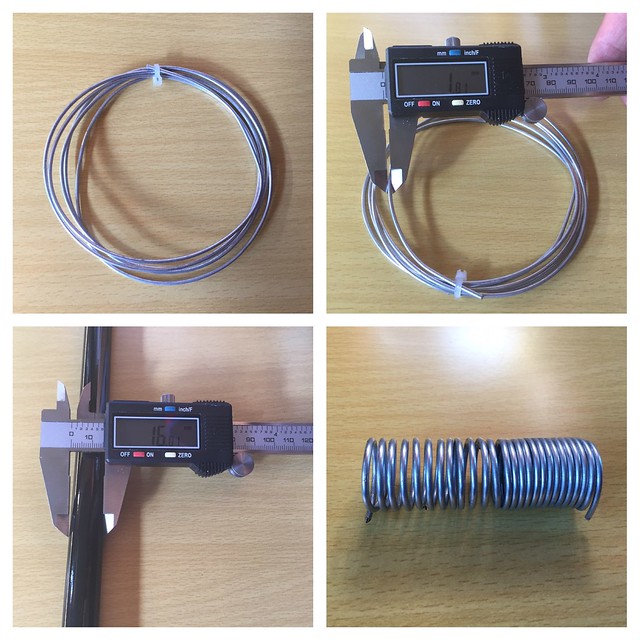
I also went to put the spring coil together. The wire was 1.8mm gauge, which provides good amount of tension to be functional. The recommended 16mm diameter rod was used to form the coil - coil came away with the perfect diameter. I used one of the rods for a mobile closet. This is the final coil, completed. You can tell I began to be more efficient half way through.
Until next time! and thank you for reading
-
1
-
-
Ah, the very necessary workbench to set the stage - curtains, lights, camera!
-
1
-
-
53 minutes ago, Bulldog44 said:
Awesome! Digging out the tiny spaces where the t-tracks enter the holes looks great, super start , looking forward to the rest of your build.
Thanks Bulldog! and great of you to check in. I have to say, your detail work on your M38 scope offerings are amazing - so many component pieces. See you at the next post.
-
3
-
Doopydoos Full Resin Kit WIP + Tino,Chris + more, Additional Parts
in ANH BlasTech E11
Posted
Cool, very cool - I'm going for my personal best with aim for a screen accurate, battle worn, and realistic E-11. If I get mine confiscated, I'll be sure to let you know for kicks lol I see that the reference has multiple mod choices as well - lends to the builders skills, supplies, and tools available, making for a very versatile guide book. Will keep it close! Thanks again