Lee_C_77
-
Posts
66 -
Joined
-
Last visited
Content Type
Profiles
Forums
Gallery
Articles
Everything posted by Lee_C_77
-
Vendors list for Imperial Commando costume parts & accesories
Lee_C_77 replied to Sly11's topic in Quick find resources
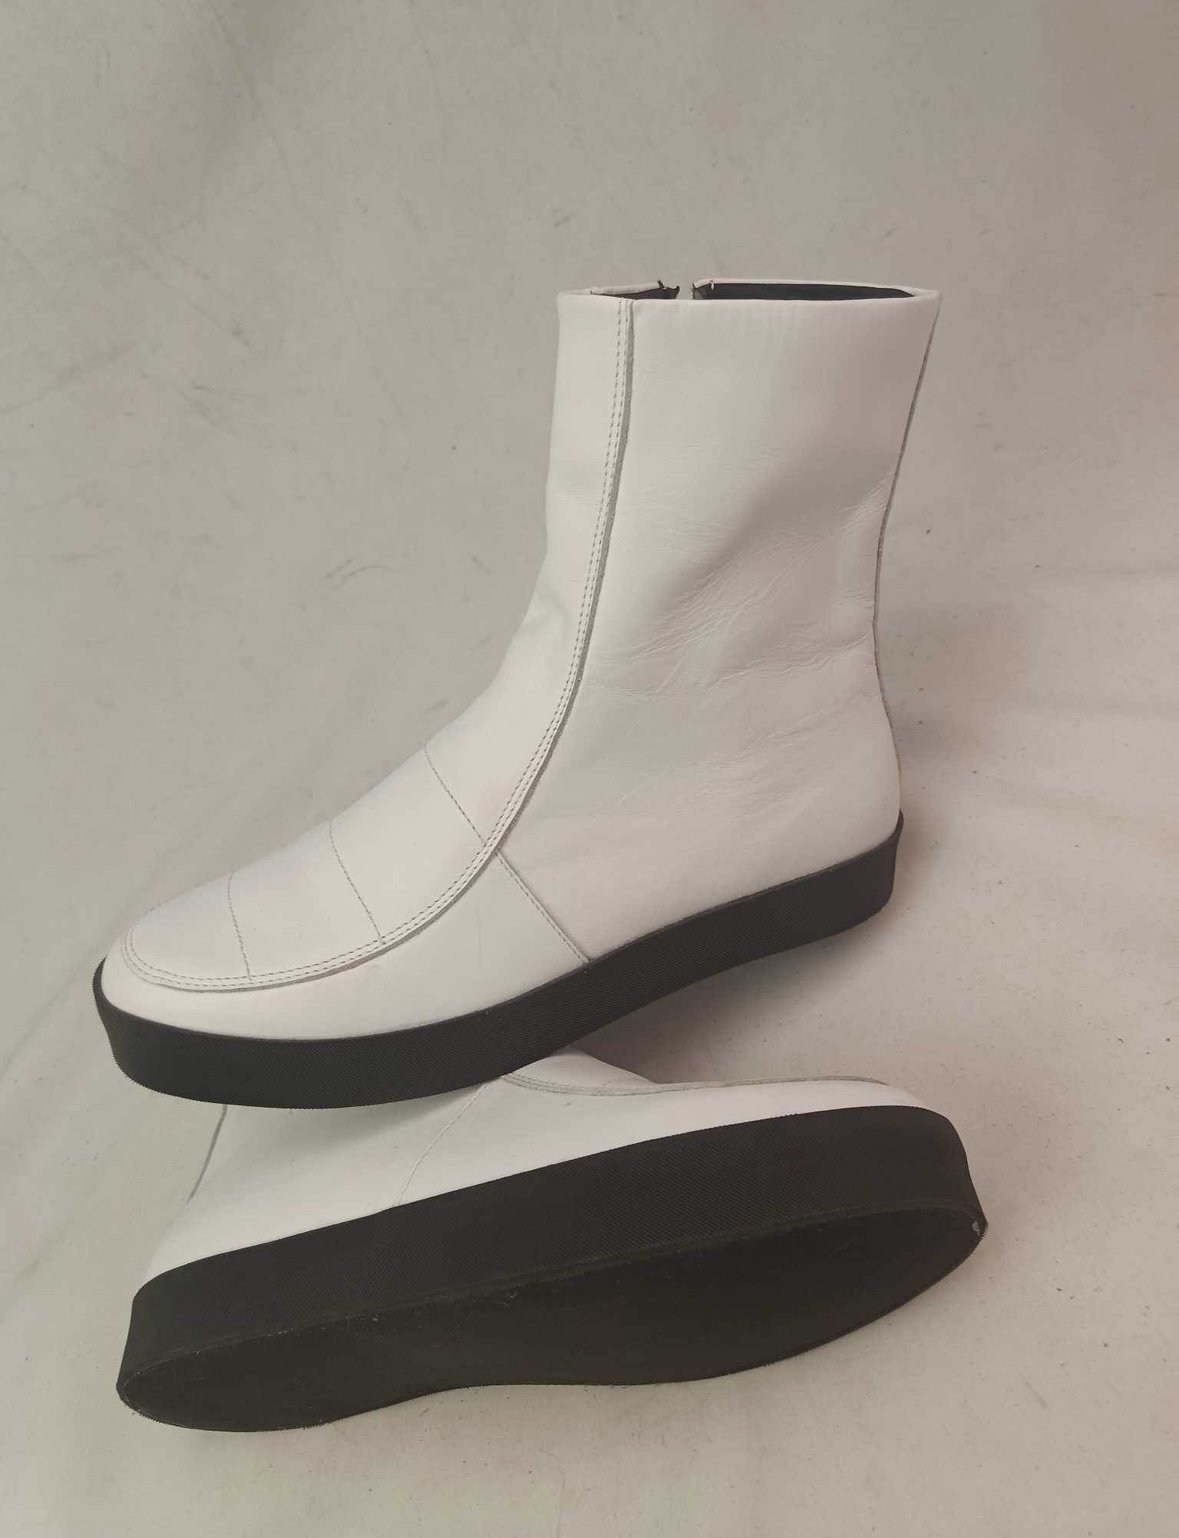
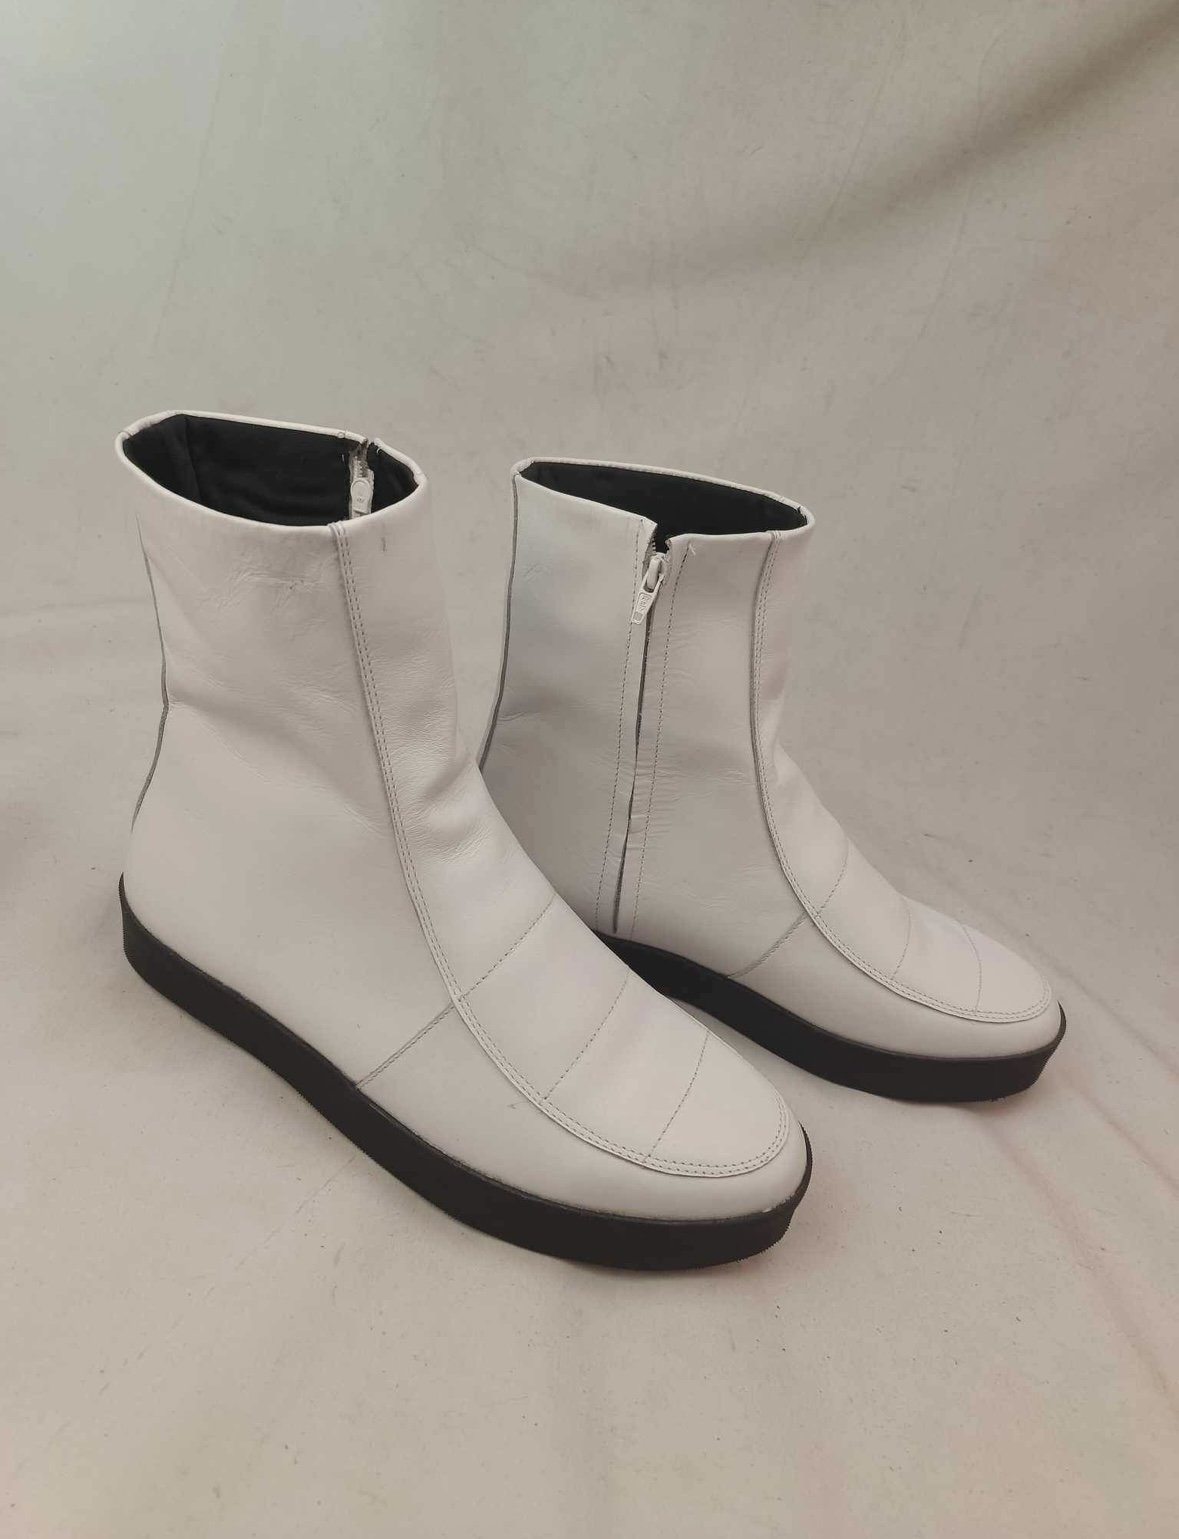
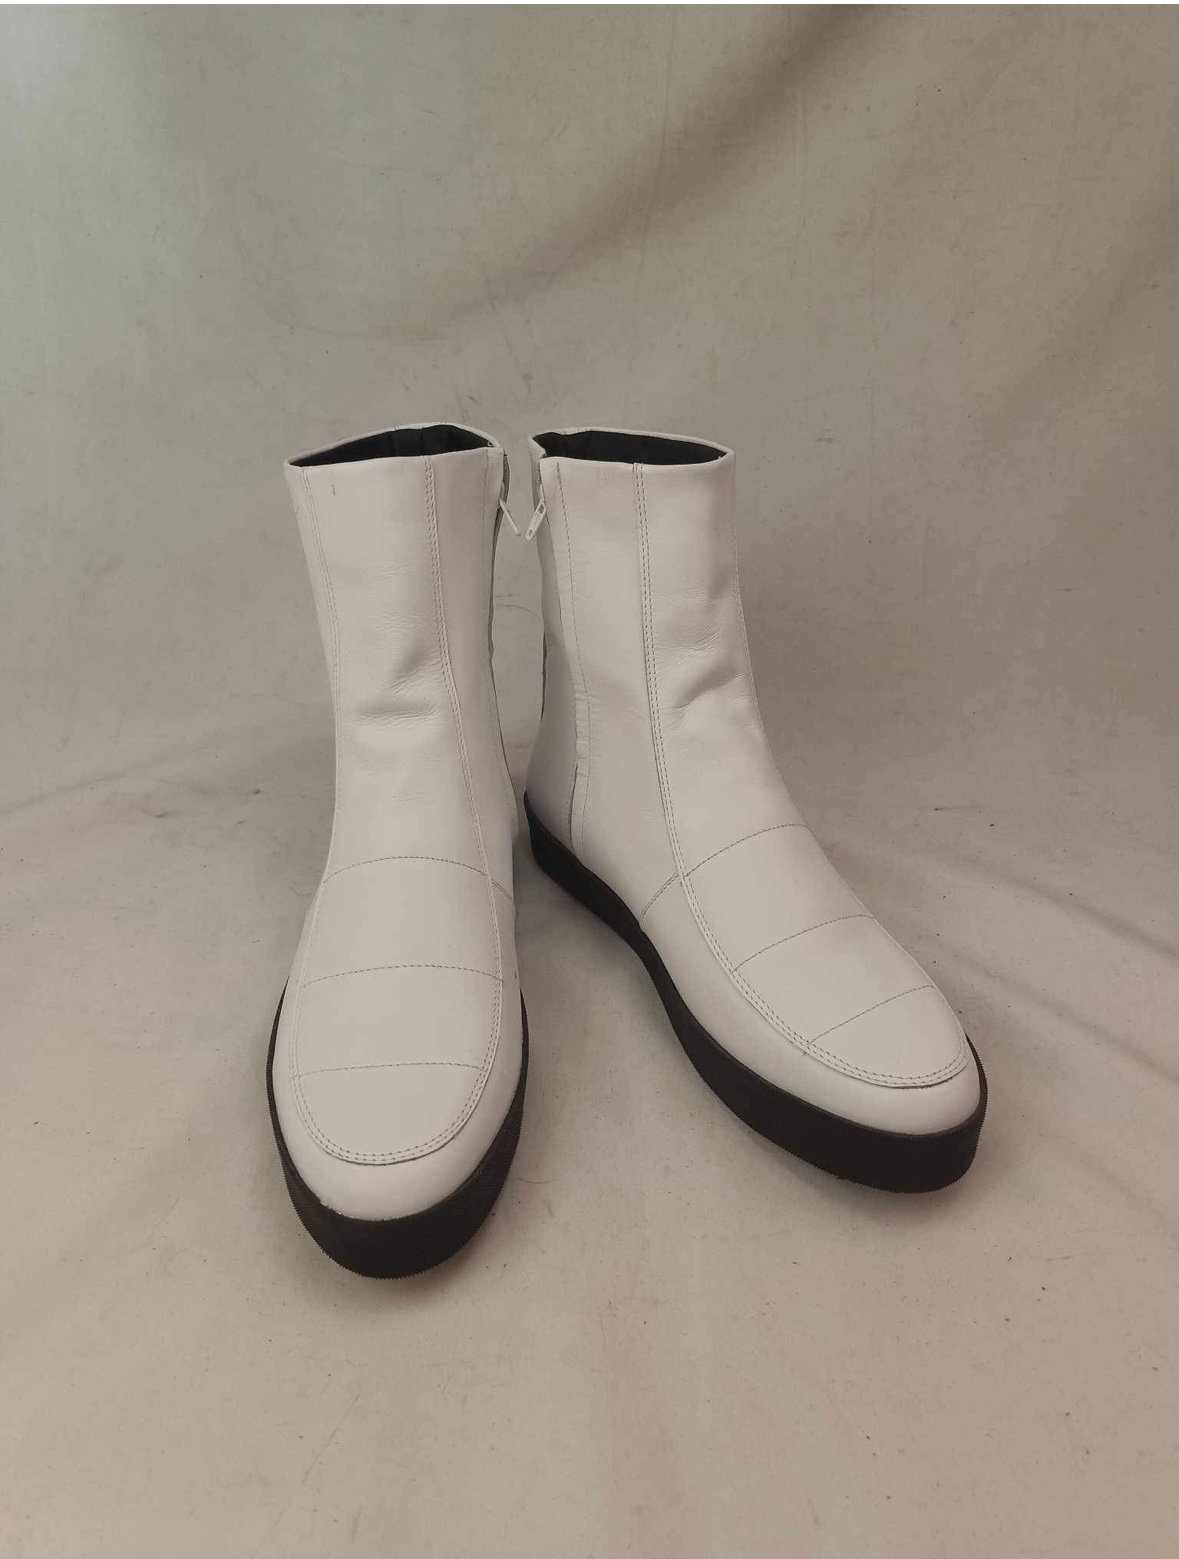
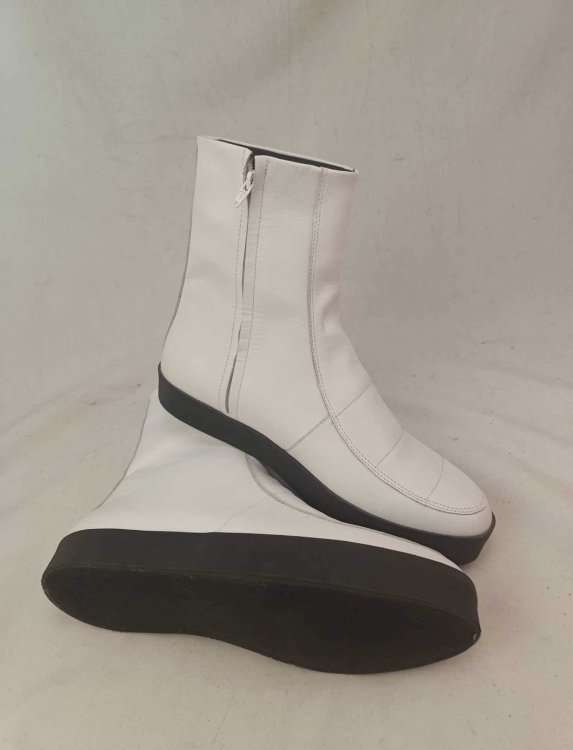
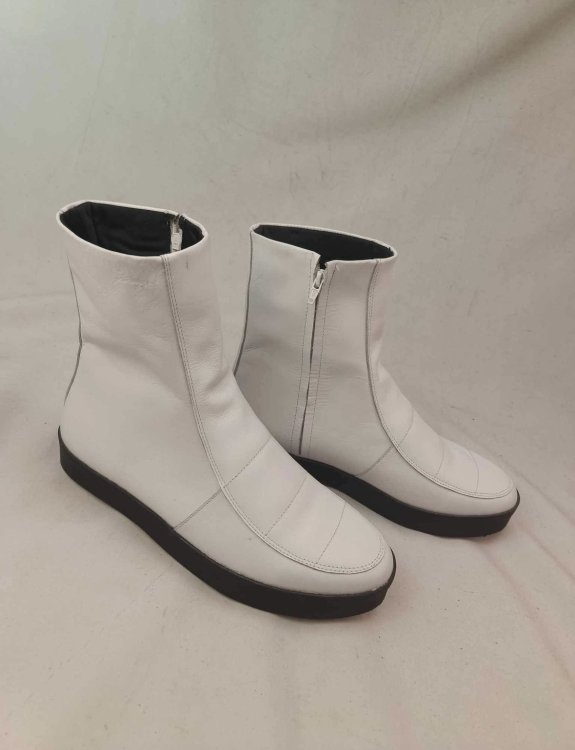
Gio from crow props has just sent me pictures of my boots that he made. These are the first pair but look good to me.


-
Vendors list for Imperial Commando costume parts & accesories
Lee_C_77 replied to Sly11's topic in Quick find resources
Gio from crow props is currently making me a pair from the limited screenshots that were about. -
Paints fine. I used 2k paint so it holds up well and most marks buff out Sent from my iPhone using Tapatalk
-
Just checking in. My kit cleared just before Christmas. Good to know that with a few mods, the Anovos kit is clearable. unfortunately, even with the reinforcing of the yoke, it’s got a couple of cracks on the return edge. I’ll strengthen with plastic, fill and flash over. Apart from that, all good. Now if only Anovos would ship these out to everyone else.
-
TK22510 requesting access https://www.501st.com/members/displaymemberdetails.php?userID=22720 My 501st profile finally got updated.
-
ANOVOS (DENUO NOVO) FOTK Armor Delivery Possibility
Lee_C_77 replied to JonnieBear's topic in TFA Stormtrooper
Mine is 42, maybe 42.5 so it’s gonna be snug!! The problem is the yoke join. As they are pre trimmed there really is no room for adjustment. -
TK 22510 requesting access https://www.501st.com/members/displaymemberdetails.php?userID=22720 actually, my TK isn’t showing yet
-
ANOVOS (DENUO NOVO) FOTK Armor Delivery Possibility
Lee_C_77 replied to JonnieBear's topic in TFA Stormtrooper
It’s not actually the waist. More the chest. Where the front chest piece (with the pills and sticker on) meets the yoke under the arms. I had help and I can close it, but if I slouch when I stand it will start to undo. I’m going to add elastic and snaps to keep it tight. -
ANOVOS (DENUO NOVO) FOTK Armor Delivery Possibility
Lee_C_77 replied to JonnieBear's topic in TFA Stormtrooper
They’re super small. As they are pre trimmed you have to work with what you get. I’m 6-1 and 32 waist and I would say that any bigger and the kit will require major work. On top of the painting. But they are clearable. -
Thanks guys. Had my first kit up today. There’s a few dressing issues. Left bicep, right thigh and knees, but I’m nearly there. Sent from my iPhone using Tapatalk
-
Sadly, Anovos have been too busy sending GE helmets so mine still isn’t here. Never mind. Sanotized Creations sold me one. Fitted a hard hat liner for support. Just need to paint inside the helmet black and tidy up hot glue residue. Helmet is almost finished. Need to paint inside the side vents. I was going to cut them out, but this helmet is temporary until Anovos send my proper one. Also need to neaten up a little on the brow. What a pain that was. Armour wise, everything is ready to go. I need to have a kit up at the weekend when someone is here to help. Belt box 2nd from left needs painting again. Something reacted with the paint. Also, centre belt boxes look positioned badly but it must be the angle. They’re centred. I will add a screw here eventually. But at this late stage, I just painted the pip silver. And until Saturday, that’s it. Next step will be a full kit up, gaskets and all and we can go from there. Also, not sure if I mentioned before. But the templates for the ab boxes and the position of the holes are all over the place. Maybe 3-4 mm out on most. I was meant to take photos of how I fitted them but I forgot.
-
ANOVOS (DENUO NOVO) FOTK Armor Delivery Possibility
Lee_C_77 replied to JonnieBear's topic in TFA Stormtrooper
Insane. So you can buy spares just in case you break your non existent armour!!! Fool me once............... -
ANOVOS (DENUO NOVO) FOTK Armor Delivery Possibility
Lee_C_77 replied to JonnieBear's topic in TFA Stormtrooper
They’re selling replacement armour parts to replace parts on armour that hasn’t shipped yet? -
Thanks. Yeah, acrylic works well. I really suck at clear coating. I don’t have a compressor so had to use cans before. I just couldn’t get a great finish with them. The good thing about the 2k spray is that as it has a hardener and is high gloss, no separate clear coat is needed. It’s touch dry in 30 mins. Sent from my iPhone using Tapatalk
-
I’m only going off what the suppliers told me. It looks great up close once dried and polished though. Paint code is TC10 which I assume is a generic code. Failing that, it’s bought in the uk but I’m sure it’s available stateside. It’s 2k so you have to activate a hardener in the can before use. Shake really well but plan your painting. It goes off in the can after 7-8 hours.
-
Thanks Darren. The recommended white looked awful. Nowhere near a match. Colorite were super helpful. I only went there as it’s local and they custom mix paint. He confirmed that it will be impossible to paint match the Anovos plastic. But for him to bring out all of the movie sample cards and point me to the correct white was awesome. I finished my belt off too. Great kit. Just need to mount the boxes. speaking of the boxes, whoever poured the resin at Anovos has done an awful job. Bubbles and imperfections all over. Maybe Ryan and Reggie got moved out of live chat to do it!
-
Thanks for the input guys. Regarding magnets, I’ve tried them on the wrist sections and they’re fine. I used them in the chest to yoke connection too. I’ll put photos up later. I had a really productive Sunday, taking advantage of a nice warm day to get the whole kit painted, after priming it last week. Excuse the awful pictures, it’s like a game of Jenga in the shed, and I’m scared too move everything until the weekend. Remember, that this was the kit that Anovos said required no paint. Then they said the resin parts only. Trust me. The whole kit needs painting. Regarding the paint, I’m ok with painting, and used cans of 2k paint, so no need to lacquer. The paint is TC10 2k and I have it from the supplier that this is the colour used to touch up the rubber screen suits and to paint any none rubber parts. I’ve seen the sample cards from the movie in his store. It’s the same supplier that supply the studio. This sample was from the spacebear sample cards which was the working title for TLJ. The name was space trooper white, and the pint code was TC10. It was quite cool for him to let me flick through the sample cards. I’m trying to go there again regarding the TR1XIE colours for another costume. I managed to get the right thigh out and fit dans holster. And all I had to hand to try it was an F11D. On a side note Dans holster is a few mm smaller than the Anovos one. The holes in the Anovos resin part need re drilling to take this holster. And the self tapping screws that he supplied need cutting by a couple of mm. Hopefully get more pictures up soon as trying to get clearance for a con. Painting was the big job. The rest is fairly straightforward. Also, along with the instructions and the Velcro Anovos supply, toss the resin holster in the trash. Sent from my iPhone using Tapatalk
-
ANOVOS (DENUO NOVO) FOTK Armor Delivery Possibility
Lee_C_77 replied to JonnieBear's topic in TFA Stormtrooper
I know not everyone who ordered the armour is on here or the fb groups. But in total there are about 5 confirmed kits on them. Even if only 25% of the kits belong to members here and FB that would only be around 20 kits in the wild. What’s really annoying is the photos from the SWGE ROTR with all the troopers in Anovos kits. Seems that Disney got supplied, whilst everybody else waits. -
Good shout. I’ve glued the biceps and thighs tonight. Forearms need to be able to open to get my wrists in, so that will be magnets. Shins will be Velcro on the inside leg. The Anovos kit is paper thin around the rear of the neck area. Maybe less than half a mm. Adding some plastic sheet inside. Photos to follow once it’s dried. I’m guessing that all of the early Anovos kits needed reinforcing inside too. It doesn’t look pretty, but it’s needed to keep the flex to a minimum. Hopefully they start to get some kits out soon Sent from my iPhone using Tapatalk
-
Regarding the Velcro, as it’s TLJ armour, the arms and legs all have overlap joints that open to help put them on. The instructions say to use Velcro to close them. This isn’t going to work either. due to the thickness of velcro it leaves a 4–5mm gap on the overlap and looks horrible. I’m thinking of using a few 0.75mm magnets to close instead. Whilst the gap with the Velcro is only noticeable when you look close up, it looks awful and is one of those things that will bug me.
-
Ab section mods for Butt, cod and belt. I changed the way the butt and cod attach to the flaps at the bottom of the ab section too. Anovos say to use Velcro but I don’t think that it was man enough. I tried putting snaps straight to the flaps but this was too rigid. There needs to be a little give in them for movement. On the rear part, I trimmed away part of 2 of the flaps and glued 50mm webbing each side. Then I used snaps. The 2 inner facing snaps will line up with snaps on the butt connection, allowing a secure and flexible attachment. The snaps facing outwards will be used to attach the belt and stop it slipping or rotating. More on that later. For the front I did something similar. I cut 2 sections away and fixed webbing in. The 2 snaps line up with the snaps on the cod. The centre one will attach to the belt. Also, anybody building this kit, ignore/throw away the instructions. They are pointless and basically say to use Velcro to connect everything together. Also, the templates they give you for the Kit Kat parts on the shins have the holes in the wrong place. They don’t line up so be aware. Sent from my iPhone using Tapatalk
-
Thanks for the kind words. Hopefully kits will start shipping soon. I noticed that another deadline has been and gone without any updates. Yoke assembly This part has been the biggest PITA to get right. The way the instructions tell you to assemble it is by using Velcro on the shoulder joint to hold the front and back parts together. Whilst this would work, if going for clearance, the joint needs to be seamless. I thought that this would simply be a case of filling and blending. But it isn’t. Here’s a picture of the 2 halves glued together with Devcon plastic weld and a first layer of poly flex filler. It’s a small picture as I forgot to take one and edited one from further along. With this glued and dried there is a hell of a lot of flex on the yoke. Far too much. It flexes so much that it puts pressure on the area around the joint, to the extent that it will split and crack. To remedy this I bought some of the brackets from UKSWrath to support the seam and joint. These things are great. With a little mod, they fit perfectly and really do stiffen the whole of the shoulder area. These are really easy to fit. They need a slot cutting on the yoke, then bending slightly to fit, before being glued in. But note that 1 of the small parts at the top needs removing due to the Anovos return edge not being deep enough to accommodate it. And don’t forget to glue a small piece of abs to the top of the flaps that protrude through the yoke to support the shoulders. See picture below. Whilst the bracket really stiffens you the yoke, it does cause another problem. It moves the stress away from the shoulder areas to another area. If you think of the arm opening as a clock, it moves the stress point from 12 o’clock, to 10 and 2 o’clock. I noticed stress marks in these areas. I tried to photograph them but it’s hard to see them. To rectify this I reinforced the areas by heating plastic sheets up and cutting/shaping them inside the yoke. Until you end up with something like this. So, with all of the reinforcing done, I gave a final fill to the seams, after using primer to look for imperfections. And I ended up with this. And the yoke is now ready for primer and paint. I’m fairly sure that like all the other abs yokes, it will crack and need repairs but apart from reinforcing it, there’s not a lot you can do. EDIT Don’t forget to fix 2 snaps to the metal shoulder supports. These attach with elastic to snaps inside the shoulder bell. If you want, you could slot the elastic through the yoke but it leaves it very thin and at risk of splitting. Sent from my iPhone using Tapatalk
-
Forearm mods To try and make the forearms better I did the following. Trimmed the return edge from the part to be modded. Considering it was pre trimmed it was rough anyway. Then I heated some abs sheet. I heated it a few times, progressively shaping it. Once happy, I glued it inside the arm. Then cut another piece to sit on top, bringing it flush to the armour. Before I filled the joint with polytek. It might need a little more shaping but I’m fairly happy with it.
-
And here’s the screen caps. Had to change to Tapatalk. My photos are no longer appearing on this site for some reason.
-
Forearms Unfortunately, the forearms are a really poor shape. The top part cuts too deep when compared to screen caps. All the BS about perfecting accuracy and scanning screen used parts , they really messed this part up. Anyway, I was told that these were ok for clearance, but I wanted to mod them to make them a little better. Unfortunately I’ve struggled to get consistent screen caps. I’m thinking that the top may have been trimmed slightly to suit the person in the armour on screen. here’s Anovos effort