

jamesmillerio
-
Posts
24 -
Joined
-
Last visited
About jamesmillerio

Recent Profile Visitors


-
James's Rogue One TK Build
jamesmillerio replied to jamesmillerio's topic in Rogue One Build Threads
Well that’s an embarrassing miscommunication, haha. Still, another easy fix and thank goodness E6000 is removable. -
James's Rogue One TK Build
jamesmillerio replied to jamesmillerio's topic in Rogue One Build Threads
Between holiday festivities, I was able to get quite a bit done. I made most of the changes mentioned in my previous post. Those where: - Adjusting height of chest, moving it up in the front. - Adding 2" nylon strapping to ammo boxes. - Gluing calves together (more on this later) - Adjusting bicep and shoulder distance - Adjusting belt and thermal detonator. - Adjusting side black wings (more still to go) Regarding gluing the back of the calves together, I think I'm going to have to find another solution there. It's almost impossible to get my boots on after having the calve armor on. The CRL says: "Greaves are loosely held closed in the back with elastic, shock cord (bungee cord) or white Velcro and are designed to remain flexible." I'm going to see what I can do to make them remain flexible and open in the back, otherwise I may have to find another solution. Velcro was working fine, maybe just some thinner velcro so its less apparent. I adjusted the black side wings some but they still need a bit more work. I really don't like the shape of the side wings I was provided when I bought the kit. I may take TerribleBen's approach and seek something else out. I also moved the strapping for the thighs further onto the side. They still need an adjustment there honestly as they are so close to the cod piece even after dropping them slightly. Something else I noticed in the pictures is the chest armor looks slightly tilted. Not sure why that was but I’ll look into it. Circling back, I think all of these small changes lead to some big improvements. I still have a few things to tackle such as those side wings, some belt changes, a missing thigh cover strip, paint, etc. I'm pretty happy with this round. Let me know if you notice anything else that looks odd. -
James's Rogue One TK Build
jamesmillerio replied to jamesmillerio's topic in Rogue One Build Threads
Sorry, the lower black strip between your chest and back armor. -
James's Rogue One TK Build
jamesmillerio replied to jamesmillerio's topic in Rogue One Build Threads
Oh nice, that helps actually @TerribleBen. If I can ask, how did you attach your side wings and were they also ABS or something else? They look so uniform and well placed. -
James's Rogue One TK Build
jamesmillerio replied to jamesmillerio's topic in Rogue One Build Threads
@gmrhodes13 You mentioned the belt closure; in one of the pictures above it looks like it doesn't overlap at all (and only slightly in other pictures) but the CRL calls for the rear belt to overlap the front. I'm not sure how literal to be about that, just curious your opinion. -
James's Rogue One TK Build
jamesmillerio replied to jamesmillerio's topic in Rogue One Build Threads
Oh interesting! I was under the impression the shins were open in the back and velcro'd shut. That's an easy fix. The blue you saw on the belt is actually painters tape I forgot to remove after prepping for paint, hah! Nice catch. I'll swap out the straps for 2" ones once I paint it. -
James's Rogue One TK Build
jamesmillerio replied to jamesmillerio's topic in Rogue One Build Threads
Looking back at the pictures, one of the side black wings looks strange. I think I need to adjust how they attach to bring them in more and prevent them from overlapping the chest armor. -
James's Rogue One TK Build
jamesmillerio replied to jamesmillerio's topic in Rogue One Build Threads
I've had a lot of home projects that have kept me from working on my armor but I'm back in business now and making great progress. I put the armor on today after all of the adjustments I'd made. Here is a summary of adjustments since my last post: - Adjusted how and where the chest attaches to the abdomen in order to pull it into the right place. - Changed where the side black pieces attach to the chest. - Changed where my thighs attach. They used to hang off of a belt, now they are attached to the bottom of the abdomen. This feels much more secure and doesn't feel like it's drooping like it did with the belt. - Brought the butt up higher to align with the belt. I had my wife take some pictures while I had it on to figure out what needs further adjustment. Here is the list of things I know are wrong as well as things that need minor adjustments. - I did a lot of sanding so it needs paint bad. - I'm missing a cover strip on my thigh. I'll be printing one of those. - My back plate was misaligned. I just need a helper for that, it stayed in place fine. - I think my thighs need to drop an inch or two. They are being pulled up into the cod piece. Just need new straps here. - Need to fix my belt. It keeps detaching in the front. Over all though, I think I'm pretty close. I'm getting really excited to cross the finish line. Going to make some adjustments tonight and hopefully take some more pictures tomorrow. -
James's Rogue One TK Build
jamesmillerio replied to jamesmillerio's topic in Rogue One Build Threads
It's update time again. I usually take the week of my birthday off and next week is no exception. I'll be spending my time (mostly) sleeping and working on the fitment details of the armor to hopefully get it into a good shape for paint by the end of the week. My biggest issue right now, as pointed out by [mention]gmrhodes13 [/mention], is the gap between my chest plate and my abdomen. It's really pretty cavernous... I could probably hide an Ewok back there if I tried. But I digress... One of the issues I have is the black extension pieces on the sides for this kit have a pretty sharp almost 45° turn inwards, which is pushing the chest armor out on the sides. You can see that in the following pictures: I've never quite known why they were molded like that when all the other kits and gallery images I've seen has them basically flat against their sides and it acts strictly as a black connection piece between the chest and back armor. With that in mind, I took my heat gun to them and flattened them out and I think it's helping already. It's not perfect, but it's no longer adding more of a protrusion. After that what I think is happening now is the top center of my abdomen armor is pushing the bottom of my chest armor out some. I trimmed a little gap out of there, but I think I may have to trim a lot more. For obvious reasons I'm somewhat hesitant to do that for fear of cutting too much off, but I'm not sure there's a better option but I'm open to suggestions. Hopefully I’ll have a productive week coming up! -
James's Rogue One TK Build
jamesmillerio replied to jamesmillerio's topic in Rogue One Build Threads
Did I mention I have short legs? Haha. Sent from my iPhone using Tapatalk -
James's Rogue One TK Build
jamesmillerio replied to jamesmillerio's topic in Rogue One Build Threads
Actually, I just remembered I have a couple pictures from that time. None straight on, but you can see how high the abs were. The sweet spot must be in the middle somewhere. It does seem like that improved the rear gap between the butt and thigh though. Love the lollipop picture with my daughter also. Sent from my iPhone using Tapatalk -
James's Rogue One TK Build
jamesmillerio replied to jamesmillerio's topic in Rogue One Build Threads
Thanks! Not sure how I didn’t notice the huge gap on the chest wings. I’ve refrained from trimming my ab armor around the top but I have seen some troopers cut some out of the middle in the top so it’s not pushing out at the center point. I’ll try raising the armor before I do that though since that may bring everything flush. I usually criss-cross my suspenders for the ab armor but it seemed a little high the other day but maybe I was mistaken. I’ll give it another shot. Thanks again! Sent from my iPhone using Tapatalk -
James's Rogue One TK Build
jamesmillerio replied to jamesmillerio's topic in Rogue One Build Threads
Just got done wearing my armor for Halloween and I think things are improving. I may still need to shim one of the thighs but aside from aligning things and touching up paint I’m fairly happy. Open to critiques for sure. Sent from my iPhone using Tapatalk -
James's Rogue One TK Build
jamesmillerio replied to jamesmillerio's topic in Rogue One Build Threads
Oh that’s awesome, I’ll check that out. I tried just tightening things a lot more and it worked out better but having actual support is probably the way to go. Sent from my iPhone using Tapatalk -
James's Rogue One TK Build
jamesmillerio replied to jamesmillerio's topic in Rogue One Build Threads
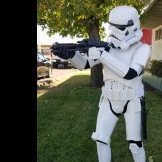
I got a chance to wear my armor the other day to test everything out. I was able to take some great pictures but did find an issue I'm having problems solving... But first, here are the pictures: It felt awesome to finally get to wear the whole thing and I was really happy with how well its coming along and how great the pictures turned out. The one issue I'm having is with my thigh armor. As you can probably tell from the images, its hanging pretty low from my belt. Admittedly, the belt is slipping some so I need to maybe add some velcro to it to keep it snug, but even with it snug I can't get the thigh armor to go much higher. After having my wife look at how it fits in the back, in her words, "there's just too much you in there." Other than looking wrong, it also causes the sniper knee plate and ammo belt to catch on the thigh/shin and it makes walking difficult. It is also damaging the paint on each of the parts unfortunately... Also, because the thigh armor is so low, it causes the drop boxes to catch on the top of the thighs since they should be floating above them. All of that being said, my thighs and calves are fairly large from being a bigger guy (mostly) but also years of playing drums. I'm not sure if trimming them along the inside contour would give me some more room to move up more, or if I need to make some kind of shim for where they close in the back. Otherwise, I think I'm doing pretty well and I'm pretty close to submitting for approval. If you notice anything else, definitely let me know. Any advice would be greatly appreciated!
