

Pixelito
-
Posts
27 -
Joined
-
Last visited
Content Type
Profiles
Forums
Gallery
Articles
Everything posted by Pixelito
-
Rubber Gloves -vs- Nomex
Pixelito replied to vortex512's topic in Build Threads Requireing Maintenance
I'll go ahead and throw my hat in the "nomex for trooping" ring. This can get a bit more expensive though since you'll likely need a second set hand guards. I use my accurate rubber gloves for pictures, like for approval or trading cards, but I use nomex gloves when I'm actually trooping. Those chemical gloves get WAY too uncomfortable for me. That and the average person you'll encounter while trooping will never say "Hey! Your gloves aren't rubber! FAKE!" ... So I opt for comfort over accuracy in the field. Like Sarah said, if you want to use the rubber ones while trooping, I'd invest in a liner to keep things a bit less...gross. -
Looking good Riley! I just had to make this fix, so I'll save you a little time in the future- going by the front and action pictures, your belt will probably need to be just a little higher up. Should sit right under the buttons. Your side pictures make it look better though... Is it a little loose maybe? Other than that, Sarah already mentioned the rivets that need to be painted. A few quick fixes and I think Cloud City Garrison has another EIB!
-
TK-16924 Requesting HWT Centurion Status [Anovos] [7]
Pixelito replied to Pixelito's topic in Request Centurion Status
Thanks everyone! -
TK-16924 Requesting HWT Centurion Status [Anovos] [7]
Pixelito replied to Pixelito's topic in Request Centurion Status
Thank you Tony! I'm honored! -
TK-16924 Requesting HWT Centurion Status [Anovos] [7]
Pixelito replied to Pixelito's topic in Request Centurion Status
Thank you! Secret is lots of Apoxie Sculpt and hours of sanding!...So much sanding... I still see sandpaper in my dreams some nights. Ah yes! I've been considering this for a while but I keep putting it off for some reason. I think that I was hoping for something cool to come along to stick in there... But nobody would see it anyway, I suppose! I guess I'll stick with foam. -
TK-16924 Requesting HWT Centurion Status [Anovos] [7]
Pixelito replied to Pixelito's topic in Request Centurion Status
Update: My belt was a little too low, so I raised it up to a more accurate level (I hope. ;P ). -
TK-10204 Requesting HWT Centurion Status [AP] [6]
Pixelito replied to CrookKnight's topic in Request Centurion Status
Congrats Shawn! I've been silently following this, but I figured I should say something! -
TK-16924 Requesting HWT Centurion Status [Anovos] [7]
Pixelito replied to Pixelito's topic in Request Centurion Status
There we go! A trip to the store, a few dollars and 2 minutes of work later: Thanks again for the positive comments, guys! -
TK-16924 Requesting HWT Centurion Status [Anovos] [7]
Pixelito replied to Pixelito's topic in Request Centurion Status
Thanks guys! I knew that I was going to forget a picture or two. Here's the side shim picture that I meant to add (I can take more tonight if needed): I somehow managed to take this picture at a weird angle, so you can't see the cutout. It's present in a picture in the original post. Just so it doesn't seem like I'm hiding it- It's probably a good time to bring up that I'm a bit uncertain about how the cutout works on my fatty shims. I think that I might have to extend the cut all the way back but I didn't want to do it without being told first, just to be safe! As for the elastic, I'll get that all fixed up after work! I have some non-roll elastic left from making my shins. If anybody sees this before tonight, is that type too textured for this purpose or does it matter? -
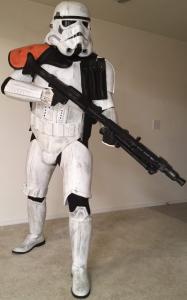
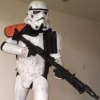
Name: Brian Martino Legion ID: TK-16924 http://www.501st.com/members/displaymember.php?userID=21419&costumeID=122 Garrison: Cloud City Garrison EIB Application: http://www.whitearmor.net/forum/topic/37190-tk-16924-requesting-hwt-eib-status-anovos581/ Height: 6' 4" Weight: 250lbs. Armor: Anovos (Modified) Helmet: Anovos Blaster: Hyperfirm DLT-19 Boots: TKBoots Canvas belt: Trooperbay Hand Plates: Trooperbay Electronics: Self-made fan system, iComm and Ukswrath's Hovi mics, amplifier and SHA Neck Seal: Anovos supplied Pauldron: Trooperbay I apologize for waiting nearly a year to put in this application. Thank you for your time and consideration. (Please pardon the interior of my armor. Adding the shims made a total mess of things!) Full Body: Armor Details: Helmet: (Note: I used an older picture because my s-trim is now glued on to keep it in place a little better. It hasn't changed though.) Accessories: (Note: The blaster pictures are the same that I used on my EIB application, so they're a litter older. Nothing has changed though.) (Just showing the electronics. There's lots of hot glue in there and it's cramped! Everything is in the bucket though.) Shims: (I'm just adding this section to show how I got Anovos armor to fit me. I know it isn't totally necessary.) Split the ab plate and added the shim Details were added back on using Apoxie Sculpt Same with the kidney plate
-
TK-16924 Requesting HWT EIB Status (ANOVOS)[581]
Pixelito replied to Pixelito's topic in Request Expert Infantry Status
Thanks guys! =) -
TK-16924 Requesting HWT EIB Status (ANOVOS)[581]
Pixelito replied to Pixelito's topic in Request Expert Infantry Status
Thank you! I will fix the issues that you brought up before submitting my Centurion application! I greatly appreciate the feedback =) -
TK-16924 Requesting HWT EIB Status (ANOVOS)[581]
Pixelito replied to Pixelito's topic in Request Expert Infantry Status
Here ya go, Tony! Hopefully these pictures show the weathering better. I also went out and blasted a few more rebels, just to be sure. -
TK-16924 Requesting HWT EIB Status (ANOVOS)[581]
Pixelito replied to Pixelito's topic in Request Expert Infantry Status
No problem, Tony! I'll take some closer pictures when I get home from work. You're correct, though. The lighting really washed out the weathering I added there. I'll add a little more for good measure anyway! =) -
TK-16127 Requesting HWT EIB Status [RT] [583]
Pixelito replied to magni's topic in Request Expert Infantry Status
That DLT-19 is gorgeous! I also really like what you did to the top of the filter cone on your backpack. -
TK-16924 Requesting HWT EIB Status (ANOVOS)[581]
Pixelito replied to Pixelito's topic in Request Expert Infantry Status
Thanks! I'm glad you like it! Thank you! I just saw that you applied as well, so good luck to you too! =) -
TK-16924 Requesting HWT EIB Status (ANOVOS)[581]
Pixelito replied to Pixelito's topic in Request Expert Infantry Status
I apologize for the change in photo quality/lighting. Some were taken at a different time using my phone. I'm also currently working on a way to hold my biceps up without a bicep hook. The hook holds them way too high, but not having them...well, you can see that they slipped down a little while taking the pictures. The low butt plate has also been brought to my attention. I'm working on a good way to fix that. -
Name: Brian Martino Legion ID: TK-16924 http://www.501st.com/members/displaymemberdetails.php?userID=21419 Garrison: Cloud City Garrison Height: 6' 4" Weight: 260lbs. Armor: Anovos Helmet: Anovos Blaster: Hyperfirm Boots: TKBoots Canvas belt: Trooperbay Hand Plates: Trooperbay Electronics: Self-made fan system, iComm and Ukswrath's Hovi mics, amplifier and SHA Neck Seal: Anovos supplied Pauldron: Trooperbay\ Thank you for your time and consideration!
-
TK-16924 of Cloud City Garrison requesting access! http://www.501st.com/members/displaymemberdetails.php?userID=21419
-
Extending ab/cod and fixing armor gaps
Pixelito replied to Pixelito's topic in Assembly, Mods, and Painting
Here's the gap between the ab and chest plates that I'm talking about. Sorry for the poor lighting and quality and all that. I couldn't get any pictures of the gap between the back plate and kidney plate... I'm doing the best I can by myself. -
Extending ab/cod and fixing armor gaps
Pixelito replied to Pixelito's topic in Assembly, Mods, and Painting
I'll take some pictures tonight after I'm off work. I probably should have done that in the first place, sorry! Regarding the armor make, it's Anovos. I figured an armor gap is an armor gap and the maker didn't matter much. Sorry again for not posting that initially! Brian- That Facebook post looks almost exactly like what I had planned on doing. Although, I was thinking that I would split the cod piece off a little higher so that the belt would be able to cover where the shim is. That shim looks a little too low. -
I've been looking around for topics on this, but I haven't actually found any answers or helpful information, really. I'm rather tall and after some test fitting, I have about a 3" gap between the top of my ab plate and the bottom of the chest. I had sorta' anticipated this, so I bought a good amount of extra ABS so that I could attempt to remedy the issue. My initial idea was to separate the cod and ab pieces, then add a few inches of ABS and hide that behind the belt....hopefully I can extend it enough. I'm sure this has been done by other tall troopers, but I haven't seen any images or anything. Am I going about this wrong, is it just a stupid idea that will never work or am I on the right track? How could I cover up the shim while keeping the belt in an accurate position? This has all brought another issue to my attention that I would like some input on. Initial measurements suggest that there will be a fairly extensive gap between my back and kidney plates. Is there a good way to fix this or do I even need to fix it at all? The CRL doesn't seem to say anything except that the back shouldn't overlap the kidney.... Clearly the opposite of my situation. I'm actually getting unreasonably stressed about these problems. I'm shooting for Centurion, so I want everything to be as "perfectly imperfect" as can be. Thanks for any help/info you guys can provide!
-
How 'battle worn' is too worn?
Pixelito replied to Pixelito's topic in Hard Armor (General Discussion)
That looks rather effective, I'll keep it in mind! Now, this is slightly off-topic, but when you wipe it all off and go standard TK, do you have a separate belt with the drop boxes or do you attach them somehow? Edit: I have basically answered the question that I was trying to find an answer to, by simply reading about drop box attachment in the CRL. Seems easily removable and I now realize how stupid of a question that was! I apologize. -
How 'battle worn' is too worn?
Pixelito replied to Pixelito's topic in Hard Armor (General Discussion)
Thanks guys! I'll definitely check with my GML when I get to this part! Didn't really think about that, so I appreciate the info. Joseph, I'll probably be in contact with you in the future when I finally get to start building, thank you for the offer! -
I did a little searching but couldn't quite find an answer on this. I'm going for a Heavy Weapons Trooper. As I have it pictured in my head, HWT probably get shot at a lot... You know, big guns and all that... SO, I would really like to make the armor look more battle-worn than just scuffed up a little bit. I'd like to add some dents and scorch marks from being shot or nearly shot. How much is too much? And is it acceptable for Centurion to be this battle damaged as long as it looks great? I'm getting way ahead of myself, as I don't even have my kit in-hand yet, but I'm kinda' trying to plan the whole thing out. Thanks!
