


kman
-
Posts
1,571 -
Joined
-
Last visited
-
Days Won
7
Content Type
Profiles
Forums
Gallery
Articles
Media Demo
Posts posted by kman
-
-
I look forward to seeing this come together!
-
-
10 hours ago, Sly11 said:
Holy mother of a Star Destroyer Kman!!
Are you sure that's enough?
Apparently not, because I forgot a couple and just added them to the in-progress list, LOL!
TFA/TLJ First Order Lieutenant/Captain
Heavy Weapons Trooper
9 hours ago, justjoseph63 said:I think Kalani and Glen may share a chromosome or 2..

Brother from another mother!

-
 1
1
-
-
Hmm, let's see.
Approved:
501st:
ANH-Stunt Stormtrooper
Heavy Weapons Trooper
Imperial Staff Officer
Imperial Warrant Officer
Bridge Crew
TIE Reserve
Rebel Legion:
ANH Han Solo
ESB Han Solo
Jedi Knight
Rebel Fleet Trooper
X-Wing Pilot (OT)
Willrow Hood
Rogue One Rebel SpecForces Trooper (aka Scarif Marine)
Endor Rebel Trooper
Rebel Captain (Star Wars Miniatures Game version)
Non-SW:
Malcom Reynolds
Jack Harkness
In process: (not yet approved, obviously)
OT TIE PilotDirector Krennic
OT Imperial Gunner
Hoth Rebel Hangar Trooper
Rogue One generic signals intelligence technicianRogue One Intelligence Officer (Generic Operations Officer) (Generic Cassian Andor)
TLJ Resistance Trooper
TLJ Poe Dameron
TFA/TLJ Resistance X-Wing Pilot (still deciding which variant)
TFA/TLJ First Order Lieutenant/Captain
and, and...
-
This is amazing! I'm blown away by the amount of detail, time and effort you've put into this. The results are outstanding!
And I agree, considering how fast kids grow, I hope you're ready with v.2.0 for when he outgrows this one, very soon! LOL
-
That's literally a $13 Rubies plastic blaster that someone has spray painted black and wiped a little silver over.
It'll pass basic. But I personally wouldn't pay £45 for that, and I am lousy at painting.
Actually, I should modify that: It'll pass basic in most places. I'm not sure if it will pass in the UKG which has more stringent guidelines. You may wish you post your query on the UKG forums to get a more authoritative response.
-
I would stick with the clear. It has a longer track record. And armor yellows over time, sometimes subtly, sometimes not. So even if the white matches reasonably well now, it may not stay as matched. No such issue with the clear. And frankly, clear is just more versatile, since you can use it on so many other projects (ones that aren't necessarily white).
-
Safe to assume you're familiar with Retr0bright to remove yellowing and restore that OEM creamy white goodness?
-
-
Just be careful about how much pure Acetone is used, especially with thinner armor (like Anovos). That stuff eats (and warps) thin plastic very very quickly. Thicker stuff can handle a small amount of the pure stuff, carefully applied, or runnier ABS paste, but thinner plastic can have serious issues with that.
-
15 hours ago, Btabc said:
Odd... perhaps it's dealing with my computer then? Thanks for the heads up, I'll check on another device/computer.
I self-host. For some reason certain business firewalls have an issue with my site, which is odd, since they're just direct links to plain JPG files. Try it on mobile, or somewhere other than work, and chances are it'll work just fine.
")
-
Thanks, guys.
I edited it a bit to add some advice on safely working with Acetone, given the nasty fumes...
-
At the encouragement of @ukswrath, here is a post I originally made a year and a half ago on the Anovos FB build group, which is handy for all makes of armor, not just Anovos.
ABS Paste?!?! WTF is THAT?
I've seen variations of this question over and over. So perhaps this will be helpful.
ABS paste is homemade glue for your ABS plastic. It literally melts and reforms the plastic into a solid piece, so it's more like welding than gluing. But as the warning phrase "it literally melts..." foreshadows, you should be careful.
Making couldn't be easier. Get a GLASS jar. Don't be that person who makes it in a plastic cup. You know... the one that puts plastic melting stuff into a plastic cup. You've met that guy. Don't be that guy.
All you need is a jar, some ABS scrap, and some construction grade acetone. Nail polish remover is NOT strong enough, even though it has "some" acetone in it. Pick up a bottle at Home Depot or the like. (For people in other countries, like the UK, where Acetone is not readily available... you have my sympathies)
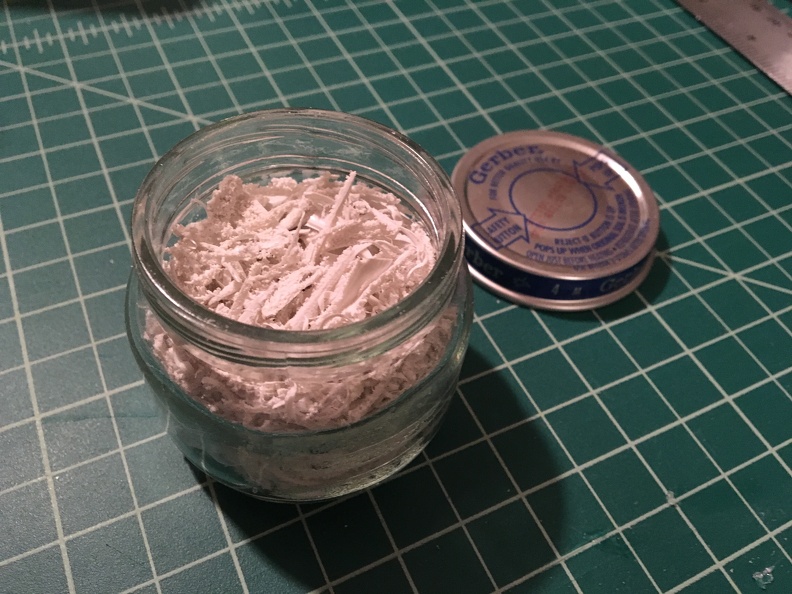
For containers, I feel a glass baby food jar is ideal. It's just the perfect size (unless you doing something epic!), stupid cheap (if you don't already have one somewhere), and easy to work with. I'm going to assume baby food jar, so if you choose a 2 quart mason jar, scale as needed.
In general, ABS paste is practically free, other than the price of a tiny bit of Acetone and maybe a buck for a jar of baby food, if you don't have a suitable container already, since your source material is scrap from your own build. (never toss that armor scrap!)
A NOTE ABOUT FUMES: Pure Acetone is nasty stuff. You really don't want to be breathing Acetone fumes. A whiff here and there likely won't cause lasting harm, unless you have existing pulmonary issues, but still, do your best to avoid breathing a lot of the stuff. At a minimum, you can end up with a NASTY headache. At worse, you can actually cause damage to your lungs. Use your own level of protection that feels best for you... some want to wear a full respirator (with a volatile organic cartridge), others, like myself, are content to work outdoors and minimize breathing it. (Once the jar is capped, it should be fine to bring indoors.)
FILL the jar with the tiniest scraps if ABS you can get. I literally used the curly-que and powdered scrap from under my belt sander, after all my rough cuts, in addition to cutting up a few pieces of scrap into 1/4" square pieces, with scissors.
And now the magic. Add approx 1 teaspoon of Acetone (and remember, I'm assuming a baby-food size jar... scale accordingly if you're trying to go big and make enough for your entire squad to build with!). Cap the jar, wait 15-20 min (or more, no worries) and then check on it.
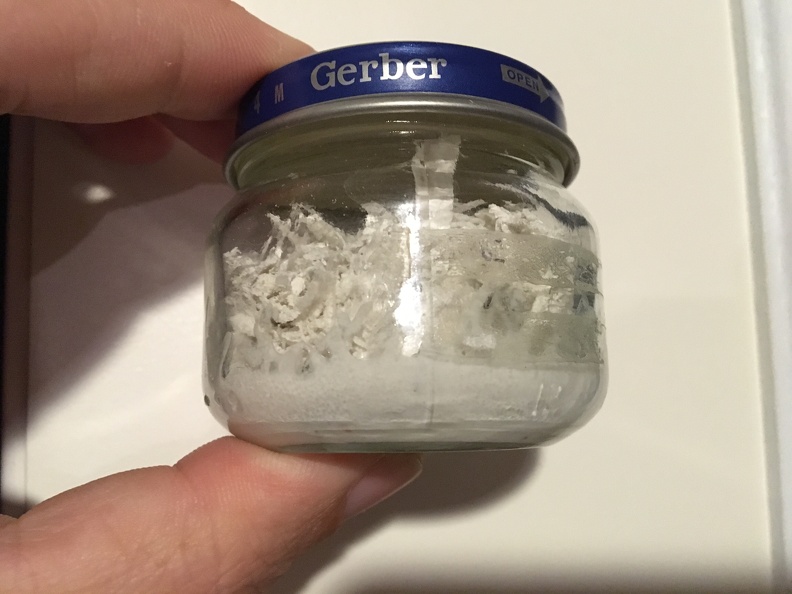
Poke it with a stir stick. (You can literally use a stick. Although IMO, a wooden coffee stir stick (free at Starbucks!) is ideal, and Popsicle sticks have their proponents, too, as does the toothpick crew, for detail work.) If you literally do not have a stick, a strong piece of scrap you don't care about will do, just be careful where you set it afterwards. But poke at it. Get an idea where it's going.
Then add about 1 tsp more Acetone. Re-cap it again, wait 15-20 min, then check again, and this time, stir it a little more seriously. Note the consistency. You'll probably want to add some more, perhaps 1 more tsp, perhaps less? You may be starting to get a feel for it by now. Let sit for a good 1/2 hr, then check and stir AGAIN. We're going slow. Slow is good. Watch some TV or read a book. You have better things to do than watch ABS melt in super slow motion.
At this point, you SHOULD be close to ready to go. If not, I recommend letting it sit overnight before checking it again. (in fact, that's not a bad idea in general, but it's not strictly necessary) Only add more Acetone if you still really think it's too thick and clumpy in the morning, after stirring it some more.
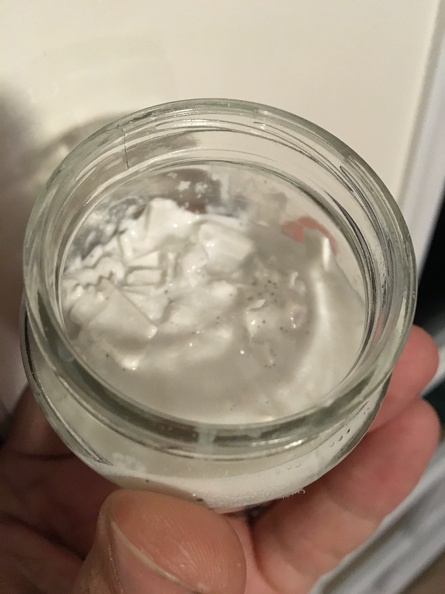
Repeat until you reach that magic mayonnaise moment.
Correct consistency is *roughly* mayo-like. I'd say somewhere between Elmer's glue (a little too runny?) and Toothpaste (perhaps a little too thick). Too runny = bad. Remember the "melting plastic" part? You don't want that running down your armor. Too thick and you may get air pockets. Shoot for the Goldilocks zone.
 )
)
When you're ready, apply with a stick. Let it dry (duration depends on thickness... maybe 20 min, maybe overnight?) and sand it down. Repeat until pretty.
Relatively small amounts (read: the small patches that ABS paste is generally best for) should be relatively safe to use indoors, just be aware of the fumes. Larger projects (or sensitive spouses... not that it smells too different from the nail salon, in my mind) are probably best to work on outdoors.
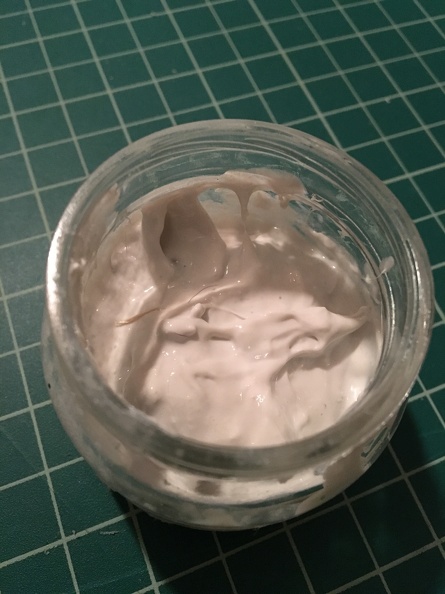
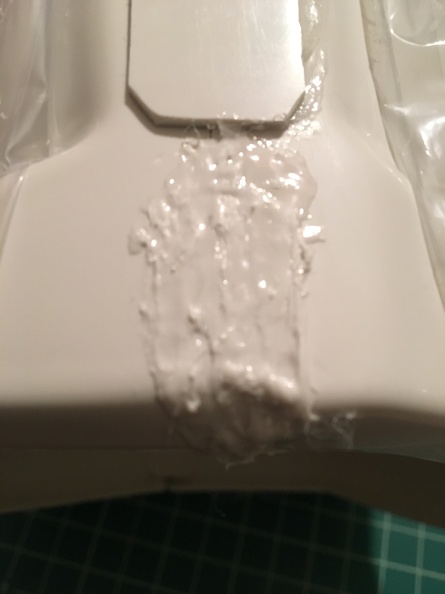
The beauty of using the same plastic your armor is made from, to make paste, is you get a dead-on 100% perfect color match. No painting needed! (note: The level of polish/sheen will not be the same, but the color itself will be a match. ABS paste isn't really good for large area applications... and trying to do that will likely end up causing warping from too much acetone anyway) (2nd note: ABS paste is not as strong as the original plastic. It's not actually a glue, even if it looks like one. For connections needing a very strong join, use CA glue, as usual.)
(pre-sanding... but note that color match to the Anovos armor!)
The paste doesn't really go bad, but eventually it'll harden and you'll need to add more Acetone. Keep it capped, and it'll last longer, of course... you can dry it out quite fast if you leave the cap off for more than a few hours.
Future batches you can probably go faster (read: add more acetone, sooner), but I recommend the slow approach when you're starting out, until you have a good feel for it.
Good luck!
-
13
-
-
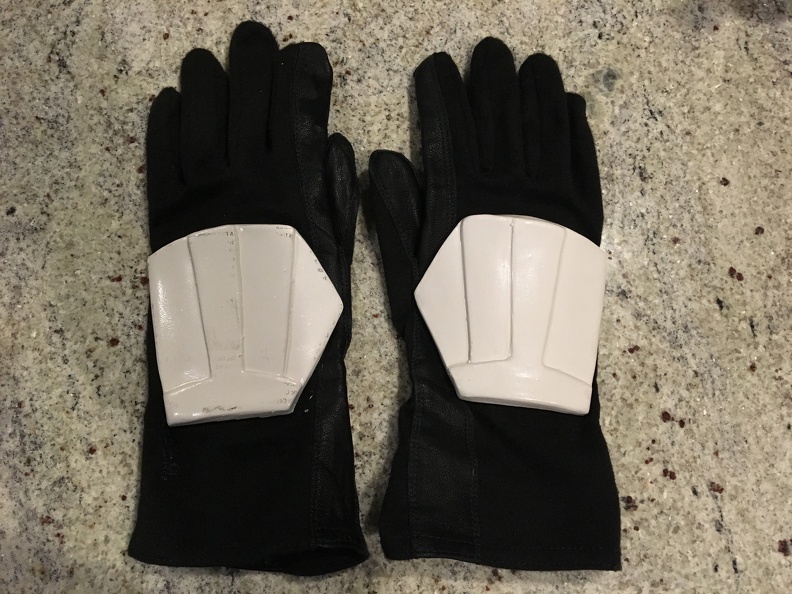
For those who have used Nomex, what did you attach the hand plates with? I try a spray adhesive and E6000 and neither of them worked. Any other ideas??
I tried E6000 as well and it did not work at all. I use regular SuperGlue and it worked perfectly. I have even ran my gloves through the washing machine and the hand plates are still perfectly attached.
I used E6000 to glue my latex plates from JustJoseph and it has worked great.
-
2
-
-
^^ That's impressive.
-
This is the internation FB group: https://www.facebook.com/groups/248862279225/?ref=bookmarks
This is the freshly minted forum: http://mousedroidbuilders.club/
The plans I'm using are available on both those.
For the top greeblies and side stuff I'll probably use the 3D files TinyP has done. He also did some wheels but they are for hubs from the chassis he's using.
I'd like to have got a vac shell but I'd have to import as the new UK source isn't quite 1:1 scale (22" long is 1:1 the RWA one is 20" long). The company most use is this one: http://www.graniteearth.com/ProductDetails.asp?ProductCode=One-BOX
Thx!
ARGH. Why on earth would someone take the time to vacuform a shell and NOT use black plastic, forcing you to paint it??? (and ensuring any scratches will be super obvious)
-
Following. EAGERLY.
I've been wanting to do this myself! What FB group are you referring to, Chris? I might just start copying your build bit by bit.
Although I admit I was sort of wanting to go with one of the vacuum molded chassis, if I can find one, rather than piecing together the raw sheets. Just seems more durable.
I assume you'll be modeling and printing the top and side greeblies?
-
Yes, TrooperBay is just reselling the same Hyperfirm you can buy direct from HFx. No difference. Handy way to just add one to your order if you're already ordering from him, otherwise, it's almost as easy to buy direct from HFx.
Only the Elite model has the D-rings preinstalled for Centurion. That's a 5 minute installation with very basic tools, though, and then you're good for Centurion with ANY model Hyperfirm. I can't recall which model TB resells.
-
Amazon, generally cheaper than other retailers
Not usually for small items, though, because they have to add in shipping. Once you get into the sub-$5 range, I find it's often not too tough to meet or beat their prices locally, with no shipping cost (or time). The exception might be cheap stuff that ships directly from China (taking the slow boat, 1 month delivery time) that's sold via Amazon, but not BY Amazon. (not Prime, either) For those who are extra patient, that's usually cheapest option.
Amazon definitely carries it, however, when local retailers don't. (or have unusually high mark ups)
-
I posted some of this on the thread over at MEPD as well, but probably warrants mention here, where there is more traffic, too.
Reading above, the "block" on top of the scope is accurate, in some cases? I personally don't care for it... I don't remember seeing it, and it just looks bizarre. I'd leave that out, if it were up to my vote. If not, can it be cut off relatively easily?
Shame about the scope rail. I really think the filled in portion is not great for the overall look. I understand from a moulding standpoint but can it be cut out in the final product? What about replacing it with an actual metal rail? (which is what THG Props did with their otherwise rubber E11s) That might solve any dropping issues, for a modest bump in price or complexity. Perhaps as an option?
I suppose the same issue exists with regard to the front site infill? Again, is it just a moulding issue or a structural issue? Because if that fill can be cut out, the look would be considerably enhanced. Might be a skosh fragile by comparison to the rest, but just a thought, anyway. If it's just not a good idea, I'm not hung up on that.
-
Thank you all. I'm starting to get my supplies ready. I already have some things I need. I just need to gather the rest of supplies. I feel pretty comfortable I will be able to complete the build. I think the scariest thing is trimming. I'm sure that's the common denominator for most first time builders.
Wouldn't you guys agree?
Definitely the scariest part. I'll see if I can find a link to the YT video I posted on score and snap.
Edit: See if this helps:
-
I was not. However, I am looking to attend the next one whenever it comes around. I am already a member of the SoCal garrison page on Facebook and I've liked the LA Squad on Facebook as well.
I'd like to connect and ask you some questions if you have some time. Let me know what the best way is to do that and I'll reach out.
Excellent! You're welcome to PM me here, or on FB if that's easier. Happy to answer any questions you may have.
-
I agree. ABS doesn't normally need painting. And if you DO paint, considering armor tends to take a beating, you'll be consigning yourself to the armor's lifetime worth of touchups...
-
The sandtroopers also carried those electrobinoculars.
You can also convert it to Heavy Weapons Trooper if you add the backpack.
-
1
-
HOW TO: Make ABS Paste
in Tutorials, Tips and HOWTOs
Posted
I can't quite tell what's going on there. Maybe take another photo, and make sure it's in focus? (you may be too close for the camera to focus... pull back, and crop the photo instead of trying to get so close)
But yes, normally you can fill a hole with it. You need something behind it, however, at least while it's drying. Note the warning, though: It's not as strong as the original plastic. Especially completely unsupported.