

BrinkHouse
-
Posts
591 -
Joined
-
Last visited
-
Days Won
9
Content Type
Profiles
Forums
Gallery
Articles
Everything posted by BrinkHouse
-

BrinkHouse ANH TK Stunt Build [RT-Mod]
BrinkHouse replied to BrinkHouse's topic in ANH (Stunt and Hero)
Thanks guys! I'm pushing hard to get it done but also want to make sure I get the details right. It's a fine line I'm walking. -
BrinkHouse ANH TK Stunt Build [RT-Mod]
BrinkHouse replied to BrinkHouse's topic in ANH (Stunt and Hero)
Rebuilding Belt: As mentioned previously, the belt was not assembled to the correct length so I spent most of today getting it trimmed and reassembled according to CRL standards. I started out by sticking the ammo belt in the freezer so I could remove the snaps which were glued on the inside. Again, very happy this thing was assembled with e6000! "You missed a spot." Also, I'm pretty sure this armor has been through a firefight or two, it's plenty broken in! With the old snaps removed, I could measure for the new line that the belt will be trimmed to. I got this distance by looking at other builds as well as measuring the size of the button cover and adding 10mm extra. Made a few score marks along the line and then bent off the excess. As long as you score a few times it will separate very cleanly. Did this for both sides. Measured halfway down and 20mm in from the edge and marked, this is where the snap will be installed, same for both sides. Used my handy dandy snap installing pliers (have I mentioned these things are a lifesaver?) to punch out the holes in the plastic and installed the snaps. Then it was on to cutting the 45° angled corners. I eyeballed it, and I think they ended up being 18mm from the corners. Used an angle finder to trace the lines and then scored/snapped. I also cut down the button covers and glued those down. I realized after that I forgot to sand the edges. Facepalm. I may try to carefully hit these edges with some paper. They don't look too bad, I guess. Drop boxes went on, I tried my best to align these based on reference photos and screen grabs. Looking much better at this point. Then it was on to doing the fabric belt. I started by transferring the snap locations for the ammo belt, by making a mark with a pen through the hole of each snap. As I said previously I am able to use the old belt as a guide, as the ab facing snaps are already lined up with the snaps in the ab. However now that the ammo belt is shorter, the very outside snaps on the ab and canvas belt are not covered, and so I had to plan to remove the outside snaps and reinstall them closer to the center. I started by finding an appropriate new location. I should've spent a few more minutes on this, for reasons I'll get to later. Then I drilled out the old snaps. Made sure to go slow and attack them in a few passes so as not to overheat the plastic like I did with the knee ammo piece. Cleaned up the gunk with some mineral spirits and moving along. Next I drilled the holes for the new snaps and taped off the old area, ready to be filled with ABS paste. (forgot to photograph this step, sorry!) Installed the snaps and good to go. Cool. Next, I transferred these new hole locations to the belt using a small screwdriver. Was the only thing I had on hand that would fit through the hole in the snap. And this is where that 'should've spent a few minutes thinking about the location of this snap' thing comes back. I failed to realize that there was already a snap VERY close to this position, the snap that connects the end of the ammo belt to the fabric belt. I got really lucky and there was just enough room to install the snap but they are basically touching. Whew! I lined up and installed the other ab facing snaps and it seemed to all go together just fine. All that's left to do now is shorten the fabric belt, which will have to wait a few days for my friend to get back into town. She's a professional costumer so I trust her a lot more with a sewing machine than I do myself! My undersuit was supposed to arrive today but didn't for some reason, otherwise I would've done a full upper body fit test, guess that will have to wait. ...Until next time. -
BrinkHouse ANH TK Stunt Build [RT-Mod]
BrinkHouse replied to BrinkHouse's topic in ANH (Stunt and Hero)
Must've missed that bit. Darn. Ok, one more thing I can do while I wait for cover strips to arrive. -
BrinkHouse ANH TK Stunt Build [RT-Mod]
BrinkHouse replied to BrinkHouse's topic in ANH (Stunt and Hero)
Thanks Aaron! -
BrinkHouse ANH TK Stunt Build [RT-Mod]
BrinkHouse replied to BrinkHouse's topic in ANH (Stunt and Hero)
Yeah, that was my inclination, Tim. Annoying that the belt wasn't done correctly the first time but in having to undo a lot of stuff I'm learning a lot more about the armor and the small details, which I'm enjoying. I'll probably spend most of tomorrow figuring out how to get the belt rebuilt to spec. Thanks for your input! Regarding rivets, yes I should've mentioned that I will definitely be adding the split rivets in the side for CRL but they won't add much functionality in my setup. Ordered latex hand guards, split rivets and additional cover strip material from Trooperbay today, looking forward to getting the arms/legs built! SO CLOSE! -
BrinkHouse ANH TK Stunt Build [RT-Mod]
BrinkHouse replied to BrinkHouse's topic in ANH (Stunt and Hero)
Sweet, thanks for the photo Darth! -
BrinkHouse ANH TK Stunt Build [RT-Mod]
BrinkHouse replied to BrinkHouse's topic in ANH (Stunt and Hero)
Just found these strips via Trooperbay, does anyone know how well they match the RT-Mod armor? https://trooperbay.com/abs-plastic-extension-strips.html -
BrinkHouse ANH TK Stunt Build [RT-Mod]
BrinkHouse replied to BrinkHouse's topic in ANH (Stunt and Hero)
Bummer, the spare ABS plastic I have doesn't quite match the whiteness of the armor, so I'll have to wait until I hear back from Rob to order some cover strip material. -
BrinkHouse ANH TK Stunt Build [RT-Mod]
BrinkHouse replied to BrinkHouse's topic in ANH (Stunt and Hero)
Internal Strapping: Here's a quick look at the finished strapping! Feels great to not be taping stuff together anymore. Today I finished all the strapping for the shoulder bells, back, chest, kidney, ab, cod and butt pieces. I mainly used 1" knit elastic and heavy duty snaps. For connections which had critical spacing, like the back to kidney, I taped the pieces together and installed the strapping to maintain the spacing. Worked really well. One trick I used was to glue one whole side of male snaps onto the plastic, let that dry and then snap on the strapping with the other male snap piece attached and then glue/place it exactly where I wanted it on the mating armor piece. This worked really great for the back to kidney and kidney to butt pieces. The ab and kidney are held up with velcro'd suspenders, which work great. I love the heavy duty velcro approach because it allows for fine tuning of the armor over time, as well as if I want to replace the straps or suspenders. No biggie. I know a lot of people rivet the left side of the ab/kidney together, but I chose to use velcro straps on both sides. The "access" side, the side I'll use to get in/out uses 2" knit elastic with snaps on one side and velcro on the other. My main reasoning for velcro was again adjustability, I really like the idea of being able to easily modify and adjust things in the future without having to tear out webbing, rivets, etc. The other reason I went this route was because I left the ab and kidney armor just slightly larger than my actual size, and the velcro allows me to adjust the pieces in to compensate for that while also leaving opportunity for them to be expanded if necessary. With the velcro attached on both sides, the armor is held together really well. If I were using this stuff to do heavy movement or lots of physical activity, I may not have gone this route, but the fact that I'll mostly be standing around, posing, etc. leaves me feeling more than confident in the velcro. The shoulder straps use 1.5" elastic with double snaps to connect the front to back and velcro to hold the armor strips down to the strapping. The back piece snaps on and the armor strips have velcro which connect to the top of the back plate. I'm pretty sure the CRL calls for these to be free floating in the back, however, so that may change. If so I'll take the velcro off the back and add the white elastic band instead. Lastly, the shoulder bells got new strapping with snaps from the shoulder strap to the bell, and then continuing down to where they will snap onto the inner bicep. My hope is that these, along with the plastic hooks, will keep the bicep from ever sagging. While I wait for some feedback about the belt situation, I'm going to attempt to glue up the biceps and make the hooks, so that the entire upper body (sans forearms) is completed. I think I have enough extra ABS to make the cover strips... -
BrinkHouse ANH TK Stunt Build [RT-Mod]
BrinkHouse replied to BrinkHouse's topic in ANH (Stunt and Hero)
Worked most of the day on making snaps and assembling the strapping for the body section of armor. Got everything done except I ran out of velcro for the kidney/ab side closure. Once I install that tomorrow I'll post photos of it all. Decided I'd start working on the belt. Because it had already been assembled using a khaki colored belt, I could use that belt to transfer the existing snap locations to the new white TKettle belt. Only one problem... When this belt was first built, the ends were not trimmed to the correct length, and so the two end snaps, which correspond to snaps on the ab plate (already installed) are not going to be covered if I trim the belt down to its correct length. I'd have to drill the snaps out on the ab plate and fill the holes with ABS paste, then drill new holes closer in to the center, within the cover of the ammo belt. The alternative here would be to leave it as is, which means that the plastic material which extends past the last ammo box is 3 1/8" on each side... Is that acceptable for EIB/Centurion? Didn't see a specific measurement required on the 501 requirements for either... Not to mention the snaps that were installed were glued inside the button covers which would need to be cut off and relocated. Argh. -
BrinkHouse ANH TK Stunt Build [RT-Mod]
BrinkHouse replied to BrinkHouse's topic in ANH (Stunt and Hero)
Kidney notches cut. I won't be applying for Centurion right away, as the previous owner had cut out the ab buttons and replaced with screw in style, which aren't allowed. For now I should be able to get EIB and maybe down the road I can fix that and any other small issues I'm not able to fix right now. -
BrinkHouse ANH TK Stunt Build [RT-Mod]
BrinkHouse replied to BrinkHouse's topic in ANH (Stunt and Hero)
I was wondering about that because none of my body armor has return edges, and only the bottoms of the thighs, biceps and shoulder bells, shins and tops of forearms have them... Edit: Ok, I lied. Upon further inspection, the top edge of the ab has a slight return. Maybe I can heat the area where I cut the curve and try to extend that return all the way across. -
BrinkHouse ANH TK Stunt Build [RT-Mod]
BrinkHouse replied to BrinkHouse's topic in ANH (Stunt and Hero)
Trimming Kidney and Ab Pieces: My first cuts and some of the most important to get right. No pressure, right? I started out by taping the two pieces together to find the right fit and marked approximately my center line with a pencil (half way from my stomach to back). Then I took my straight edge and drew the actual line with a fine point sharpie. Once I had marked all four lines, I refit the armor and aligned the lines together, just to double check it was correct. They were, and they leave a very small amount of extra material in the event that I have an extra large lunch one day and don't want to feel like I'm wearing a corset. Since I'll be doing a velcro closure, it leaves me a little bit of flexibility in order to get the tightness just right from troop to troop. Happy with the fit, I carefully cut down my straight edge with a razor blade a few times to score the plastic. I was then able to bend the cutoff back. I ran my razor blade down the center carefully to separate the two pieces. Will need some sanding but ultimately came out pretty well! Taped back into place, I drew a curve that would match the ab to the kidney a little better, I thought it looked sloppy to have the ab be so much taller at the joint. Then with sharp scissors I cut out the curve. This still needs some finessing and sanding but I'm pretty happy with it. The mid section had velcro suspenders installed, which I really dig. They can be removed easily but hold really well during use. I put them on in order to get a feel for how things were fitting. Taped on the butt piece and cod piece, and attached the belt (which is currently built but will be redone at correct length and with white belt instead of canvas) and overall, I was really happy to see things lining up and feeling good! Then I threw on the chest and back armor because I was curious about how they were going to sit with the ab and kidney plate as far as gaps. Pretty damn good! I did a little happy dance at this point. QUESTION: Because I trimmed the width of the kidney plate down, should I do the same for the butt piece so they line up at the sides? With the belt on it sort of hides that the butt is a little wider but I'd rather have it be right. Thanks! -
BrinkHouse ANH TK Stunt Build [RT-Mod]
BrinkHouse replied to BrinkHouse's topic in ANH (Stunt and Hero)
Can't wait to give this a try. -
BrinkHouse ANH TK Stunt Build [RT-Mod]
BrinkHouse replied to BrinkHouse's topic in ANH (Stunt and Hero)
You guys are awesome! Got the ab and kidney cut and fit last night, will post a little blurb with photos soon. Today I'm working on the strapping between back/kidney, kidney/butt and chest/ab plates. Also doing the closures for the sides of the ab section. Photos to come! -
BrinkHouse ANH TK Stunt Build [RT-Mod]
BrinkHouse replied to BrinkHouse's topic in ANH (Stunt and Hero)
Thermal Detonator: I started by cutting the caps down to width, unfortunately didn't photograph that step. Just used a dremel and carefully followed my pencil line. Next I placed the caps and hooks on and made pencil marks where the holes should be drilled. Also drilled a hole underneath the cover plate to allow air out when both caps go on. Then I installed the hooks, the kit came with hardware but you could pick this stuff up at HD. just 4) 6-32 x 1" flat head machine screws with rubber seat washers and nuts. With the hooks on, I placed the cover plate on and made some new pencil lines to make realigning it easy once the glue was on. Glued on the cover plate and tightly wrapped it with tape to dry. Glued on the end caps and done! I thought about starting on the belt next but I think I should wait to do that until the ab section is resized, so I guess that will be next. Scary! -
BrinkHouse ANH TK Stunt Build [RT-Mod]
BrinkHouse replied to BrinkHouse's topic in ANH (Stunt and Hero)
Just finished reading your build thread, very helpful. I was envious that you didn't have to do much trimming to get your armor to fit. Turned out awesome! -
BrinkHouse ANH TK Stunt Build [RT-Mod]
BrinkHouse replied to BrinkHouse's topic in ANH (Stunt and Hero)
*Saved for later* -
BrinkHouse ANH TK Stunt Build [RT-Mod]
BrinkHouse replied to BrinkHouse's topic in ANH (Stunt and Hero)
Got all the pieces split apart and glue residue removed. My fingernails hurt but everything looks good and is pretty much ready to be trimmed. Will need to procure cover strip material, should I reach out to Rob directly or is there another resource for picking that up? I did manage to possibly ruin my knee armor pack trying to remove the rivets. Didn't realize the drill was superheating the rivet and subsequently melting the plastic. Was able to salvage the second hole but the first one got massacred. Salvageable or should I look for a replacement? -
BrinkHouse ANH TK Stunt Build [RT-Mod]
BrinkHouse replied to BrinkHouse's topic in ANH (Stunt and Hero)
[inserts everything into freezer] -
BrinkHouse ANH TK Stunt Build [RT-Mod]
BrinkHouse replied to BrinkHouse's topic in ANH (Stunt and Hero)
Thanks so much for the tips, Jason! Looks like I've got a bit more work ahead of me than expected. -
BrinkHouse ANH TK Stunt Build [RT-Mod]
BrinkHouse replied to BrinkHouse's topic in ANH (Stunt and Hero)
Gloves are done. Hand plates had elastic straps, and I supplemented by gluing some velcro strips so that they'll stay in position on the glove. edit: Thanks to Jasons tip, I'll be sourcing some latex guards instead, as these are too large. -
BrinkHouse ANH TK Stunt Build [RT-Mod]
BrinkHouse replied to BrinkHouse's topic in ANH (Stunt and Hero)
Here are some photos! Wanted to show you guys some of the fitment issues. With most of the main pieces on, it seems like once I take in the ab/kidney section that will really resolve a lot of the other issues, like the butt piece not being tight enough on the sides and the gaps in the chest piece/back piece. One thing I'm really curious about before I cut anything is just exactly how tight should the armor fit? Particularly curious for thighs and forearms but also for ab/kidney section. Thanks! ...Stay tuned. -
Pyrates AP Build and Journey to The 501st
BrinkHouse replied to Pyrates's topic in Build Threads Requireing Maintenance
Enjoying this thread! Regarding neck seal, take a look at the seal I just put together for about $10, you may find something that helps you in your design! Happy building. http://www.whitearmor.net/forum/topic/34548-10-diy-neck-seal-v1/ -
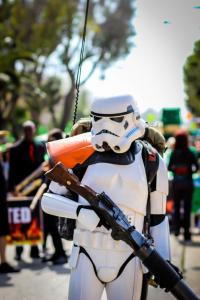
I guess the thread should be called a RE-build, instead of a build, as I picked up the set of RT-mod armor from TB5K (TK #55321) second hand. Most of the kit is assembled apart from some small elements such as TD, snaps needing installed, etc. he was shorter and a slightly larger build than I am, so some resizing/modifying of certain pieces will be necessary. Luckily it's mostly put together with e6000 and snaps so hopefully that won't be a nightmare! I'm super excited to get started on this, just seeing it on my living room floor makes me so happy! This is my absolute first time doing any of this and so while I've spent many a night reading over the build threads here, there is still a LOT I'm unsure about. I'd love your guys' experience and guidance. Here is a quick to do list after talking with TB5K and trying on the armor as is. I'll start posting more photos tomorrow with some specific questions I have. Things I'm Not Worried About: • left shoulder bell needs snap • biceps need hooks • trim belt to proper length and restitch • install snaps on new belt (kit came with a khaki toned belt with snaps already aligned to ab plate, but he also included a new white belt which I'm thinking I'll use but it needs trimmed/snaps) • replace elastic straps on hand armor with Velcro (is this acceptable?) •build TD from kit (all the parts are there, just needs assembling) Things I Am Worried About: • trim kindey/ab plate. [it's currently too big around for me, and I probably need to take off a few inches to fit my narrow frame. Is it as straight forward as disconnecting the two sides and taking off some material from front and back, or should all the material be removed from the kidney, for example?] • thighs, forearms and biceps all need slight trimming, the thighs are the worst offenders. • currently the back piece has no connection to the kidney plate, need to figure that out. • need to assess how the cod and butt connect as well as how those connect to the kidney and ab plates • need to adjust the front and back plate spacing [they are sitting slightly off my body. Maybe adjustable via shoulder straps, need to investigate tomorrow.] • wondering if chest plate needs more secure connection to ab plate [currently just two elastic snaps holding it down to ab plate] Photos will come tomorrow, wrote this on my iPad and apparently this forum hates that idea.
