RankAndFileTrooper
-
Posts
110 -
Joined
-
Last visited
Content Type
Profiles
Forums
Gallery
Articles
Everything posted by RankAndFileTrooper
-
 I have been working hard in the last couple of days, good thing that I was on holidays in the last 2 weeks with some time to spare, so I managed to compile a first version of the User Manual which you can have a look here: https://github.com/Protonerd/DIYino/blob/master/DIYino_Stardust_v2_User_Manual_v1.pdf
 -
Good news! I'm happy to announce that the Stardust V2 finally arrived!!! New Features: [Full USB integration]: one interface to interact with the board, the integrated micro-USB port is used to 1. upload code 2. charge a single Li-Ion or LiPo battery 3. upload sound files to the MP3 player/SPI flash 4. see below [uSB kill key]: the v2 can be wired to enable a so called USB kill key feature, which allows a complete shut-down of the board in case USB is connected [K3 technology]: the v2 does not need a kill key, with its current consumption of 0.3mA in sleep mode it retains selve life for a long period of time. With a 3000mAh 18650 battery your blaster prop discharges the battery in (3000/0.3=10000h=416 days, which equals to over a year!!! [single battery use]: the V2 runs off a single 3.7V battery without the need to boost the voltage. You can use a voltage source up to 5V or a DC-DC booster still if you so choose. Thanks to the powerful 3W audio amp the v2 still retains superb sound quality and volume at 3.7V supply. [breadboard friendly design]: the v2 is fully breadboard friendly [uSB charging port]: the V2 can be used to charge a single Li-Ion or LiPo battery cell with 250mA according to the standard CCCV charging profile, thanks to the integrated USB charger circuit. The board will come with an on-board micro-USB connector as well as an extrenal, small size micro-USB breakout board to be able to place a port to anywhere in your prop design. Legacy features: - based on the successful DIYino Prime v1 design for lightsaber props - Arduino Compatible board, configured as Arduino Uno to leverage the additional code space of the Uno bootloader - smal size to fit into any blaster prop (W x L x H = 21mm x 51mm x 5mm or 0.82" x 2" x 0.2") - can be intergated with neopixel stripes for the barrel running lights as well as RGB high-power LED modules (Cree, Luxeon, etc.) Price and availability: The Stardust v2 price is 54 EUR + 6 EUR shipping worldwide. With this extreme low price its about half the price of similar, commercial products while being programmable, more flexible and offering a wide range of extra features over existing blaster electronics. I accept payment via PayPal, my account is: [email protected] . If you prefer to use the PayPal function to pay for services or products, add +3.9% to cover PayPal fees. The first bigger batch of V2 boards are now in the manufacuring, I expect to get them in about a month. For 501st blaster props I included a nice little extra:
-
If you are in Nuernberg, you can come and pick it up, I'm in Munich but I can send per Post as well. The Stardust is also based on the Nano design, the MP3 player module is different, but the board comes with an integrated 3W audio amp. You need therefore only a speaker and some Wav files.
-
The v2 is right now in assembly, I can't wait to start testing the first few prototypes. If they work as I expect I will reserve a few for those who expressed interest in this thread. I will keep you updated, I wish I could get the board faster now, my hands are itching, but it's a few hundreds of miles from me and I need to rely on conventional transportation methods to get them. A hyperdrive will not fit onto the available PCB space
-
Hi guys, The Stardust v2 will go into the prototype phase in the coming weeks. I expect to have samples by mid June. If you cannot wait so long, I will have a few Prime v1 as well, this board is the big brother of the Stardust. It is not USB-chargable though.
-
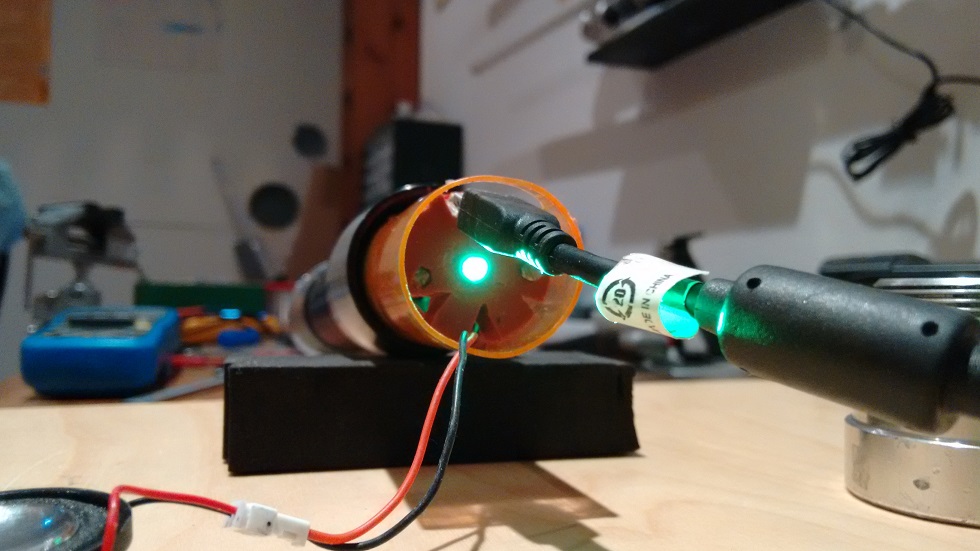
Sorry guys for not being around for some time, it had its reasons, them being: - I had a larger commission for my DIYino Prime boards and I had to cater to the logistics - and more importantly, the 1st run of the Stardust boards is fully sold out. For lightsaber builders... Following this positive launch and enthusiastic feedbacks from saber builders, I plan a bigger run, but not before I make some adjustments to the design. It's not to say that the v1 has flaws, it just that being from Germany I became a perfectionist. All the new functions I designed in compared to the Prime are working fine, what is needed is a LaPo (Layout polishing), reasons are: - bigger cooling area for the USB charger to be able to charge with more than 100mA (the next run will come with ~250mA charging, but with a change of a single resistor it can utilize the full 500mA as well) - some housekeeping among the breakout signals, all of them will be kept, but with a layout lending itself to easier soldering - and a new idea: I want the battery to be decoupled from the board if the USB is plugged in, acting as a sort of kill-key Here are some pics of a Stardust lightsaber, I include it here because lightsabers are more sophisticated in terms of functionality, therefore a system which can drive a saber is a good match for a blaster as well. I did not edit the sound of the video, this board is REALLY this load https://youtu.be/YQtkhgFm0GM A pic of the USB charging, in the middle is the indicator for fully charged battery: I also had a crazy idea: with the next run, which I will dedicated for blasters I swear (to avoid selling them all out to saber smiths), I will comission a special 501st flavor with white board. Actually I already made a first step in this direction, my Prime boards are available already in white. If I manage, I will include a stormtrooper helm on the silk screen
-
Thanks guys, really appreciate the likes and motivating posts! My philosophy is to create something first. and once physically there show it. This is exactly what I did with the "big brother" DIYino Prime, which is an Arduino board for lightsaber props, and now I continue this nice tradition with the Stardust as well. I will keep you posted about details when the boards become available, currently I have a prototype batch of ~10 boards but I definitely plan in 1-2 months to have enough to start the sale Until that time, stay tuned and here is a video showing the capabilities of the board, using FX-BlasterOS (this build uses a DIYino Prime, but the Stardust is technically speaking compatible):
-
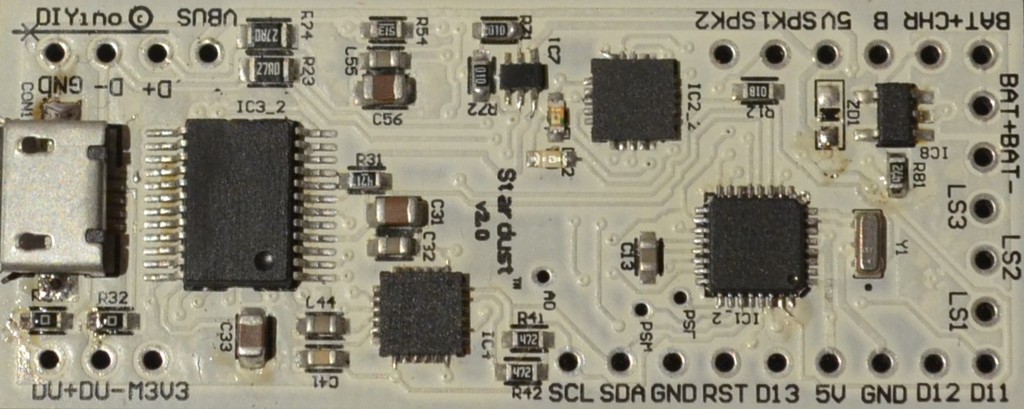
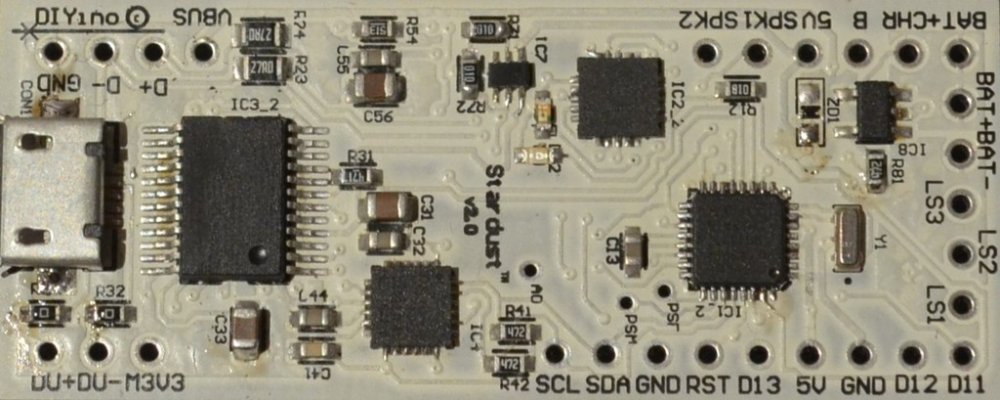
I'm happy to present you the first Arduino based, fully integrated blaster board, the Stardust "B" This tiny but powerful board is a mid-range member of the Arduino compatible DIYino boards, capitalizing on the already proven architecture of the Prime and at the same time streamlining the design to give you a board which is easy to integrate into a prop blaster of any size. To this end I applied certain adjustments to the Prime architecture, like: - replacing the bulky SD-card with a 16MByte on-board SPI Flash. No moving parts involved. - swapping the DFPlayer MP3 chipset to a more advanced one, capable of handling SPI Flash - using 3 instead of 6 driver channels for LEDs and other peripherials (making board smaller but still perfect for RGB LEDs and neopixel builds) - it comes with an micro USB connector for smaller size - the USB signals are broken out so you can hook up an external USB connector, serving as general access port (and more!) - all connections necessary to operate https://github.com/Protonerd/FX-BlasterOS are integarted on board, eliminating the need for on-board wiring - The board can operate on a single 3.7V Li-Ion/LiPo battery, usage of a small DC/DC to boost the voltage to 5V is highly recommended. - still based on the popular Arduino Nano board featuring an Atmega328P - it has added-circuitry to make the board low-power if not "trooped with", eliminating the need for a kill-key/switch for cutting power. All features discussed in other threads related to Arduino type blasters can be implemented with the Stardust with no big effort. The 3 PWM controlled low-side switches can be used to drive LEDs (up to 3), but also rumbling motors, smoke generators etc. . The board includes I2C signals to communicate with an OLED display for a blaster with added sci-fi flavor! But there is more! The Stardust is not a stripped-down version of the Prime! It incorporates a feature unique among prop electronics board: USB charging of Li-Ion/LiPo battery This opens up a whole new world of possibilities of design and interaction with the electronics. Only a single interface suffices to reach all features: - charging a single 3.7V Li-Ion/LiPo battery, via USB - no charging device needed, no need for a big recharge port or swap batteries - software updates can be flashed over USB - the on-board SPI flash can be directly accessed over the USB as well, eliminating the need to take apart the design if you want a new set of blaster sound I hope you like it and I will keep you updated about the details!
-
No necroposting intended, but speaking about a ready to use kit, since it seems there is an interest in the community for such modules, there is already one for blasters: http://www.whitearmor.net/forum/topic/40360-arduino-based-e11-blaster-build-using-diyino/
-
This is simply awesome! You have very string skills in this, if I hadn't looked through the whole therad I would have laughed at someone saying the majority is made from wood! Much cleaner than a resin kit, unbelievable. I'm looking forward to see the videos with sound, which I cannot do from work but the lights inside the barrel look terrific! Good job! I always liked the scenes on the Death Star with troopers holding the big gun, so this is going to be my next project. This thread will be a great inspiration!
-
I hope that too, let's see what events this year brings to Germany. But first thing first, before all else I need to apply for 501st membership with my nearly-finished ESB Stormtrooper. Wish me luck
-
Thanks Bulldog, was a great fun doing it and a great excercise to learn what I can do even better the next time. Nevertheless with the modules I used I'm mightily satisfied, and them being programmable opens up vistas for further customization/expansion.
-
Hi fellow Stormtrooper and Star Wars fans! I've recently finsihed my E11 blaster, having spend a good portion of my Xmas vacation to plan the assembly, put together the parts, install the electronics. My goal was to build the E11 to not only look like the standard issue weapon of stormtroopers, but also to sound like, feel like and as a whole be like the E11 I remember from the movies. For this reason I wanted to give it a sci-fi look, still moving inside the boundaries of strictly visual screen accurateness, enhancing it with an Arduino based board I programmed with light and sound effects. The body of the blaster is a DoopyDoo E11 resin kit, inside the blaster I've built in the following parts to achieve the effects: - a DIYino Prime v1 Arduino compatible board - 32 neopixel LEDs (in two stripes of 27 and 5 LEDs respecively) - a RGB Cree HP-LED module for the nozzle - a 20mm 2W speaker - an 5V DC/DC converter - a single Li-Ion battery of type 18650 - 2 neodyn magnets - a momentary switch with long lever - an 96x32 OLED display - an aweful lot of wires - lot of fun programming it The blaster is ~90% ready, I need to add a trigger guard, and cover the opening on the side of the barrel to hide the wires. I'm happy with how it turned out, it's fun to play with it, I made a lot of learning during the build process and it was worth every min of work.
-
It's crazy!!! If I would have known that you were going to publish all these treasures I would have waited with the assembly of my newest E11. There are simply sooooo many excellent ideas! I love the way you've put electronics in the Hengster box and completely made it from scratch. That I will copy in my next build! And the whole assembly simply rocks, never saw such a clean E11! I personally like it way better than those excavated, lifeless (i.e. electronic-less) WWII memorabilia...
-
Which sound board are you using?
-
Lights &/or Sounds for TFA Pistol & F11
RankAndFileTrooper replied to ELCIDious's topic in Electronics for Helmets / Blasters
I absolutely admire your Nerf conversions, you made them look like in the movie! To the question which ligths to use one idea would be the (fairly new) neopixels. They are essentially all RGB and very small in size,they come in stripes such that they are all individually programmable. Makes it easy to change color, even on the fly. Your superb blasters and costumes really deserve appropriate electronics. BTW, I also made a blaster trial using a Nerf: https://www.youtube.com/watch?v=DReCijuCF7A -
For those who prefer to have a first quick impression without bothering too much about the technical details I made a shortened version only showing the effects. <iframe width="640" height="390" src="https://www.youtube.com/watch?v=DReCijuCF7A"frameborder="0" allowfullscreen></iframe>
-
********************************* anyone knows how to include youtube video which can be activated from the post? ***************** As promised, my newest in Arduino toy. Stats/BOM: - modified Nerf N-Strike Elite XD - DIYino Prime v1 - a stripe of 15 neopixel LED modules in 3sections (12 for barrel, 1 for main muzzle, 2 for stun/auxiliary barrel) - 2 momentary switch (one reused from the toy gun, one home-made for the main trigger using a small spring) - 2 lenses (normally used for Cree LEDs on star pcb, but a neopixel LED fits underneath perfectly) - 2x 14500 3.7V batteries in parallel - an Adafruit OLED 128x64 (used with 32 rows only due to memory limitations) - 2 sound fonts from my other proprietary blaster board Code can be found on GitHub (site under construction, I will add some photos about the build as well as more explanation):https://github.com/Protonerd/FX-BlasterOS]GitHub - Protonerd/FX-BlasterOS Please forgive me my broken English and ignore my rantings, but hey, I know the bunch of you, you will anyway not listen to what I say and fast forward to the light show (which is perfectly OK, I do the same!) Special thanks (again and again) to neskweek, the FX-BlasterOS is based to a very large extent on his LSOS <iframe width="640" height="390" src="https://www.youtube.com/watch?v=j20hTjiBVxU"frameborder="0" allowfullscreen></iframe>
-
Blaster Master fit
RankAndFileTrooper replied to rayabear's topic in Electronics for Helmets / Blasters
Start here: http://forum.arduino.cc/index.php?topic=393174.0 If want to know more about the history and main field of application, go here: http://forum.arduino.cc/index.php?topic=361566.0 -
Blaster Master fit
RankAndFileTrooper replied to rayabear's topic in Electronics for Helmets / Blasters
This can be a beginning of a beautiful friendship. Look for DIYino on the web and drop me a pm. It's all there already. -
I know there are a lot of controversies about UltraSabers, but their sabers are of excellent quality and very robust. I like mine. Saberforge makes nicer sabers but IMHO quality-wise lower (although with their new ASP they improved a lot, on pari with US), and the inner space is very limited. TCSS is best, because of the customidation, for sure also the priciest.<br> Just personal opinion. All of them have pros and cons. I have sabers from each of these shops.
-
If you like open-source and not afraid of programming, you can search the web for DIYino Prime. Start here for history: http://forum.arduino.cc/index.php?topic=361566.0 Or jump right to the middle of it: https://forum.arduino.cc/index.php?topic=393174.0
-
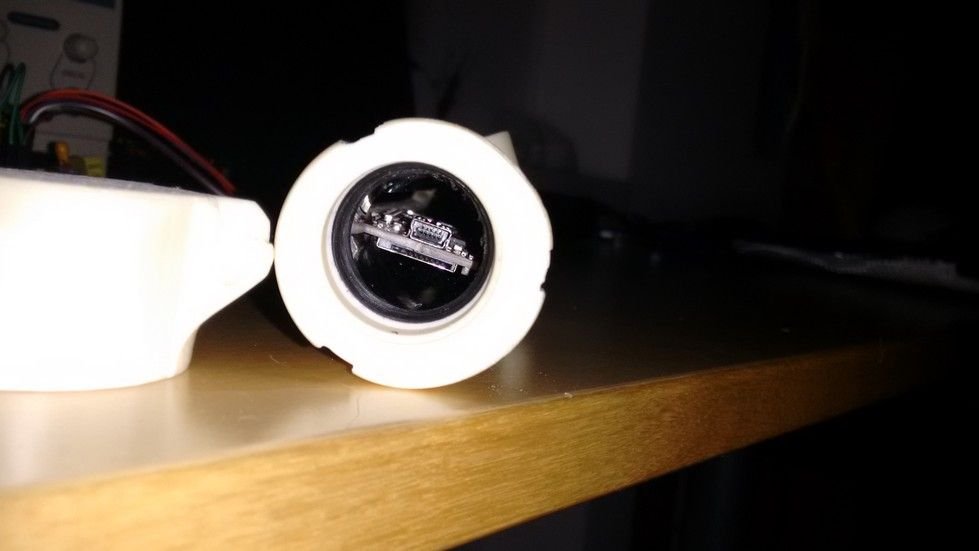
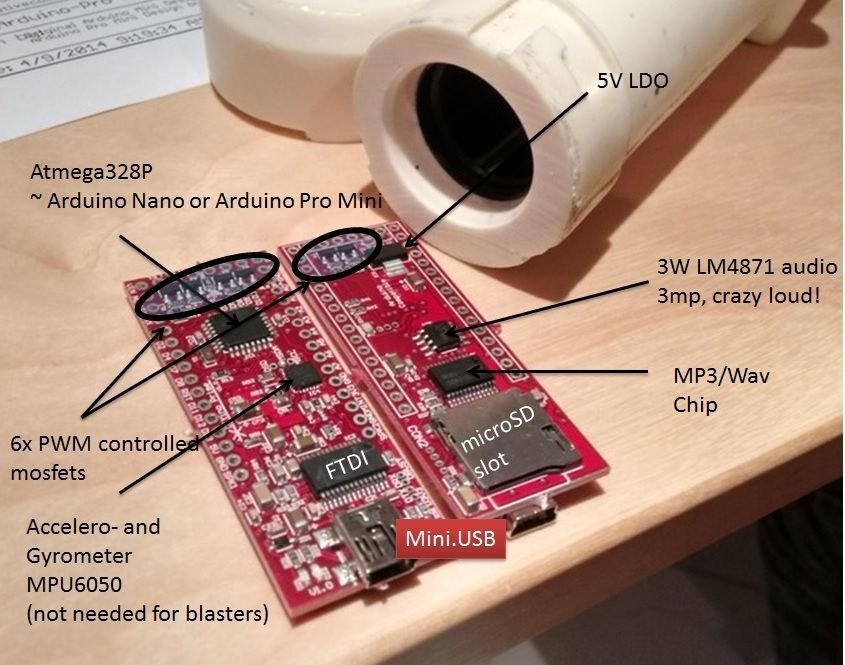
Update: I was mainly working in the last couple of days on: - display layout - config menu system For the display I came up with following layout: The Ammo counter and the Status field are updated in case there is a change - the status bar will display if the ammo is full, empty, is being reloaded or shoots. Later, when I finish coding stun, it will also display that, future plans are: random jam, overheat. Changing color of the shot also works now, you can configure it for every sound font separately and the values will be stored in the EEPROM of the Atmega (well, storng still does not work, I have to figure out why...but changing color does and it is FUN!!!). Because this Bounty Hunter blaster is a prelude to a bigger project, which is going to be a DoopyDoo's E11 Blaser Kit, I tried how well the DIYino fits into the main barrel. It fits quite snugly even into the black PVC tube, requiring minimum sanding., I expected this, because the DIYino was developed for Ligthsaber props, where space is much more limited as in a blaster, so compared to them I have the luxury of nearly unlimited room in the E11 kit. Actually the board I have has a lot of functionality, some of which might not be needed for blasters (but for sure in Lightsabers), but it's significantly smaller than if modules are soldered together. It is based on the Arduino Nano, so has an Atmega328P. Next step is to have the stun light effect coded. And oh yeah, I noticed that the foremost neopixel seems to have supply problems, it only lits up in warmer colors (red, orange), probably a wire is broken and it gets supplied from the data line...

-
Amazing work Manuel! I just accidentally happened on this thread when looking for similar minded people working on similar projects. Currently I'm working on a Bounty Hunter blaster project for my son's birthday from a modified NERF toy, started about a week ago, first impression is here: https://www.youtube.com/watch?v=yahG9uOorS0 For the electronics I used a DIYino board, which has everything already integrated. It uses another MP3 module as the one used here but it works excellently. I also opted to use neopixels both for the running lights and the nozzle light. Not as bright as HP-LED, but I make it for a 5-years old, no need to burn eyes. Code is still very basic: - single shots - ammo counter on OLED display - empty clip - reload function - nozzle with running light Some pics I found on my phone (sent to a friend): I plan to make a better video as I go on adding additional features, I already got a lot of crazy ideas from the bunch of you guys, thanks a lot for the inspiration!