

yoshix
-
Posts
273 -
Joined
-
Last visited
Content Type
Profiles
Forums
Gallery
Articles
Everything posted by yoshix
-
It's a little hard to explain. They are made of a Styrofoam with paper on top and bottom. Check out my backpack build thread http://forum.mepd.net/index.php?/topic/15485-yoshs-build/&
-
Pack is D O N E
-
I used a bandsaw but you could use a Dremel or jigsaw. Try to keep the line as strigh as possible. Also I definitely recommend a belt sander to trim off the rest of the white part and straighten it out
-
I haven't been posting here because all the work I've gotten done lately is on the backpack and posted on mepd. Fingers crossed I should be done this weekend
-
Lol! I read your mod and was a little confused, some of the pictures aren't showing up.
-
My solution for the brow line was cut off the black top, sand it and glue it back on. It took about 1/8 off. I also had to cut a little off the back of the cap so that it lines up. The tape is just to hold it together for now. I want to make sure I'm not doing anything else to the helmet before I glue it together.
-
Here's what I got done today. I cut the armpit line down even more and cut he bottom of the belt line off. That way I have room to bring the butt plate up under the belt. I noticed that the two halves of the belt aren't lining up right so I moved this snap down just a little. Hopefully that will do the trick. I noticed that the straps that run between the chest and back were getting caught on the kidney plate, so I trimming them down as well.
-
I've been getting some work done on the backpack, if you want to see more pictures of that process check out http://forum.mepd.net/index.php?/topic/15485-yoshs-build/&page=3&tab=comments#comment-198969
-
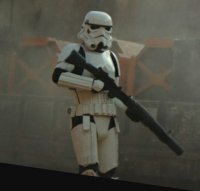
Had another great test fit, I learned a lot. I'll be making some changes as I found some problems. For one the butt plate is too low. Also the shoulder bells need to be higher more flush with the sholder straps. I'm still not happy with the shins. I think my mods helped but I'm looking into some alternative. I really don't want to rebuild them
-
I keep forgetting to take a few pictures of some spots. Maybe soon I'll remember
-
I was able to paint the thighs today and hopefully (with my wife's participation) I can get some pictures tomorrow. I started on the backpack. the first thing is the white canisters are too small so I'm remaking them using some tubing I had lying around. I cut circles and glued them to the ends to seal them up. Then I resined them. It made some tiny bubble in some areas, if they don't sand out I'll have to resin them again.
-
That's actually the way it came. I rounded the top so that it fits under the back plate better. I suppose I could have rounded the bottom to be more accurate as well but at the moment I'm not worried about it.
-
I forgot to mention that I decided to glue down the kidney plate. That way it always sits flush on the one side. I put a snap on the bottom of the opposite side to close it.
-
Resinnd Sanded Primed The thighs are just too flimsy for me, so I decided to go ahead and resin the insides aswell. I thought this thing was going to be the easy part of my day, but it turned out to be a pain. I finally got it in the position I want. The tape should hold it up at the right hight till it drys tomorrow. After I paint the thighs tomorrow the armor is done, then it's on to finishing up the backpack
-
I cut to that line. For some reason I was really nervous figuring out how I wanted to attach the back belt. I'd love to see how others have done theres. For the front belt I have a snap in the middle front and velcro on the sides. For the back belt I did the opposite, snaps on the sides (hopefully will hold it in) and velcro in the middle.
-
The CRL says this about the belt It is entirely made of plastic in two pieces, with the halves joining directly in the middle of the wearer's side waist. The rear half overlaps the front half's ends. But as you can see in the photos I have found a few examples of the front overlapping the back. I've decided not to fight this and do it the way the CRL wants Also you can see in the one photo it looks like a fabric belt is underneath Also also, the bottom left photo is a bad example
-
I used fabric that hopefully looks enough like the screen used helmets. That way they still let air in.
-
Haha, you sir are absolutely on top of it! I did resin the bottom, I just haven't taken pictures yet. I was going to wait till I sanded it. I was worried that the bondo would crack if I hit something.
-
You can see what I cut away at the bottom. I cut plastic strips to recreate that bottom Glued Bondo in the gap and some sanding. E-6000, I'm on my 5th tube of E-600. A few time I've had to stop and go back to the store to pick up more. For some reason Home Depot and Lowe's stopped selling it. I can put together an Anovos kit with one tube. I'll have to go back to the store for more when I start working on the backpack again.
-
I forgotto take a picture of it. I glued plastic strips to the sholder straps and put velcro on the ends. Works well, I'm happy with it.
-
I found these washers for the buttons. I wish the inside was a little wider but they will do. So this is a lot of work you are looking to here. I hope it all turns out looking like I would like in the end.
-
Great news! The 3d printed parts for my pack are in! Because the backpack is supposed to be strapless I'll need to support the weight. I attached suspenders to the snaps underneath and that will hook onto the ab. Hopefully that will prevent the back from sliding down and pushing the chest up, choking me.
-
I'm not quite sure what you mean
-
I wish I had thought of that
-
Hit it with some sandable spray paint primer. Then the paint. Almost done!

