

HSM76
-
Posts
141 -
Joined
-
Last visited
Content Type
Profiles
Forums
Gallery
Articles
Everything posted by HSM76
-
It's not split but double cap rivets *smartass mode*
-
As addition to Freddy: 4. Those are for the bizeps to forearm connection. 5. I think those were intended for the ABS handguards to work as loops. Did not use them. 7. Yes, that's the side connection. 8. With the split rivet in the bag, that has to be the crotch strap. Connecting the an plate to the button at the bottom. 9. Correct, this is for the shoulder bell, the snap for the top, one of the other pieces (the longer one I think) for the loop around the bizeps, and one for an optional connection of shoulder to bizeps. 11. Spares I would say 13. I think they are intended for the ammo packs, but I used Chicago screws for the belt and single cap rivets for the ammo pack on the knee.
-
Look much better would have been the goal...
-
Will the placement of the back cover strips be a problem with Centurion status?
-
Thank you Paul for the Information! When cutting the back of the thighs I kept the cut off on both sides equal, that was the mistake I made here. I should have left the thigh backs until the very end of the build, or at least until the Torso would have been done. Maybe I try to order new thighs from RS at some point in the future and redo them.
-
The cover strips are there, you have to look at the pictures in a zoomed version. I worked at some of the points this evening. I reworked the forearm and the shoulder and tried to find out how to set the thigh straps. Here are some pictures of the thigh tests, I think now the elastics might be right: As I hoped, the drop boxes seem to be right, it is only a thing in conjunction with the thigh placement. Matt, Paul, here you can see that I have cover strips on the back of the thighs they are just a little shy in pictures and try to hide. The top of the thigh is the thing I am not quite sure how to cut like this?: (Even better view on the cover strips) Excuse the crappy lines, but the mobile phone is not so precise for drawing lines. But I think this is what @troopermaster meant, is it not?
-
Thanks Matt. Yep, as I wrote above, this is cooling system Is on the list. The forearms should be the same circumferance but I will look into it, thank you. The thighs were the main reason for the pictures and there is still some work to be done I know that.
-
Concerning the hight of the biceps I just checked some of the RS Centurion applications, of people roughly my hight, it looks the same as with my armour. (Like here: ) @CTID: while looking through the RS Centurion application I saw, that the belt seems the same as with them. I think, the left Dropbox was pushed into a strange position by the thigh. But I will look into it tonight.
-
@CTID: I'll look into the belt issue, thanks Marc. This will get interesting... I was using the marks made by RS, seems those were a bit off @Frank75139: I kept the gap between forearm and bicep as on orientation to have this as narrow as possible, if I pull up the biceps either I get to much gap to the forearm or to much gap to the gloves. The cooling system is made by CTID, named Troopacoola. I have the digital veriable speed version where you can set the speed of the fans in certain levels.
-

Doopydoos Full Resin Kit WIP + Tino,Chris + more, Additional Parts
HSM76 replied to Dracotrooper's topic in ANH BlasTech E11
Tino is right, wrinkle paint is not the right for the scope. They have a war time finish and are a rather rough cast, but the paint is simple. I think it depends on what you want. Here are two pictures of an a M40 1943 and an M38 1942 it is between flat and semigloss, but I think it might have been more glossy at some point, when they where new. -
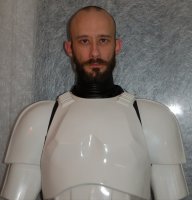
We had some problems with the photos, first of all I forgot the gloves, then we got to make the photos late yesterday and finally the SD Card of the camera was a bit uncooperative, when we finally got the pictures on the PC it was to late for another set, with corrections. But it was the first full suit up and I noticed a few things: - I have to make sure where the belt is sitting. Even so I lengthened the loops, the thighs ended up in the same height as last time. - the right shoulder bell will ride out some bit if I raise the arms. See portrait picture, where I think it is okay. - I have to look into the Helmet padding, as the bucket is a bit off center. - the cooling system is visible from the back, advertising for @CTID (And last, I have to give my Girlfriend a list of things she has to check ) Any more things you guys noticed
-
Marc: that's the plan! Aaron: its the belt with suspenders. But everything is okay I just closed the loops with safety pins as a first test, at a point where I thought it might be right. I will see the shut after I have worked out the correct fit.
-
No sweat if you use E6000, you can get the off. There should be no problem. Pull the carefully off and you are fine.
-
Just a small update right now. I will use an acrylic tube to replace the barrel and hold the LED strip of the BlastFX as well as the muzzle LED. But I had some problems with it holding in the front. This coupled with the missing retainers of the muzzle screws made me think to build a front for the new "barrel". Thus I am rebuilding the front part. Here is a picture of the two parts in rough form. The white is 4 sheets of 1mm ABS glued together, the clear part is the cap of a small plastic bottle, which fortunately nearly had the size and form of the front of the original barrel. It needs a bit more work but here is a first picture of the two parts:
-
Did not got to do much today, disassembled the helmet partially to install the SHA. Drilled the holes in the rank bars and the holes for the microphones in the side, unfortunately one side did not cooperate and I had to redo some of the plasti dip, which is now drying. I glued on the rest oft the sniper plate and I am very curious how it will turn out. I did a first partial fitting today, obviously without the left shin. First with now shins at all and than with the right, to see how big the gap between shin and thigh is. Excuse the crappy pictures I had to use a propped up mirror again.... Therefore no pictures from the back. With right shin (yes it is the right, keep in mind, mirror) Pressing the thigh down to how mich I think I have to extend the elastics. Now with gloves: I need to do some pictures of the back but I fear, this will not happen before the weekend. From what I saw, I am inclined to leave the thighs as they are right now. I don't want to loose to much at the top, as I fear it will be to much of a black gap. Would that be okay for Centurion?
-
Yep, I try to build to Centurion right from the start. Yours was one of the many build threads I studied prior to and during my build.
-
Another small update nearing completion. I glued the shoulder bridges to the chest, the big and 4,5 small ridges on the chest plate, the rest is floating free: I fought with the sniper plate and glued on the left side, but no pictures here, as there is not much to see under all the painters tape and all the clamps. I attached the ammo pack to the right thigh. 7mm single cap rivets, now painted white, all in the "RS Suit" configuration: Interrestingly enough after fastening the second rivet, the pack was in the position on the pictures. It might be that I don't need any glue to hold it up. But only time will tell. The belt is done so far, only the straps on the drop boxes have to cure: Last thing I did today was glueing the elastics to the thighs. The loops on top will be done after fitting. First thing the needs to be done on the next session is trimming the backs of the thighs. So the list of things to do on the armour has shrunk down to this: - cutting back of thighs - cutting lower edges of shins - gluing sniperplate
-
For final polishing Novus works great for me, but for removing deeper scratches I found, that sandpaper with 600 grit for pre treatment (for very deep scratches) and than 3000 grit and 7000 grit work better, as it is more precise in my opinion.
-
Thank you very much! I hope, with the electronics I don't get to much difference in the setup. @T-Jay: I think I will paint the rail black as I need to route the wires for the display beneath it. That will cover it a bit. The aluminum tape withstood the first 5 or so trials of sliding it in an out, until the cocking bolt fit as I wanted it. When the installation is done it should not move from its place, since it will hold the main part of the system, I will have to find a way to keep it (reversably) in place. @justjoseph63: there are some further pictures of it in my armour build thread:
-
I got my BlastFX some time ago and started to strip my Sterling. The original Blaster is a deactivated Sterling with cut magazine, big eagle Hengstler and M38 1942 scope, cylinders from PlayfullWolfCub, and T-tracks from Wannawanga, the rail is made by me. Right now everything is taken apart. I have gutted the Hengstler to make room for the display. I have removed the barrel and bolt from the gun. They have to make place for the electronics. Also part of the trigger assembly is out. Only the trigger with feather mechanism and fire mode switch stayed in. this way I have room for the trigger of the BlastFX in there. The bolt will be exchanged with a pvc tube: I made openings in it for the clip and the whole to the trigger assembly, as well as the cocking bolt. The raised part was done with scrap ABS from the armour. After that I covered the visible part with aluminum tape: Next will be the longer part of figuring out the fitting and setting of the JST connectors to make the whole assembly easier.
-
Damn it, if you think you have something done it kicks you in the shins.... Late last night, as a last thing, I put the belt on the chest. But I had to accept that one of the poppers, the left one, of all things won't stay. It slips of the stud. I always feared the the left side would be a problem, but thought it would be when the Blaster is in the holster. But this.... Snapped it of and will set a new one. After that I will see what I need to do. I don't want to put in Velcro, but it might be necessary as the E11 is very heavy, because of the Sterling casing. But I want the armour as near to the prop setup as possible. I got further from that goal by adapting to my size, but...
-
@CTID: Hi Marc, it is symmetrical, tried it already in all directions, both at least twice :-) @CableGuy: great, thank you Dan, that is good to hear.
-
Okay.... Both addons to the leg parts give me problems, aside from the fracking sniper plate, the ammo belt is a problem. In most of the Centurion applications the ammo belt sits like this: But if I attach it like this the ends don't end at the same part of the thigh. One side is to short: I know it is the inner side of the right thigh but... If I attach it like the RS Suit and some other screen references it will work: Is this placement acceptable for Centurion or has the middle pack to be centered?
-
Because I worked through the weekend of the 21st I had yesterday and today off. I used the time to get some work done on the armour. The arms are done so far, I have to see if I need bicep hooks. Will see this after final fitting. The thighs are finally cut, inner cover strips were glued in: And today the outer cover strips: When they are fully dried I will see how I will cut the upper edge to the butt plate, this will get interesting. The belt was assembled and the button covers glued to it and the holster installed: The dropboxes are glued and drying right now, I am trying to make the functional for storage. I will post pictures of them later, when they are done. I did a last hot water treatment of the shins and installed the hook straps: I was trying to get the sniper plate to sit right, but this thing is driving me crazy. If I get it to sit right in one point, it is moving in another. There will be a lot of tension it it if it is glued right at all three points. Right now I am not sure how to proceed here... But first the hooks have to be cured.
-
The Snake's Terrifying & Totally Amateur AM ANH Stunt Build
HSM76 replied to The Snake's topic in ANH Build Threads
The mm is wrong that is right. The cut should end at the canvas belt. But the 45° angle is right, it is not the angle before cutting but after the cut (dotted line) as far as the CRL goes the 45° cut is what is needed. The actual distances are connected to the belt.
