


justjoseph63
-
Posts
12,619 -
Joined
-
Last visited
-
Days Won
317
Content Type
Profiles
Forums
Gallery
Articles
Media Demo
Posts posted by justjoseph63
-
-
Josh is absolutely right, Richard. But, like he said, glue (even E-6000) will make it difficult to change things in the future if you want to. I am not "shill" for SUGRU, but the thing I like about it is that it will stay in place forever, until you decide to change it.
-
Wow.. I Think I may have ruffled a few feathers with my post on this subject. It would be interesting to hear opinions from other HWTs on this topic, or anyone interested in becoming one.
-
I will second that, Jeffrey. When Charles does a project, he goes for the gusto, and nothing less.
-
 1
1
-
-
Welcome to the FISD! Bugging us is what it's all about, Tony, (we all did it), but you can probably find most of the answers you are looking for with a little research on here in the different threads! The amount of information you will find here is truly staggering, and there is LOT to absorb, even before Big Brown Box day arrives. I would suggest taking the time you have prior to your armor arriving to get everything in order. That way, when it gets there, and you tear into it like a kid at Christmas, (again, as we all did), the absolute elation of carefully unwrapping each piece will not turn in to sheer terror at the thought of "Oh my God, I have to put this thing together"?
It's not as hard as it may seem, and you will be in good company. A Build thread is always a good idea, as you can post all your questions in one place, and show off your progress!
I would also suggest checking out the "Advanced Tactics" section, which covers the higher levels of EIB (Expert Infantry Badge) and Centurion.
All the best in your TK journey!!
-
Wow, John... Great looking build! I honestly don't think I have seen such a perfect back/kidney connection, and your bucket paint is spectacular! The thing that stood out to me the most was your neck seal. Damn I an envious of that! I thought about a rubber type neck seal, but it gets a bit warm here in Florida at times,
 Yours looks like the perfect answer to that! I think you should have this nailed, and best of luck!!
 -
I have purchased two from Imperial_issue on ebay. GREAT quality, fast shipping. They run $38.00 shipped, and are made to fit in different sizes.
-
As for the green film in the tube, Richard, it just looked entirely too flimsy to use, and seemed like it would be a nightmare to attach. I ended up ordering a set of hard plastic flat lenses, and attached them with SUGRU, which is kind of a cross between glue and Pla-Doh. Easy to do, and worked like a charm!.
-
1
-
-
That is hilarious, Ben!!! But does this mean that we can expect to see someone different coming down the chimney this year? Thanks for sharing!

-
1
-
-
Hi, Paul, and welcome to the FISD! You have a few big decisions to make before you get started... Like which armorer you will purchase from, what type of TK, (ANH, ESB, ROTJ, etc.) you want to build, and how much you want to spend. Your best friend on this site will be research, but know that we welcome any and all questions that you cant find the answers to somewhere on here, (which is rare). If you haven't already, I would suggest studying the "Getting Started... Read this First." in the Recruits section. Many of the questions you will have are answered here, like where you can purchase armor that will pass 501st standards, things you will need, et al.
There is a LOT to learn, but I am sure you find the journey a lot of fun once you get started. All the best!
-
A lot of it depends on how well you want it to stand up, Wayne. If you are looking for something durable, that still looks great, you can try a Hyperfirm from HFx (slavefive here on FISD). They are almost indestructible, and perfect for trooping. If you are looking for something you can do some more accurate modifications to, you may have to think about either a full resin build, like Doopydoos, or getting a toy Hasbro E-11 and purchasing the upgrade kit. There will be some work to it, but not as much as a full resin kit. You can also keep an eye out for blasters for sale on here.
-
You may want to post some detailed, close-up photos of the bucket in question, but when it comes down to it, Steve REALLY knows his armor, and has the final say in the matter.
-
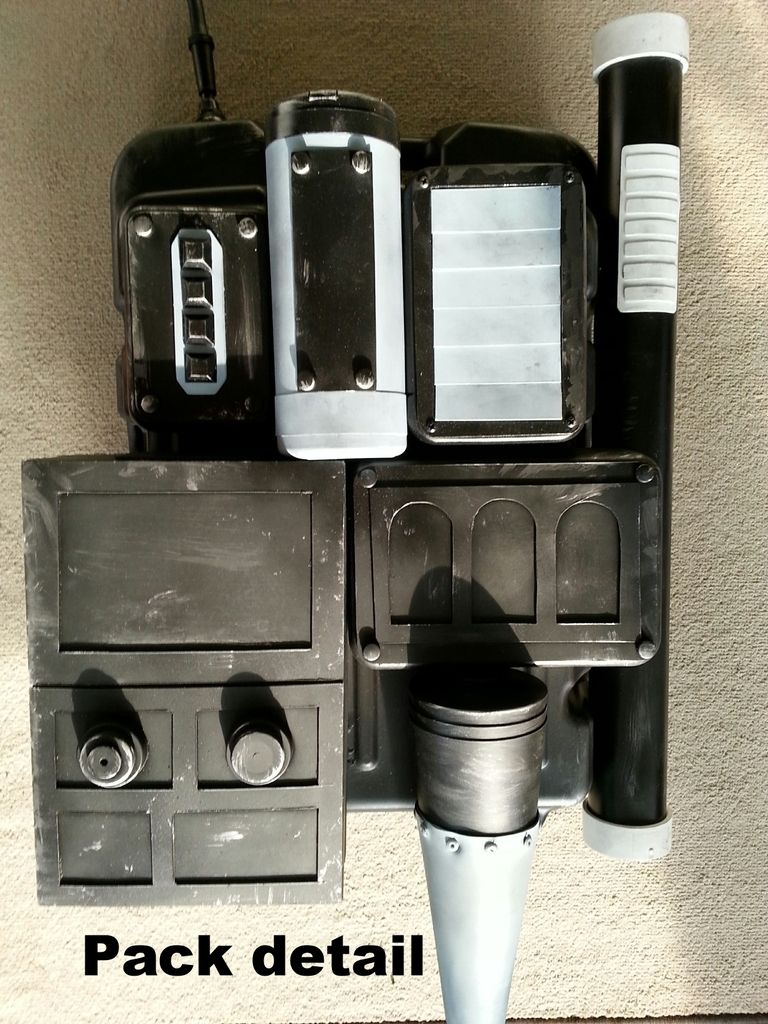
For what it's worth, I'm going to toss my two cents into this conversation... When I built my pack, I used Charles' (Templar 726) and Tonys' (ukswrath) builds, as well as the one in the HWT CRL photo as a guide. Are there differences? Of course. Are they similar? Very.
Handles? Of course they have handles. They are made from oil drain pans, (which hmmmm.... have handles). Do the screen grabs have handles? Looking closely, (Thanks, Matthew), it looks like they do, but have been "filled in" to a degree. I do like Charles' handle mod, and just may steal the idea.
 They do make it easier to carry, though.
To be honest, I had a blast building mine using the aforementioned references. It was either use their ideas, and spend about 80 bucks, or let's see... Wait around for someone with a vaccu-form to make detailed molds, and charge God knows how much.
Unlike armor, weapons, and such, there are no "official" or vetted manufacturers of HWT packs, so we are forced to get creative, and use the closest thing we can find. So far, I think the vast majority have done an outstanding job. Yes, there will be small differences. It's just the nature of the beast. (Line up 10 TKs and see how many differences you can spot in their armor... some ANH, some ESB, some ROTJ, etc.) Not to mention their blasters... Hyperfirm, Doopydoos, Hasbro, holster on the left, holster on the right... and the list goes on.
Are the small differences in the packs noticeable to the general public? Not likely.
All we have to go on officially at this point is the HWT CRL photo, which does indeed have an antenna, and, like Charles said, can be removed down the line if needed. I personally like it, as it gives it a bit more character, but again, that is just my opinion.
In the end, we all strive for accuracy, of course. In the event that the CRLs change, I would mod my pack to follow them, but until then, I am more than happy with my own little creation...
-
1
-
-
Tandy leather makes nice, durable snaps. Just make sure they are the long (5/16) post type. Try searching Amazon or such for Tandy leather Line 24 long post snaps.
-
Since it seems no-one has a complete template set, (or I simply can't find it), could someone that has a finished one maybe post some really detailed/close-up photos? There are some pics on here, but more would certainly help! Thanks!!
-
Great job, Stephane!!
-
Yes, Paul, this is the thread you need to research for finding your armor. The vetted, or "approved" armorers on the first page are still in business. A lot of it will depend on what size you are, (some are more specialized for larger/taller troopers, but can be cut down to fit), how much you want to spend, and how long you are willing to wait.
-
Q is right on the money, Matt. If you go to View New Content on the right of the main toolbar, then go to page 2, you will find a lively and informative discussion on this exact matter about half way down entitled Shoulder Pauldrons, posted by ArmyDocTrooper on July 6th. Well worth a read.
My personal view is that I do not wear a pauldron when I troop as a TK,..ever. The only time I wear one is when I am going as a Heavy Weapons Trooper, which requires it. As long as it is not a canon event, you can honestly do as you like. IMHO, however, if you are the only TK wearing one at a troop, you may look a little out of place..
-
ç§ã¯ã‚ãªãŸãŒãれを好ã幸ã›ã§ã™ã€éžå¸¸ã«ã€ã‚ã‚ŠãŒã¨ã†ã”ã–ã„ã¾ã™ï¼
-
No, but it certainly does look like it! What that is, Sean, is a small indentation that AM builds into the ear guard to assist you in the correct screw placement. Mine happened to be off by about 1/32 of an inch, and is casting a small shadow.
-
Just be sure to use quality snaps, Ken, not the cheap ones from discount stores. (Trust me). I actually ended up doing a double snap system, as suggested by a fellow TK, (see photo). I have found that it will never, ever come undone during a troop.

-
Wow, and I thought $60.00 was a lot to pay for my 50 gallon rolling toolbox from Home Depot (DIY). There has to be a European manufacturer of this type of equipment.
---------
-
Great call, Tino, and thanks for the info.! I updated it accordingly.
-
Hola! I noticed that there are some folks who are having a bit of trouble posting photos, and thought I would share the way that I learned from Tony (ukswrath), to whom I am MUCH appreciative! It may seem lengthy, and perhaps a bit complicated, but it's pretty straightforward and fast once you get the hang of it. Put it this way, I can barely check my own email, and I picked it up really quickly. If anyone notices anything that needs to be changed, or a shortcut, I would be happy to amend this post! Hope it helps!
A quick foreword...
First, you will need do download Google Chrome or something similar. I found it will not work with regular internet explorer, (not mine at least). Also, you will need to open a Photobucket (Photobucket.com) account to host your pics. It is really easy, and they guide you trough the 3 minute process.
Photobucket:
Once you have created your account-
1. Look for the UPLOAD tab on the top task bar and click on it.
2. This will bring up a box that says "Drag n' drop photos and videos here"
3. Below this is a blue tab with Choose photos and videos. Left click.
4. This should bring you to your computer's photo library.
5. Highlight (click) the photo you would like to upload, and hit Open.
6. This will automatically take it to your Photobucket account, and put it in your PB Library.
7. You did it!
Some additional notes on PB at the end..
To post photos:
In the text box, when starting a new topic or replying to one, you will see a small icon in the task bar above it which looks like a tiny Polaroid picture, (below the smiley face). Then you:
1. Left click, which will bring up a pop-up box that says Image Properties.
2. Below that will be a box for the URL. Leave it for now, but don't close it.
3. Go back to your Photobucket account, and go to your Library or Album.
4. Below the photo you would like to post, there will be some options... Left click on the DIRECT option.
5. After that, RIGHT click on the same option. This will give you the choice to COPY. Right click on copy.
6. Go back (without closing PB) to the URL box.
7. Right click on it, then left click. Choose PASTE, then hit OK at the bottom.
8. Congratulations, you have posted a photo!!
Some extra notes on Photobucket...
You can re-size. enhance, edit, crop, add text, and create your own "Albums". Just follow the instructions they give. BUT, and this is very important... If you delete the photos from your PB library, or move them to a different album after posting them, they will disappear from your post. ( I found this out the hard way).
-
My eyes are glazing over. What do I still need to pick up?
in Getting Started - Read this First!
Posted
I posted a thread in the "Getting Started.. Read this first" section called "Supply list for your TK build". It covers pretty much everything you will need for your armor build. Hope it helps!