

Crusader_6
-
Posts
288 -
Joined
-
Last visited
Content Type
Profiles
Forums
Gallery
Articles
Everything posted by Crusader_6
-
My first DD E-11 Blastech Blaster Build
Crusader_6 replied to Crusader_6's topic in ANH BlasTech E11
Thanks everyone! Now, here's the final paint job and weathering. I used the toothpaste technic but the weathering was a bit too much... In the ended i repainted it and scraped it more subtle with 320 sandpaper. Rustoleum Hammered Black spray paint. After it dried, I used hot water and a wash clothe to scrape off the toothpaste parts... I sent these pictures to T-Jay, and he advised me to redo it. Then I weathered it with the sandpaper... That's it for now... Sent from my iPhone using Tapatalk -
T-Jay, that was what I was going to ask! How to stop the reset button for resetting back Sent from my iPhone using Tapatalk
-
My first DD E-11 Blastech Blaster Build
Crusader_6 replied to Crusader_6's topic in ANH BlasTech E11
Once the weathering was done, I thought I was finished but then I remembered that T-Jay had also put real Crystal lens to the scope. So, I went to Amazon and ordered a set of jeweler Loups. The lenses were 21mm for the rear lens and 12 mm for the front one. I drill both holes a bit bigger for them to fit and then a tighter one deep inside for the lens to set in. On the rear lens,before I put the Crystal in, I used a "digital reticle" decal I bought from Trooperbay. I also used green stuff to tighten the grip. Let me knew what you think of the scope lenses... I guess Icould have done a bit better but im ok with it. Later I'll post picture of the paint job. Sent from my iPhone using Tapatalk -
My first DD E-11 Blastech Blaster Build
Crusader_6 replied to Crusader_6's topic in ANH BlasTech E11
Thank you very much! Sent from my iPhone using Tapatalk -
My first DD E-11 Blastech Blaster Build
Crusader_6 replied to Crusader_6's topic in ANH BlasTech E11
IWhile I waited for the paint to dry, I worked the power cylinders. I didn't work them as Isaw in most of the build threads, I kept it as simple as I could. I just drilled the screws from T-Jay mod set and drilled a space for the aluminum Rods As I finished carving the hole for the mini rods, I took the mini rods into a drill to give the oval form rotating them against a flat file. Once that was done, I used green stuff (T-jay mod set) to form the tips on The rods, stick the wires and glue them to the power cylinders base. Now back to the main body. The paint dried and I drilled and screwed the buttstock. I used the screws provided in the mod set I got from T-jay but used epoxy to glue the front part of the buttstock grip. Then used a plastic strap to hold it in place while the epoxy dried. I also made the scope rail and screwed it to the top of the rear sight. I also didn't document the process as I should. [emoji53][emoji17] While I waited for the blaster to cure the epoxy, I took the M38 scope, gave it a Rustoleum hammered black coating and weathered it with a 320sandpaper. I also used a white crayon to stand out the numbers and letters. As always, feel free to make any comments, give tips, or ask questions. Best regards! -
My first DD E-11 Blastech Blaster Build
Crusader_6 replied to Crusader_6's topic in ANH BlasTech E11
Well, here are some more progress photos. This one is when I glued in the front sight. On this one, I used the screws provide by T-Jay's mod set for the M38 scope. It really added a more realistic look and texture to it. I used a drill bit wide enough to Fit the screws, and use quick dry glue to hold them in place. In this collage of 4 photos, you can see that I added a real screw on the grip (T-Jay's mod set) I drilled a hole, cut the screw and glued it in the whole. On the second and third photos you can see that I drilled holes on the tube, to make it look more real, and used the dremmel with a sanding head to make the holes even... It worked magnificently. If you want to know the exact measurements of the one drill and sand head pm me. On the last pocture(down right) you can see that I added the magazine( Gazmosis resin mag). I didn't take photos when I cut it and made the adjustments to fit it in, I was way focused on the job. I apologize, but if you need more info you can always pm me and I will let you know how I handled it. Also you can see that the trigger is already in place. I had to take out the trigger (I had to work on it a lot, trying to make it a working trigger, but couldn't document it.) and primed the main body,the scope and the buttstock with a gray base primer. Then, after it dried, I gave it an aluminum coating, for weathering purposes on the main body and buttstock and gold spray paint on the M38 Scope for a brass look. (we'll cover more of that later). I'll keep posting. Comments and tips are always welcome!! Sent from my iPhone using Tapatalk -
My first DD E-11 Blastech Blaster Build
Crusader_6 replied to Crusader_6's topic in ANH BlasTech E11
Yea, thanks for your valuable input and tips!! You're definitely one of the best resources FISD have lol Sent from my iPhone using Tapatalk -
Hi! I started this thread as I made the mistake of mixing the DD blaster build with my TK armor build thread. First I want to thank T-Jay http://www.whitearmor.net/forum/topic/28444-fs-completion-sets-for-e-11-kits-like-doopydoo%E2%80%99s-full-resin-kit-incl-worldwide-shipping-and-paypal/and Gazmosis http://www.whitearmor.net/forum/topic/26677-doopy-dos-replacement-e-11-magazine-run-7-now-open/ for their amazing mod sets! Without those, and their threads, my build wouldn't have been as it was. I didn't take as many detail photos as I should because I wasn't sure I was going to make a build thread( I didn't think I would pull it off). Any doubts of how I did any on the mods please feel free to ask. This is the famous brown box photo! I bought this precision drill set for carving, as I knew that most of the mods would need much of it. My Dremel rotary tool proved very valuable for this build. First I cut the hex bolts heads for the muzzle and grip. http://s304.photobucket.com/user/rubensantos84/media/Mobile%20Uploads/2015-03/2D22E324-750B-4600-B901-E7634A226F00_zpswjcwpdxy.mp4.html I used the Dremel to cut and carve all the metal and resin on this project. Here's how the bolts and screws were cut. Precision drill set I started by gluing the grip and the mag well to the tube. I used epoxy. You can buy this on any hardware store. Then, I let it dry for 24hrs before doing anything else. While the epoxy dried, I carved some details on the buttstock. And also the front sight. I used a nail to to sight. I'll keep posting all the photos I have as time permits, meanwhile feel free to comment and/or ask questions. Sent from my iPhone using Tapatalk
-
My first build... ANH Stormtrooper.
Crusader_6 replied to Crusader_6's topic in Build Threads Requireing Maintenance
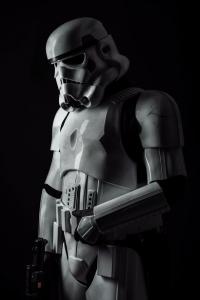
Blaster update of my ANH Stunt TK Stormtrooper I used the tooths paste weathering technic and also painted the Doopydoos display stand. Gave it a gray primer then flat black spray paint. The used testor aluminum paint for the Imperial COG. Then a light spray mist of rustoleum hammered black. Once the paint dried, I then removed the toothpaste to give the damage look on the blaster. Once I finished, I sent out these pictures to T-Jay for CC and he pointed out that it was too battle worn and that some parts couldn't have the metal underneath (t/tracks and grip) So I decided to paint it all over with Rustoleum hammered black and sand it slightly to give a more subtle battle worn look. And this was the result... Before sanding After slight sanding and subtle weathering. This is its final look: Any tips or anything that could have been done better, I'm all eyes [emoji28] Sent from my iPhone using Tapatalk -
My first build... ANH Stormtrooper.
Crusader_6 replied to Crusader_6's topic in Build Threads Requireing Maintenance
Here's more progress on my armor and I also finished my bucket. I assembled my thermal detonator. Materials for the calves strapping. Cut the 1" elastics in 4" long strips Sew the hooks. Glued the elastic strips to the calves armor section. Rear view of the calves. Sent from my iPhone using Tapatalk -
AnjelRedemption's ANH stunt build (NE)
Crusader_6 replied to AnjelRedemption's topic in Build Threads Requireing Maintenance
You might want to trim the teeth a bit more. Check mine. I used an exacto knife Sent from my iPhone using Tapatalk -
Front Sight Mod on a Doopy Doo's resin kit - added realism
Crusader_6 replied to Squimspickle's topic in ANH BlasTech E11
Good job!! Nice of you to post this here!! Sent from my iPhone using Tapatalk -
AnjelRedemption's ANH stunt build (NE)
Crusader_6 replied to AnjelRedemption's topic in Build Threads Requireing Maintenance
I have the same kit!! I just need to do the strapping and glue the forearms! Just make sure you use E-6000. Just in case. [emoji106] Sent from my iPhone using Tapatalk -
my advice would be to save for the kit and buy things as you can... That's what I did. I saved up 780 for the kit, bought the blaster when j had the $$ and so on and so forth. Just make sure that when you're going to make a purchase, ask around first, and then make a decision. [emoji106] Sent from my iPhone using Tapatalk
-
I paid 757 for just an NE 2.0 kit. Add blaster, boots, holster, neck seal, gloves, tools, paint, etc, I'm pretty much up to $1300 and have not finished building it. Sent from my iPhone using Tapatalk
-
My first build... ANH Stormtrooper.
Crusader_6 replied to Crusader_6's topic in Build Threads Requireing Maintenance
M-38 Scope weathered and ready to be screwed to the aluminum rail. Sent from my iPhone using Tapatalk -
My first build... ANH Stormtrooper.
Crusader_6 replied to Crusader_6's topic in Build Threads Requireing Maintenance
I started working on my blaster a couple of days ago... This is it so far. Used the Dremel to cut hex screws. Power cylinders mod Cut and screwed the scope rail and screwed the buttstock wishbone part to the main body. Sent from my iPhone using Tapatalk -
My first build... ANH Stormtrooper.
Crusader_6 replied to Crusader_6's topic in Build Threads Requireing Maintenance
Legs build. [/ Helmet -
My first build... ANH Stormtrooper.
Crusader_6 replied to Crusader_6's topic in Build Threads Requireing Maintenance
Yes, it is an NE 2.0 Stunt Stormtrooper. Sent from my iPhone using Tapatalk -
My first build... ANH Stormtrooper.
Crusader_6 replied to Crusader_6's topic in Build Threads Requireing Maintenance
Thanks! I'm having a lot of help from members of the local garrison. I'll be posting photos of my progress during the weekend. Members of Puerto Rico Garrison lending a hand. This is me: Sent from my iPhone using Tapatalk -
My kit arrived! Sent from my iPhone using Tapatalk A the E-11 Doopydoos resin blaster
-
I used a dry cloth. Sent from my iPhone using Tapatalk
