


MoSc0ut
-
Posts
519 -
Joined
-
Last visited
-
Days Won
4
Content Type
Profiles
Forums
Gallery
Articles
Media Demo
Posts posted by MoSc0ut
-
-
Thanks, Jim!!! Right?? I told ya!
 I thought that was cool when I actually noticed that!
Mine is the day I met my wife. May, 8th 1999. After all she is the reason I was able to do this and supports all my geeky ideas.

Jim - TK50899
-
 2
2
-
-
I haven't recieved my official 501st email yet, BUT…I got my GML approval/Welcome to South Texas Squad of Star Garrison email, so it's only a matter of time now! Woot woot! If all goes well, I should be TK-50879 soon.

Congrats! You deserve it for all the hard work you put in! Your TK ID is only 20 different from mine too!
Jim - TK50899
-
2
-
-
I have a 3D printed one I got from a guy off Etsy, he threw one in when I ordered a kit to dress up my son's Mauser as a DL-44. It's not very accurate but will work for the time being. I suggest that you check out TJ's build, http://bit.ly/TJaysE-11PipeBuild . There is a link to the power cylinder section on the first post (post #225 is the start of that section).There is also a great .pdf from Andy (PlayfulWolfCub) that you may be able to adapt, with all the equipment you have, to make some yourself.
-
1
-
-
Thanks Kman! I got a little farther. I did some detail work and cleaned up some putty work from yesterday.
Selector switch


End cap detail


Rear sight


I also finally got the part I was dreading most knocked out. The folding stock. Mine is non functional but I want it to look the part. I kind of jig sawed it together. It was kind of ugly until I sanded it down.
After a little heat bending I had the rough shapes I needed. I then marked out the interlocking cuts.

How they fit together

Assembled

Here is where I stopped tonight

Here is the mag well and magazine detail. I still have the detent on the bottom of the mag to add. I was pretty impressed with myself on this detail.
 (actual sterling mag detail on screen in the background).
I just had a thought, I should have called this thread "MoSc0ut's Ghetto Blaster!" Lol!
Jim - TK50899
-
1
-
-
I hope to sort the parts out and build some e11's .... and the prop parts for my friends. Ill let you know when I get things ready.. You need the demilled gun complete?
Whatever you'd be willing to part with. Ideally a de milled complete gun but even just a parts kit would be better than what I'm currently working with.

All plastic and all from scratch except the grip! Nothing functions it's all just for show.
Jim - TK50899
-
1
-
-
Just awesome! Great start and can't wait to see this completed. I am amazed at how you made the stock. What material did you use for that? Skills my friend!
3mm thick sheet PVC. On the way home now to work on it!
Jim - TK50899
-
What are the plans with those 200+ Sterlings? <drool> I've been looking (and found) many parts kits but if I have the opportunity I'd rather get one from an FISD member than anybody else.
Jim - TK50899
-
If you've seen any of my other threads then please excuse this one. I wanted to share but I have been in a hurry to get it done with a troop coming up in 3 days this is going to be fast and furious. I've already been building parts of this as I go, such as my passable PVC M38 http://bit.ly/PassablePVCm38. The only non scratch built part will be the grip, and I made a 2 part mold and cast these, so I'm not using a original grip if this doesn't turn out very good. Here's a few pics to get things going. I'll take more detailed pics tonight of pieces I've completed so you all can see my work. Even if it's not super clear how I got from A to B with each piece.
Template added and starting to drill

Drilling and marking of future bits locations


Fast forward a bit, flat plastic has been cut and glued into the rough shape of some pieces like mag well and front sight.

Original grip and homemade muzzle molded and cast

Fast forward some more: pile-o-parts

Now it's looking a little more like an E-11.....

So this is where I'm at as of last night. I will slow down and post some pics of pieces and details that I've replicated this far.
I'll be building a Hengstler from scratch tonight too.
Jim - TK50899
-
2
-
-
Hey Ukswrath!
Thanks SOOOO much for this tutorial. I've been following it each step of my build.
Just one question (so far). Are these the correct size 10 sew in snaps for the shoulder to front/back white elastic strap? They seem....huge.
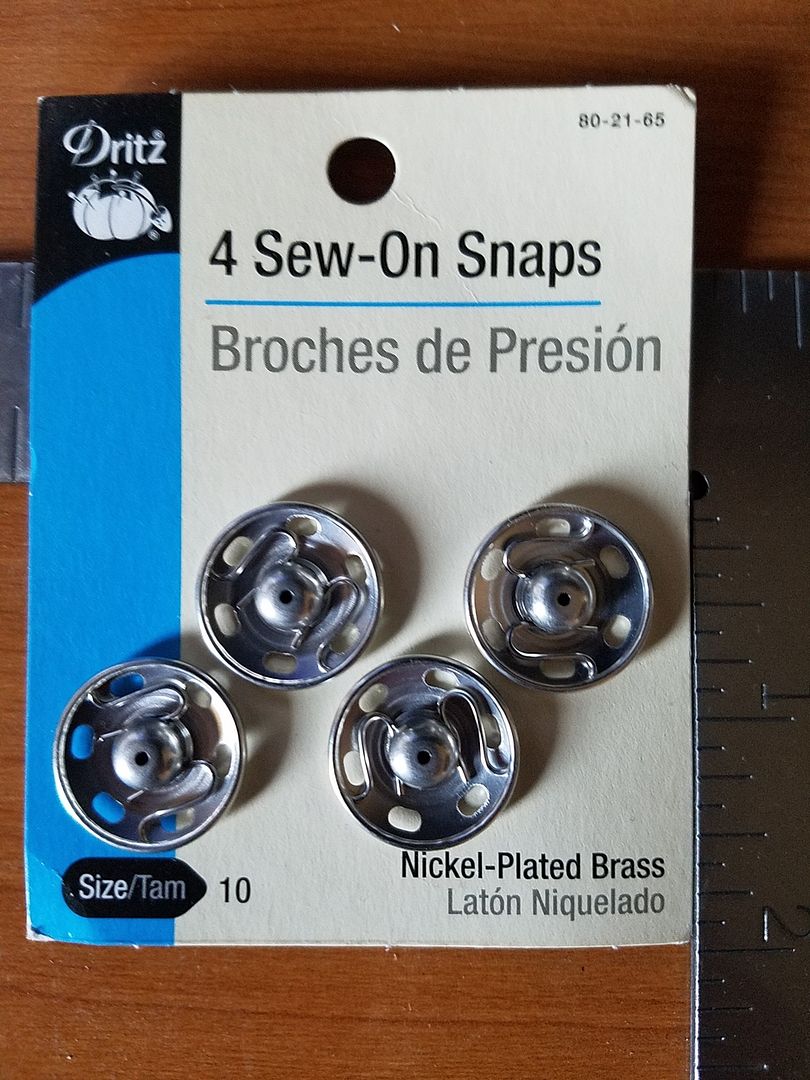
I am not he, but those are the correct snaps.

Jim - TK50899
-
1
-
-
HyperFirm must have amazing standards. The B Grade that I've been borrowing is awesome. I can only imagine what their regular ones look like! Also his is a few years old and from what I'm hearing a B Grade today is similar to a normal blaster of a few years ago.
Jim - TK50899
-
1
-
-
Thank you!! I appreciate that!
Hopefully the wait isn't too long for me! Yep! I still need to get a blaster though. The kits sorta scares me, and I'm thinking of just going with a Hyperfirm. Plus if it dropped and broke, I'd shed a tear. Still mulling it over though. I can't really decide. The kits end up looking better for sure. I think my next purchase will be iComm/Aker though. That way I at least sound the part when trooping. I'm curious where you got your blaster from too. Is it a Doopy? Mark with AP sent me a guy who makes blasters when I got my kit. I may check and see what his go for too.
I have a B Grade Hyperfirm on the way but I have a troop on Thursday and although one of the guys in my garrison has loaned me his, twice, I don't want to keep borrowing his. This one is going to be a display piece in my sons Star Wars themed room. There were 5 B grade hyperfirms up for grabs just a few days ago ($160) I got one....let me check......yep still some left. http://bit.ly/HyperFirmBgrades the one I've been trooping was a b grade and there is nothing B grade about it in my opinion. You will have to add a D ring for the next levels of consideration, but that's about it.
Jim M.
-
1
-
-
It's a PVC pipe build. Those are all bits and pieces I've gathered up for this build. 99% scratch build. The only part that I didn't make from nothing is the grip and I cast that. The one on my blaster is a resin copy. So I kind of made that too. If you didn't already see it I posted how to make a passable m38 in the "how to" section. I'll be doing a counter from scratch tomorrow. I have been in a hurry to get it done so I haven't taken many pictures.Nice! Where'd ya order the blaster from?
 http://bit.ly/PassablePVCm38
 Jim M.
-
1
-
-
Looks great!! You should have a TK ID in no time!! Next up EIB! I'm sitting in a pile of parts building my blaster right now so I can submit too!

Jim - TK50899
-
3
-
-
I am, but I'm contemplating removing them maybe. I think the velcro on the boots may be enough. Plus it's kinda tough to get them to stay in place when putting the boots on! I'll probably leave them for now and see how I feel about it down the road. I was thinking of sewing another piece of elastic to the bottoms of the stirrups to slide my foot into to keep them from wanting to slide off my foot as I am putting the boots on.
Also… who didn't cross their fingers?? It's pouring so hard right now. Photos may have to wait again (UGH!) if it doesn't let up by 5.
We should just set up a live feed and the guy on the other end can just do screen shots then email them to you!
Lol!

Jim - TK50899
-
2
-
-
I like the unnecessary sparkles, it's what I saw when opening my mail from you.
As for the "mystery gunk" that is totally something that they would do. Like you said, once it got set/calibrated at the manufacturer or depot (after receiving service) they'd make it so that "Joe" doesn't mess with it. You can never totally "Joe proof" anything but by filling those in it would be "out of sight, out of mind".Jim - TK50899
-
1
-
-
Just grabbed a Hyperfirm B grade for a song! Still plan to finish my pipe build E-11 but now I'll not have to worry about handing it to a kiddo and it getting dropped while trooping!
Jim - TK50899
-
TK Brethren,
Is there an updated list of providers? I see 46 pages here. Wondering if I can find a shortcut. Looking for a good provider in the states:
Criteria:
Classic Trooper
Would not like to wait 6-10 months
Would like something pre-trimmed.
Screen accurate
USA provider
I know of Walt's Trooper Factory and KB props. What other providers should I consider?
Thoughts? Thanks for your help!
The first post is updated constantly.
Jim - TK50899
-
TK-50899 requesting 501st Trooper status!
http://www.501st.com/members/displaymemberdetails.php?userID=21627
Respectfuly,
Jim
-
That looks really good!
 I've been wondering exactly how to make the bracket. one idea to use instead of the gaffer tape would be to drill a small hole(you could even use a small file to make it the exact size rectangle) on each side of there the wire needs to sit and use a small size zip tie through them with the zip on the wire side of the battery.. a little cleaner but a bit more permanent.
 Mike
Great suggestion Mike! I was also thinking to add a couple Velcro cable ties either end then I could keep the wires tucked away minus the gaffer tape.
Jim - TK50899
-
1
-
-
Here's my setup with my home made bracket.


A little gaffer tape to keep the cords tidy. This was my first one and I made the wires a bit longer just to be safe.
And these are the specs on the fans:
Black Brushless DC Cooling Blower Fan 5015S 5V 0.1-0.3A
I went with the lowest draw fans I could find to maximize the run time, especially since the plan was to run 2.
Jim - TK50899
-
3
-
-
Here's a quick tutorial on how to add some ventilation to your helmet.
*EDIT - I just noticed CheckWan had posted a similar thread in April (I didn't scroll far enough) but if you prefer a photo step by step here you go. Also I found my fans on AliExpress, 5 for $6.50 with free shipping. Shipping took 4 weeks from China to the US but at the time I was still building my armor so I didn't need them right away.

I used this set up on my first troop that was a 1 1/2 mile parade in 96 degree heat! It was still horrible but this helped me make it through!!
Here's what you'll need:
-2x 5v two wire blower fans
-USB cable
-5v cell phone charger
-Soldering iron
-Heat shrink tubing
-Wire cutter/stripper
First cut the USB cable to desired length. There will be some outer protective wire and foil electrical shielding as you work your way towards the 4 inside wiring.
There should be 4 colored wires. Red, Black, Green, White.

Clip off the green and white wires (they aren't needed) and strip the ends of the black and red.

Clip the small plugs of the 5v fans and strip the ends.

Twist together like colors.

Slip the appropriate size heat shrink over both the USB cable and the ends of the fan wires.


**Important step** TEST THE CIRCUT!! Make sure it works before proceeding. The first one of these I made I went through testing the voltage and figuring out which wires were what. In the 4 I've made this far the colors have been the same but that doesn't mean there isn't some off brand USB cable with weird colors inside.

Solder together like colors.


Slide heat shrink over soldered connections and heat shrink.

Slide larger heat shrink over both and shrink. This gives it all a cleaner look and added strength.

Power provided by one of these.

I got approximately 2 1/2 hrs run time from one of these fully charged. The whole set up doesn't weigh much and was added to my bucket with a few pieces of industrial strength Velcro on a mounting bracket I made with some styrene sheet I had from another project. The battery nestles in the back hump with a bit of Velcro quite well.

-FIN

Jim - TK50899
-
5
-
-
Here's the comparison photo and side by side measurements. I hit the body with some Rustoleum Hammered texture paint to see how it looks. I think it is pretty close to matching the texture of the replica scope. I'll be working on the weathering and detailing. The whole thing will get a coat of flat clear coat once it's done to knock down the shine.

In all the following photos my mock M38 is on the top and the replica is on the bottom.
Objective lens (front)

(Mine)

(Replica)
Front body

(Mine)

(Replica)
Rear body

(Mine)

(Replica)
Front foot

(Mine)

(Replica)
Rear foot

(Mine)

(Replica)
Enjoy!
Jim - TK50899
-
Jim, Fantastic work on the scope! Sorry I never got you the measurements from my scopes. Great tutorial and the end result is awesome. Looks real. Super impressed!
Thanks! I'm kinda scared to start putting together the one I got from you. I figured I'd practice by doing this first then I'm going to dive into your awesome kit!
Jim - TK50899
-
So it started with a limited budget and just the utter curiosity of if I could pull this off.
Basically the m38 is a series of various sized cylinders with a "slopey bit" in the middle.
I headed to Home Depot with some approximate diameters from what I could dig up, at the time, on the interwebs. (I later confirmed these when I got one of Bulldog44's awesome hollow replicas.)
Materials:
- various diameter PVC
- Epoxy putty (in my case some left over milliput that is close to being expired)
- Sheet Plastic, preferably thicker but you can stack and glue thinner material to the desired thickness as well. I got mine from the scrap bin and my local plastic supplier.
Tools:
-Ruler
-hacksaw to cut PVC
- CA glue and quick cure


I found all of these sizes in the bin in the PVC aisle that has precut 2 foot lengths.
Here is what I did:
I first marked out the lengths on the different PVC. Then cut them. (I do have a table top band saw so that makes it easier). Then sand down the ends and inside.


Next, cut all but a tiny bit on the center piece, this will overlap the front bit as shown here:

Add the back ring offset on the top of the center piece.

Make and add the feet. One mounts on the center section, the other on the rear section.

Next is the front piece for mounting the objective lens part on. Take a piece of your plastic sheet and cut a piece to cap off the end of the ring. Sand to hide the join some putty may be required but I use gap filler CA glue.

Add the objective lens.

You should have something that looks like this:

Time to fill in the middle with epoxy putty. I even added the little cut out for the number that will be added later.

Here it is before sanding and primer.


After sanding and black primer.


I'll be adding a textured paint to the whole thing except the rear ring and also adding details like screws and lenses and weathering it too but I'm waiting for parts to get here for my bulldog replica kit so I can duplicate it on this "mock M38". I'll post more pics as I put the finishing touches on this. The only thing missing will be the wording on the scope ring but I have an idea to replicate that maybe. If it works I'll update you all.
I think the total cost for this was around $10-15.
Thoughts?
Jim - TK50899
-
6
-
SpiceCredits ANH Stunt Build Thread [AP]
in Build Threads Requireing Maintenance
Posted
Sort of. I used a piece of cardboard from a flattened out cereal box and free handed a template and test fit it a few times and tweaked it until I had what I wanted. Then traced it onto the plastic and cut away!
Jim - TK50899