Templar726
-
Posts
241 -
Joined
-
Last visited
Content Type
Profiles
Forums
Gallery
Articles
Everything posted by Templar726
-
Building the Mickey ice cream bar prop.
-
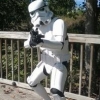
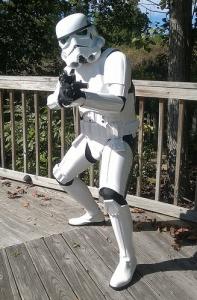
FX Thermal detonator next to the new and improved AP version on the right. AP TD is smaller and has more detail and matches the specs for the unit. Evil Boy clips installed on the new AP TD and I am done! Completed armor pictures to follow.
-
Mickey Bucket complete with screen and decals. Now back to my armor!
-
On a side note my trooper car finished third at the GAWP nationals. Looked good but was slow....
-
Inside my main AP Bucket. Padding and chin strap installed and Evil Boy dual fans installed. Snug fit but still have to put in the Rom/FX then I am good to go.
-
Frown painted. ears painted. False Mic tips painted. vocoder painted. Now to recoat cap and apply empire decal to front and add padding and this baby is done.
-
Decals applied. Blocking out for frown paint.
-
The boots are in! Now Iam ready to apply!!
-
Rough painted. Ready for touch up and inner works.
-
My pair of US size 10s just arrived. They look great! Excellent product, great communication, this guy delivers a great product. The last piece of my armor is now ready. Thank you sir!
-
Ready for the white paint, ears, and then to install the lenses.
-
Spraying the lid.
-
Old outside bubble lenses and the new curved smoke grey inner lenses. These are going to make it look a lot better than before. I hope.
-
All is glued and drying. Tonight I paint the Mickey cap black!
-
Ears are lids with inner supports glued across and bolted through helm with additional ABS support at bolt holes. I used clear plastic as the backs so I could see where the glue needed to go when I added the cap. I rough sanded the clear plastic to hold the black paint when applied.
-
Sanded and primed. Ready to add ears.
-
I bought the finished one. I really do just stare at it. It is a true work of art.
-
Just got my shiny new AP bucket. The thing is a work of art. I just stared at it for about an hour before trying it on. I have to turn it sideways and wiggle into it. Is this normal? It fits good once on but I have a Rom/FX kit and a fan kit on the way as well as padding and a chin strap. Is all this going to fit and is the wiggle twist the way you all get into your buckets? Also I have an average size head. I'm not sporting a Charli Brown noggin.
-
The eyes went pretty smooth. Got them cut out and rough sanded. That is all for tonight. This weekend I plan to sand the whole bucket, once it is good and smooth I am going to assemble and mount inner brackets to hold it all together solid. Once I have it bolted its time for glossy white!!
-
Here is the fit test for the ears. They will be drilled in place, sanded, back caps installed, and painted to match the mickey cap. And yes those are lids to Cosco chocolate covered nuts. This project has just got $9 more expensive but hey, I have two jars of chocolate covered nuts.
-
I'm cutting! Hope this works. One slip and I lose the whole $18 I invested in this helmet.......praying for a steady hand....
-
Frown is open and all it needs is some touch up teeth sanding. The eyes had the lens bolted through from the outside. Drilled them out now to cut them to fit new lenses I ordered that will go on the inside.
-
First step is to pull of decals, sand off all the existing paint, and get ready to cut out the frown. This sham of a bucket does not even have all the teeth cut out and some need to be wider. Drilling in then needle sanding the openings.
-
This helmet is basically a toy. 4 pieces of plastic.
-
General question for you, Is there a difference between the Stunt and the sandtrooper E-11?