


I'm Batman
-
Posts
1,612 -
Joined
-
Last visited
-
Days Won
2
Content Type
Profiles
Forums
Gallery
Articles
Media Demo
Posts posted by I'm Batman
-
-
On 10/16/2016 at 12:41 AM, eqdizzle said:
You'll want to look closely at the show, but the indents are clearly "painted" on in the animation, once again taking into account different lighting conditions.. As long as you can faithfully recreate the look, I think you'd be good. I don't necessarily think the micro-dotting must be a requirement, but is the method used to "paint" these.
Either way, you'd need dark charcoal in the crevices to show the look correctly.
Half of my points are "what's reasonably assessable". Yes, the indents appear somewhat different in appearance. All of the screen caps above I don't see a definitive 'painted grey'. If you look at Kat's image of her raw kit, below, the indents look a different colour. However, they're obviously not.
If you say the armour needs to be lightly weathered with a grey wash, then weathering will naturally go into the crevices. (that is probably as you say "recreating the look") That's the nature of all weathering. So I don't think you need to have something in a basic approval CRL that the GML will not be able to police. There's no way they'll be able to tell whether its fully painted or nicely weathered.
I went through the rubbish approval of my Snowtrooper - half the things on it's CRL aren't even visible. Who on earth can police something that isn't visible. I think it needs to be a compromise between screen accuracy, easily do-able, approvable by GML's. Save the finer points for Level 2,3. (you don't even need 45deg belts, or side rivets until level 3 for a standard TK! They were clearly on all the suits)
-------
-
I still think the grey indents could be shadows or dirt/weathering and I'd prefer to see them left white (or weathered).
Re: Garys comment about about the overall shading/weathering.... Hmmm.... They're definitely weathered in all images we see, but you would think it was issued to new members shiny and new, so I'll abstain from that vote

-
additional blaster photos as requested:
D Ring
Front curling charger bolt
rear sight (this has confused me as the kit only seems to have the mount spot for it to face this way?
Nice blaster Andy!
1. You could already see the D ring in the photos.
2. Charging handle was already forwards wasn't it?
3. It's not actually a mount spot. It's a reversible targeting sight that flips front to back. Unfortunately Doopy chose to hold the part the 'less than ideal' way. I (and most) just drilled straight through into the body of the receiver.
All of that should't affect your application though. We allow Hasbro's, Rubies and scratch built blasters, with no handles, so I doubt some knurling the wrong way round will affect anything. It's been mentioned before that specifics like this only affect Centurion.
Good luck. Hopefully the big red stamp isn't far away
(There's a good shot in the blueprints section, here showing how the rear sight would rotate forwards and backwards)
http://www.whitearmor.net/forum/topic/32111-fisd-e-11-blaster-reference/page-2#entry414732
-
Does the kit come with drop boxes and TD parts? Not seeing them there...
-
Boots
For 501st approval:
Animated Style Boot
Flat black sole
Webbing is primer gray “U” shaped, and wider than Movie TK boots, thinly outlined in black
Thin black stitching or detail line at bottom of webbing to sole
Boots have polished shine similar to armor
Weathered subtly with gray to match references
No seam at back of boot
Food for thought here: A standard ANH/ESB boot would not look totally out of place on this costume, so similar to how they're allowed on a FO TK, should we allow them here. Proper Animated style boot for level 2 or 3?
-
Looking sharp Andy! Very sharp. Oh, apart from that hat, you realise it's backwards?
1. The 6 split rivets on the left side of your armor, connecting the ab to kidney plate, need to be painted white, per the CRL.
2. The drop boxes on your ammo belt need to be aligned with the outer most edge of your belt. (i.e., the left side of the drop box is aligned with the left outer most edge of the ABS portion of the belt and vice versa for the right side. See example photo below.
I think you should be right for the ammo boxes Andy. Alignment at the ends is not required until level 3. Basic and Level 2 is just under the 'plastic tabs', whatever they are.
Belt
For 501st approval:- Belt face is made of plastic (TK ammo belt).
- The soft belt proper is made of canvas, or material with a canvas covering. Size must be 2.75” (70 mm) to 3.25”(83 mm) wide and not wider than the plastic portion of the belt. The color is be white to off-white.
- The drop boxes dangle from the sides of the front plastic belt (ammo belt) via white straps and are aligned under the plastic tabs of the ammo belt.
For level two certification (if applicable):- There shall be three square buttons, one centered in the middle and one on each end of the plastic ammo belt..
- Drop boxes must have full inner drop boxes to close the back. Flat covers are not allowed.
- Drop boxes are vertically aligned with the end of the ammo belt with minimal gap between belt and box.
- The corners of the plastic ammo belt shall be trimmed at a 45 degree angle.
Although side rivets are also not required until level 3, if you do have them, they probably should be white so post up that pic and that EIB Stamp is coming your way soon
EIB and Attache' (cough, cough)
-
Huge effort and thanks to Eric for wording most of the CRL. Having never watched an episode of Rebels, ignore me if I'm off the mark, but a few thoughts:
BTW, just got pricing and ETA from Jim, so seriously thinking about pulling the trigger on this kit. It's pretty cool!
Neck Seal
For 501st approval:
Same material as the undersuit
Black, with minimal dimension, fitted to the wearer
Neck Seal covers all exposed skin
If not integrated into the undersuit, armor must conceal the ends of the fabric, to give the impression that the suit and seal are a single piece.
For level two certification (if applicable):
“Hero” version has 5 horizontal ribs
That is going to be really hard to do (same material as undersiut) and even harder to police at GML level, so I would ditch it. I doubt a GML would even be able to see it based on the required photos for approval. Just say black neck seal. Leave the detail for level 2 or 3.
Vertical indent is colored gray
All the references to "Vertical indent is gray". Is this just shadow effect and the subtle gray weathering? Pics above certainly show the lines, but don;t really indicate it to be gray. I could be and probably am wrong...
Gloves
For 501st approval:
Black in color, closely matching undersuit in material and color, with no visible straps or logos/designs.
Dimension is kept to a minimum. Nomex gloves are not acceptable.
Why are Nomex gloves not acceptable? Again, with the photos we need to submit to a GML, they will not be able to tell. Only that they are black. Leave that specifics to Level 2,3.
Back Armor
For 501st approval:
Animated Style armor
Must be made of ABS, styrene, or similar durable material
Painted gloss white, polished to shine in light
Weathered subtly with gray to match references
Back plate contains a "O II" design.
Back plate has a gap above kidney plate
Gap present between the chest plate and back plate, lined up with vertical indent on abdomen armor
I would probably lose the last point about lining up vertically. Too specific for basic approval. Doesn't allow any variances for slightly different body shapes. Back plate gap, you could probably say "ideally" has a gap. And leave "must have gap" for level 2,3.
Oops, battery 3%, about to shut down. I'll try get some some more input later....
-
 2
2
-
Looking good Eric!
-
-
Keen to see this progress. I've also got one of Aaron's kits waiting for install. I too am curious about the fitment of my snozza in there once installed....
-
Question on the drop boxes for centurion. Im building ANH hero. Does it matter if i use 1 inch or 2 inch elastic on the drop boxes? I dont see a specific size requirement so i figured i would ask. Also does it matter if i sew the strap to the belt or can i loop it and attach by pop rivet in the drop box? any info would be great.
http://www.whitearmor.net/forum/topic/26477-what-we-know-about-strapping-snaps-rivets-etc/
-
Andrew, I just spoke to Bunnings. They said their 50mm Pressure Pipe is 60mm OD. Check that out if Scott doesn't fix you up
https://www.bunnings.com.au/holman-50mm-x-3m-class-12-pvc-pressure-pipe_p4750154
-
Head down to the blaster section: http://www.whitearmor.net/forum/forum/127-anh-blastech-e11/
and search for Hasbro, Disney, etc. I'm sure you'll see a few on each page. Some with differing levels of mods - mine in my signature for example, a very basic one.
-
So, you have your photo bucket account. When the photo you want to paste is on the main viewing page, click on the IMG code:
Down there on the right hand side
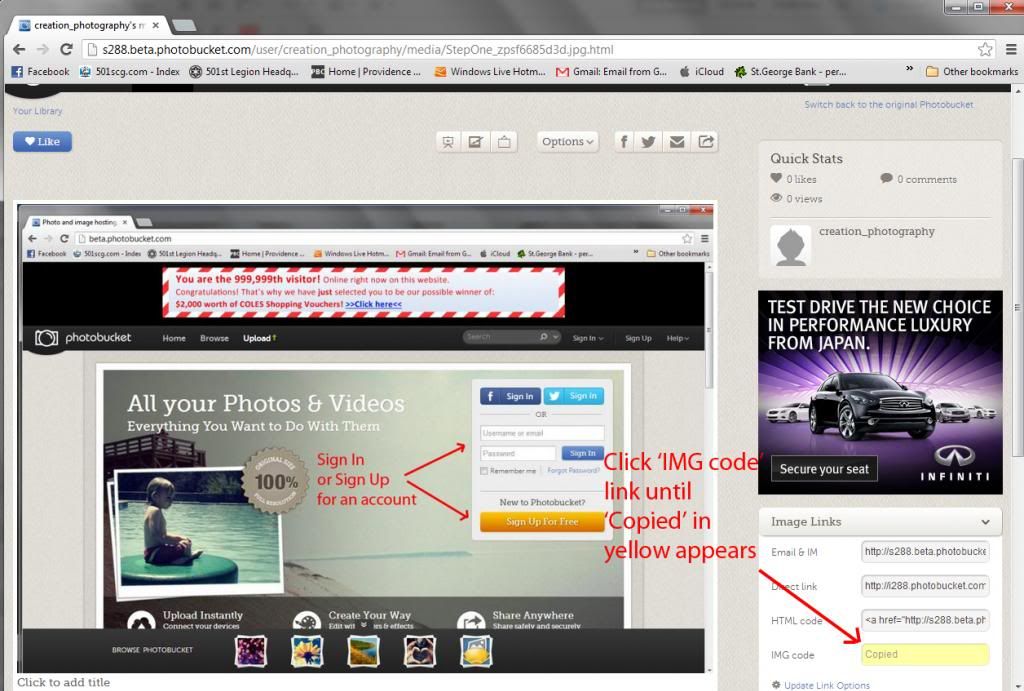
Then come back to your thread and 'paste' in your thread. Anywhere, but the photo will appear where you click ('paste')
-
Nope. Still not showing in the thread
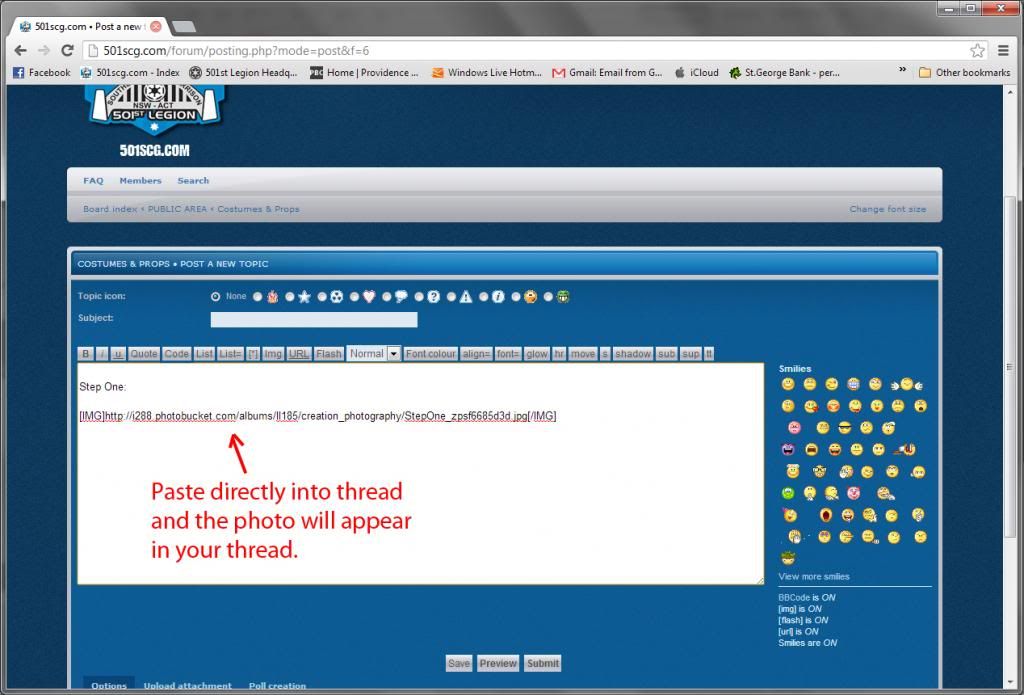
Like this:
-
Nope, not working. Don't see any photos in the thread. An easier way - copy the 'IMG Code' from photo bucket, post where you want it in your FISD post. Simple
Edit - Even if I click on that link above, it comes up "the person moved or deleted this image"
-
-
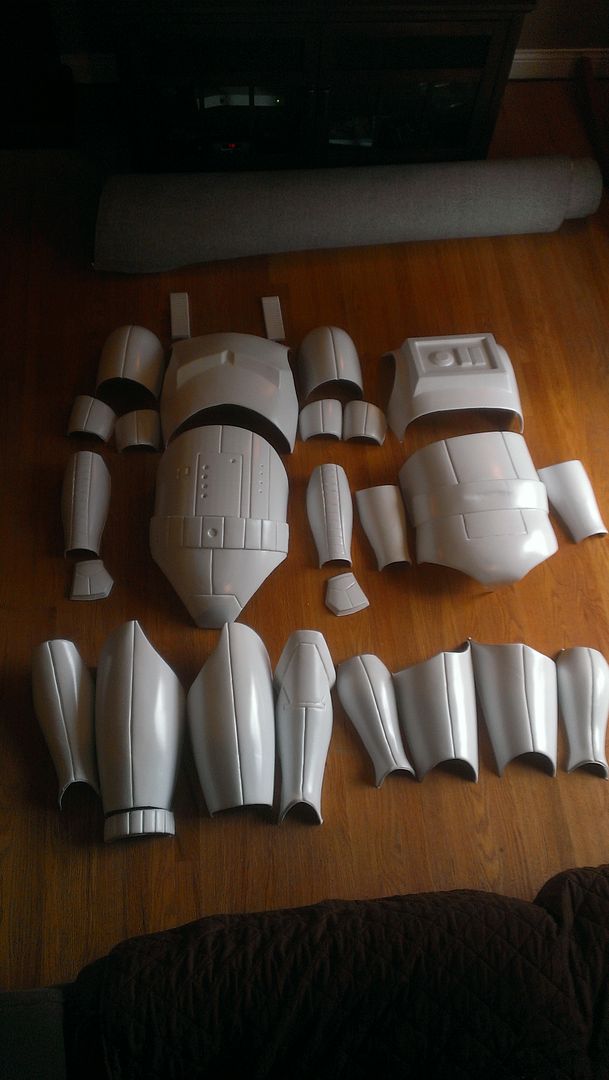
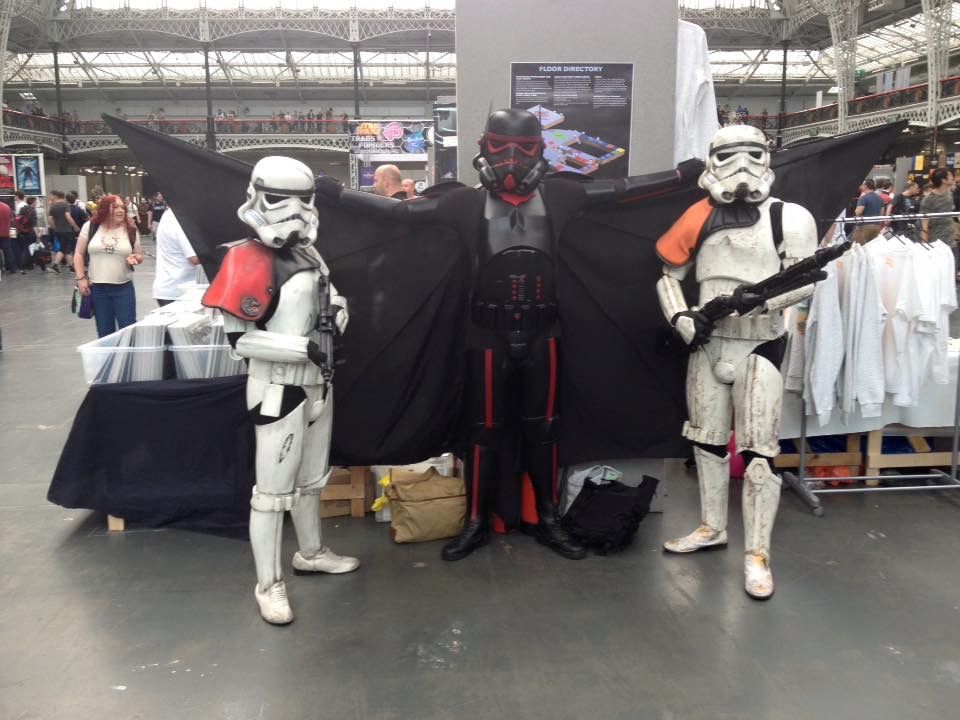
So, almost a year later.......I eventually got to debut the kit!<br>
Went to LFCC last weekend and tried it all out<br><br>
Please check out my photo bucket link and tell me what you think
I think you should post up some pics so we can see
-
1963g
Aluminium pipe, real folding stock, real scope, imitation counter, resin other parts
-
1
-
-
I started a Darth Vader, then moved to a Clone trooper (thread on the main 501st boards). I just couldn't sculpt the head accurately so I gave up. I wouldn't have been happy unless it was 100% true to the lego form. Had bought a bunch of packets of 12mm foam camping mats for the body/legs. I'll maybe retry one day
G-man did an awesome Boba Fett in this thread.
http://www.whitearmor.net/forum/topic/18357-lego-star-wars-costumes/
-
1
-
-
Looking good mate. I'd see if you can get your trigger group housing inserted further into the trigger/handle holder thingo (not sure what you would call that bit). You can see in the E-11 Reference below and pics in the Photo Reference Gallery that it should sit much further in. Only a mm or so of the housing should be visible.
http://www.whitearmor.net/forum/topic/32111-fisd-e-11-blaster-reference/#entry414329
Keep up the great rebuild.
-
I'd bug Darth Aloha about getting a CRL discussion started as well! I'll be joining you in Animated TK building soon!!!
That's what I've just been trying to research - Rebels is canon, isn't it?
So with this and the other 10 kits already sold, with more probably coming we'll need a CRL soon.
-
Great videos. Love your work Tino!
-
1
-
-
Uhm....check with sly or ukswraith...if the armour wasn't made with the 22*22 notch it's not required anymore.
The poll was, um, polled, in favour of making the notch optional, but the CRL hasn't been updated yet
http://www.whitearmor.net/forum/topic/37000-crl-change-poll-kidney-notches-for-all-tk-costumes/
-
1
-


Rebels Stormtrooper CRL Discussion
in Star Wars Rebels
Posted
Most definitely different. Still not convincing me on the painted lines though. Pics of the Rebels above don't look any different to the Clone Trooper below, whose CRL just says 'weathered with shades of grey'
A further view on the weathering is that the lines are grey, then there's a white wash, then further grey shading. More swaying my mind to weathering as opposed to paint.
And I'm guessing we won't get our hands on any screen used costumes to verify? LOL. Or better screen caps showing crystal clear paint lines?
Anyway, I'll let the powers to be decide which way they want to go.