-
Posts
54 -
Joined
-
Last visited
Content Type
Profiles
Forums
Gallery
Articles
Media Demo
Everything posted by Ratchet
-

--WINNER- FISD C-8 t-shirt Design Contest---
Ratchet replied to justjoseph63's topic in Announcements
Love the design Any chance of a pick up option at Celebration? -
I'll be there, no Armour though!!!!
-
Thanks Walter, I'm waiting on my GML now for approval now.
-
I feel I'm finally ready to submit my approval photos, but I would appreciate some feedback, prior to doing so as to not unnecessarily waste the GML's time...so don't be shy Things I have already picked up to address, lighting, left bicep twisted, need more curve in the butt plate, move the Thermal Det to centre of back
-
TK Bondservnt 2392 I appreciate your feedback, as you can see in my thread, there has not been much to date, I have responded below to each point in blue, I would appreciate if you could also point me in the right directions for correct references to assist me in correcting.
-
Here we go hand plates stitched on
-
Photo's have been fixed
-
Thank you kindly
-
Hi, Can a Moderator please move my build thread Ratchet ESB NE Build from Assembly, Mods, and Painting to the ESB Stormtrooper ESB Build Threads where it should be please. Thanks Ratchet
-
Belt, canvas belt and drop boxes fitted, I decided I liked the Idea of using Chicago screws of holding its semi permanently to the AB plate, I'm very happy with the way it has come together For the back of the drop boxes I cut a small slit in the top of the back for the nylon strap to slide through and use a standard rivet and washer to secure the nylon strap to the inside of the back of the belt box.
-
Here are the NE hand plates , had to trim off just over 1/2-1" off the bottom and taper the back of the plate to get the right shape, now just have to stitch it on.
-
Here are some updated fitment photos, still have secure shoulder bells and belt Any feedback is appreciated!!! Ratchet
-

ESB Handguards- Suitable for EIB or Centurion?
Ratchet replied to Ratchet's topic in Assembly, Mods, and Painting
That's what I was working towards, just not sure if it has any real benefit as you say Gazmosis -
The CRL states "If silk or satin gloves are worn, the hand plates shall have the correct visible stitching pattern using black cotton, with a five point/star pattern, equally spread out with 2 on each side and 1 in the middle front, and needs to be double stitched at each point. " I was thinking would it be acceptable to stitch the hand guards to elastic straps rather than the silk glove itself? Thoughts and feedback please!!! Ratchet
-
Thanks Kyle, I have considered that option, but for now I would like to explore the MAS Staz-On
-
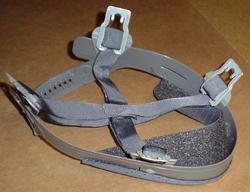
I have a MAS Staz-On (pic below) as it was supplied with my NE Armour does anybody have any fitting tips? So far the bucket is larger than the safety helmet it was designed to fit. I like the idea of this as I imagine it would allow better airflow around your head as apposed to using foam and ensure the bucket moves with your head. So any thoughts or idea and suggestions are most welcome. Ratchet
-
Anybody got fitting instruction / hints for the Staz-On helmet insert that comes with the NE bucket?
-
Bucket Finished
-
Started to fit the ab buttons Image has been scaled down 7% (600x450). Click this bar to view original image (640x480). Click image to open in new window. Body armour strapping Image has been scaled down 7% (600x450). Click this bar to view original image (640x480). Click image to open in new window. first test fit as you can see the upper back piece just isn't sitting right, wondering if trimming down the run edges seen below so they are all uniform would help,down the sides it ranges from 7mm out 22mm bottom return edge is 22mm what do you think?
-
Detonator finished, a straight forward part of the build with the all parts except the clip trimmed and correctly coloured ready for gluing. for the clips i used 25mmx1.6mm aluminum strip and followed the instructions from TK Leper http://www.whitearmor.net/forum/topic/14...elt-clips/ Image has been scaled down 7% (600x450). Click this bar to view original image (640x480). Click image to open in new window. Image has been scaled down 7% (600x450). Click this bar to view original image (640x480). Click image to open in new window. Image has been scaled down 7% (600x450). Click this bar to view original image (640x480). Click image to open in new window.
-
The replacement ears have arrived, yay, I can now do some more work on the bucket. Here are some reference pics the new ears are on the right, old on the left, the new ears are a little longer and also sharpened up the detail, including marks for the screw placement.
-
Painted the teeth and vocoder with Humbrol #85 satin black Gluing the cap and back
-
Teeth being cut out on the frown Finished


