R5SB
-
Posts
94 -
Joined
-
Last visited
Content Type
Profiles
Forums
Gallery
Articles
Everything posted by R5SB
-
Wow. Now that was a great newsletter!<br><br> Many thanks to everyone who contributed and pulled it together.
-

Episode 7 Stormtrooper Helmet, WIP
R5SB replied to Dday's topic in Build Threads Requireing Maintenance
Glad that my comment was taken in the spirit it was meant. If you intend to release new renderings before going for the full scale 'physical' prototype would it be possible for a 3D render that can be spun around to see it from more angles or even a short animation of it spinning? Hopefully anything 'odd' might become apparent to more eyes. Hopefully this would still allow security against copying. Either way I look forward to seeing the next step Sent from my iPhone using Tapatalk -
Episode 7 Stormtrooper Helmet, WIP
R5SB replied to Dday's topic in Build Threads Requireing Maintenance
Hi Derrek Was very happy to see this thread pop up on Tapatalk today. Looking at the work you and Roy have done on the 3D renders I'll be very interested to see the final results. Will you be producing the kits in Europe when you get going (hope so)? Please don't take this as a criticism (it's not meant that way) but when I was looking at your most recent renders the nose section seems to be missing the rectangular cut outs on the side. Will you be adding these or leaving them off due to the production method? Please keep up the good work and I know I'll be following this thread with more interest now. Cheers Andy -
A good read, as always. Thanks to all. Sent from my iPhone using Tapatalk
-
Latex stunt neck seals research and build thread
R5SB replied to Sonnenschein's topic in Build Threads Requireing Maintenance
That's great news Karin. Will you have any samples for sale soon? -
I did ask the person at StormtrooperUndersuits about the ribbing. He said that this was added over the undersuit. I've had a quick play with one of the stills from the trailer and it doesn't look like there's any ribbing on the "buttock" area. It might be why the undersuit has a shiny area. ---------------
-
Hi All To save anyone else buying one (and potentially wasting their money on shipping and import fees) I decided to buy one of the undersuits via the link, but not without emailing the guy(s) at "Stormtrooperundersuit.com" for a bit of background info. He mentioned that it had been commissioned by AVCO for the production (this info has now been added to the listing on their page). I took some photos of the suit that arrived. The shiny section seems to be as stretchy as the rest of the suit (although I can't say how well it fits as I haven't tried it on yet). Hope these pics help. Cheers
-
I like this as it shoes how the parts should go together.
-
Do the detail pictures show wardrobe malfunctioning? It looks like the fastening tab is hanging loose and not closing the ankle spat properly. If so this is a fitting tribute to the TKs in the Tantive IV boarding scene where bits were taped up, etc.
-
Thanks Vern, that made me chuckle. If only I had the same computing power that they had in Bladerunner. I should be able to zoom into the reflections and make out the whole design for armour and helmets!
-
Last night I tried to find the largest version of "the" helmet pic and after doing this I opened it in iPhoto. I wondered if the photo could possibly have any further secrets to reveal and I was quite surprised to find that it did! ------------ At first I wasn't sure where it had pointed me to but after zooming out I realised that it was Pinewood. The skylights in the roof seem to match the reflections in the helmet as well. The date in May could suggest that whoever took the pic has left the production and now doesn't fear the reprisals quite as much. The reduced size of the file might suggest that the pic was emailed or texted off the phone (an Apple iPhone 5s). If only I could just make out a little more detail in the picture itself....
-
Excellent newsletter. Looking forward to the year ahead!
-
Thank you to Ingrid and Sam too
-
Thank you Eric and Aloha!
-
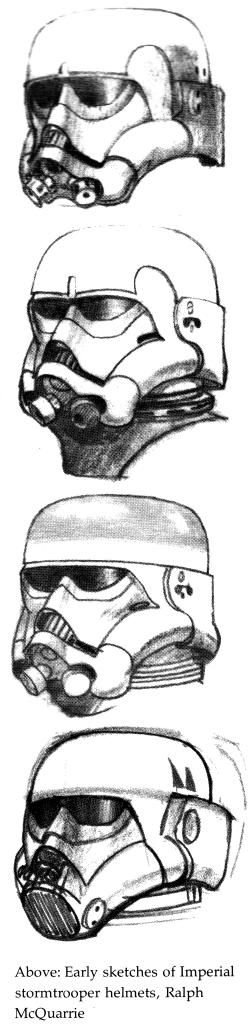
Ralph McQuarrie's Concept Stormtrooper "Helmet(s)"
R5SB replied to kwdesigns's topic in Concept Armor
Hi Kevin Probably a bit late in the day but I scanned these sketches in for you at a larger size (if you don't already have them). Hope they help in some small way. Good luck and all the best with your project. Andy
-
TK 23279 requesting 501st access please http://www.501st.com/members/displaymemberdetails.php?userID=16477
-
R5SB's ANH Stunt Build WIP (TM)
R5SB replied to R5SB's topic in Build Threads Requireing Maintenance
Thanks for your kind words. I noticed the gap at the top of my thighs (front) and the overlap of the back parts, as well. I'll leave them for now until I get some feedback from my local armorers about the fit and any potential clearance issues. If it gets clearance as it stands I'll be looking at improving the fit as I get Trooping. Unfortunately in my haste to get some parts glued last night the results were not good enough. I'm re-gluing them now but that's another day gone. -
R5SB's ANH Stunt Build WIP (TM)
R5SB replied to R5SB's topic in Build Threads Requireing Maintenance
Thanks Mathias. All 8 rivet heads painted and drying as I type @SIMpixels doesn't look too bad, does it? Just wish I had got to this stage sooner. -
R5SB's ANH Stunt Build WIP (TM)
R5SB replied to R5SB's topic in Build Threads Requireing Maintenance
(UKG... well, you know) Progress continues on the build with only a few, minor* details needed to "complete" the armour (*shoulder bridges and their thin, white elastic, removing masking tape plus painting some of the rivets). Before I do those things (tonight) I thought I'd try the whole thing on for some better pictures. Any comments for these would be useful. Couldn't help posing for the last pic (where I've "borrowed" SIMpixels belt holding stance). Right, onto tonight's gluing and painting -
R5SB's ANH Stunt Build WIP (TM)
R5SB replied to R5SB's topic in Build Threads Requireing Maintenance
*UKG deja vu warning A few more pics from the build. This time of the sniper plate and questions about its ideal position and gluing points. I've lined the part up to the what looks like the right positions on the sides but the front seems to be twisted in relation to the cover strip. Is this right or should I be trying to get the the front vertical instead? Should I be gluing at the same points as the magnets are currently holding it or should I be gluing at the rim? Is the flat part glued to the cover strip? Here is a pic of the completed belt. I'll be making the fabric part a bit whiter before approval using shoe/fabric whitener. Hopefully placement of rivets is okay. Thanks in advance for any comments. -
R5SB's ANH Stunt Build WIP (TM)
R5SB replied to R5SB's topic in Build Threads Requireing Maintenance
Time for some more pics of my progress (apologies for their low quality). Opinions about how the arms look would be especially appreciated although if you see any other issues that need addressing please let me know. Finally I'd like to share my method of finding the position of the snap base placement, Blu Tack! Thankfully within a few millimetres of the position suggested on the relevant Bill-o-Gram Cheers -
R5SB's ANH Stunt Build WIP (TM)
R5SB replied to R5SB's topic in Build Threads Requireing Maintenance
Thanks Steve. Hope to continue in the same way. Many thanks Paul. At least with a date in mind it's something to aim for. The 19th October was the anniversary of the arrival of the BBB which is a sad reminder of my slow progress and a subtle kick in the behind to get a move on! -
R5SB's ANH Stunt Build WIP (TM)
R5SB replied to R5SB's topic in Build Threads Requireing Maintenance
Not at all but your visit focused the build in a way that it hadn't been before. Hopefully the same will happen with the MEM date and the need to get cleared a week or two before that. I'll have some time on the armour this afternoon when the rest of the family are out, which is a bonus Thanks again. Andy -
R5SB's ANH Stunt Build WIP (TM)
R5SB replied to R5SB's topic in Build Threads Requireing Maintenance
*** UKG Deja Vu Warning *** Hi all Thought it was about time for a build update. Yesterday Si "SIMpixels" came over to help me and the anticipation of his visit was like finding out that Lord Vader was popping over to see how construction was going on the Death Star 2. Anyhow, with many thanks to Si's efforts and words of encouragement here are the pics (the six split rivets will be painted white in the not too distant future). Here are the bits that I still need to trim... Fortunately I have some excellent pictorial guidance from Billy H. of the UKG so hopefully won't go too far wrong. Right, must get on.