

BIDS
-
Posts
190 -
Joined
-
Last visited
Content Type
Profiles
Forums
Gallery
Articles
Everything posted by BIDS
-
BID's ANH Hero Build Thread - RT-Mod
BIDS replied to BIDS's topic in Build Threads Requireing Maintenance
Thanks Glen. -
BID's ANH Hero Build Thread - RT-Mod
BIDS replied to BIDS's topic in Build Threads Requireing Maintenance
Thanks Derrek, I'm pretty happy with how it came out. The Memorex box is big, but even with my oversize melon it still fits OK. Bluetooth would be cool, just nobody has come up with a saleable kit yet, would be nice to be able to answer a phone call in your bucket though. -
BID's ANH Hero Build Thread - RT-Mod
BIDS replied to BIDS's topic in Build Threads Requireing Maintenance
UPDATE - Fans & Headset After having the bucket on for several test fits over the last couple of weeks I realized how hot they are to wear and today I finally got around to fitting the fans I purchased from TheWolf (Redback Garrison) some time ago. I mounted the fans in the front of the bucket between the mold for the Aerators and the Tubes on either side. I sanded off the mounting "ears" where necessary for clean fitment and used hot glue to affix them. I then ran the power cable for the battery pack to the opposite side of the bucket and mounted it in the tube using stick-on H/D velcro. I put the velcro on the battery pack lid so that I can still operate the switch with the bucket on, and still remove them when necessary to replace the battery. The length of cable allowed me to mount either side battery pack on the opposite side to the fan, and 1/2 way back in the helmet to keep everything nicely balanced. The fans point up diagonally across the teeth and towards my nose, as well as across the lenses to hopefully stop fogging. I've got Lithium disposable batteries fitted at the moment, but I'll replace these with some of the 600mha li-ion rechargeable batteries from ebay (will get 2 set's so I've always got a charged set ready to go). At the moment I've simply got the lenses taped in as I'm waiting on another pair with a slightly different bubble. Once I've chosen the pair I'm most happy with I'll mount them permanently. I then installed the wireless headset module I purchased from TK6294 (Jim here on FISD), along with my Aker Amp & Icomm Static burst module. I mounted the wireless headset module in the rear of the bucket in the rear flare, again using H/D velcro so it's easily removable. I haven't had any luck being able to put the helmet on with the wireless headset on my head, as it always either pulled off, or ended up crooked or just plain uncomfortable. To combat this, and also make suiting up easier I decided to mount the mouthpiece in the bucket full time. I laminated 5x 45mm lengths of 25mm wide ABS together, marked out the shape of the microphone junction block and then drilled and sanded out the shape. Once happy that it would mount firmly I cut off the wire retainer (the part that goes over your ears and around the back of your head normally) and cut in recesses in the ABS mounting block to allow the small wire tag I left, the cable to the module, and the boom cable into. I have used velcro on the back of the headset junction block to retain it in the ABS block, as well as velco on the back of the block so that it is also removable. With the boom mounted the mouthpiece now sits in the front of the helmet just above the vocoder mold and as it's flexible I'll be able to fine tune where I want it to sit. I hope this helps anyone who was experiencing the same fitting issues I was get their headset sorted. -
BID's ANH Hero Build Thread - RT-Mod
BIDS replied to BIDS's topic in Build Threads Requireing Maintenance
Thanks Jeremy, I appreciate that. Thanks for your feedback Glen. I'll have a play with the knee belt & see if I can get it to sit better. -
BID's ANH Hero Build Thread - RT-Mod
BIDS replied to BIDS's topic in Build Threads Requireing Maintenance
UPDATE - Test Fit OK Update time, have lengthened the Crotch Strap to stop the Cod being pulled out at the top due to too much tension. Cut up some foam knee pads and padded out the top front of the shins so that the Sniper Plate can't get caught under the thigh. This has also tightened up the calf and stops it rotating so I don't think I'll need to put velcro on the top of the boot to keep it straight anymore. Also put some foam in the thighs to straighten them up and get them sitting better. Pretty happy and think I'm nearly ready to submit 501st approval shots. Once I've got 501st approval I can then move on with EIB/Centurion. List of items yet to do for EIB/Centurion :- * Male Snap on upper RHS of Ab Plate * Split Rivets on LHS of Ab & Kidney * Shims for Ab/Kidney closure * Fill 4th tooth indent in frown Any comments or Suggestions ? -
BID's ANH Hero Build Thread - RT-Mod
BIDS replied to BIDS's topic in Build Threads Requireing Maintenance
UPDATE - Thermal Detonator As I still haven't managed to find the Grappling Hook that I so badly wanted to use on my Hero I have surrendered and decided it was time to assemble the Thermal Detonator. White Parts Cleaned up & ready to fit I used Jesse' (TK4702) great tutorial on YouTube to make the Alloy Belt Clips :- http://www.youtube.com/watch?v=n1zeqNW11hw&feature=g-list&list=PLMLLSjdqV41KdkpeXplCpCRQvEbIiasE_ I made the mistake of assuming he used 25mm X 3mm alloy as that's what it looked like in the video. It was going OK right up until I'd drilled the holes and attached them to the pipe to start the bend. After much grunting & groaning and some sore thumbs I watched the video again and after seeing how easily Jesse formed his, I realized that he's either the strongest man in the world, or I had alloy too thick. I finally managed to find some thinner alloy, but had to go to 20mm X 1.6mm which worked out ok as they fit quite nicely, and I now feel like the strongest man in the world Here are the Clips attached to the Pipe with Tech Screws before painting I left the clips a little long so I could put a return hook on the bottom to avoid any light fingered fans Once I was happy with the Clips I sanded the pipe smooth and then applied a coat of plastic primer, followed by the grey topcoat. Pretty happy with how it came up as I'm not a painter I then fitted the white parts and test fitted the detonator on the belt, pretty happy considering it's my first try. It will keep me going until I get hold of a grappling hook to replace it with Now I need to finish off the foam for the Calves & Thighs to get them sitting where I'm happy, and adjust a couple of straps. -
BID's ANH Hero Build Thread - RT-Mod
BIDS replied to BIDS's topic in Build Threads Requireing Maintenance
Thanks for the tip's mate, it's nice to have another set of eye's looking over it. I actually think the whole thigh has rotated a little in the pictures, will look at that. I plan on replace that undersuit with a model with the double zip, but with care I should be able to use it for the approvals, will just have to double check the logo before pictures. I'll be taking the approval shots at a mates house as he's got a good SLR, and I'll have some foam to fine tune the legs as I think I need some on the thighs as well. Thanks again. -
BID's ANH Hero Build Thread - RT-Mod
BIDS replied to BIDS's topic in Build Threads Requireing Maintenance
6' Tall & 29" Inseam. -
BID's ANH Hero Build Thread - RT-Mod
BIDS replied to BIDS's topic in Build Threads Requireing Maintenance
UPDATE - Test Fit -
BID's ANH Hero Build Thread - RT-Mod
BIDS replied to BIDS's topic in Build Threads Requireing Maintenance
UPDATE - Butt Plate Snaps Installed & Crotch Strap Finished I installed the Male Snaps in the Butt Plate, drilling the holes just big enough for the snap stem to fig snugly. As there is the thinkness of ABS to allow for, instead of sewing velcro to nylon to make a glue on snap plate, I simply glued the velcro directly to the ABS so that the snap stem had enough meat to rivet cleanly. I made the snap plate for the crotch plate the same as normal with the nylon base and glued it in. The crotch strap is the same H/D non-roll elastic as I used for the shoulder bell straps. External view of the Crotch Split Rivet & Butt Plate Male Snaps Snap Plate on Crotch Male Snaps & Velcro on Butt Plate Crotch Strap Still have the following to do :- * Crotch Strap * Butt Plate Male Snaps & Split Rivet * Ab Male Snap * Paint Ab Buttons (bought the paint & brushes today) * Complete Thermal Detonator (until I can find a Grappling Hook to replace it) * Put velcro on tops of boots to stop shins rotating * Fit foam in Shins & Thighs to improve fit * Replace Undersuit (to get rid of visible logo on chest) * Fit Ab/Kidney Side Split Rivets (will probably hold off on these until I've figured out how to shim the sides for EIB/Centurion. * Still got to paint the heads of the rivets on the thigh pack Update Helmet with :- * Hand Painted Vocoder * Hand Painted Decals * Permanently fix Bubble Lenses. * Fit Helmet Fans * Install Static Burst Kit -
BID's ANH Hero Build Thread - RT-Mod
BIDS replied to BIDS's topic in Build Threads Requireing Maintenance
Mine is RT-Mod, but the same issue with the extra molds for the Hero teeth. I've spoken to Mathais regarding this and his reply was "it's strongly recommended to fill the holes", so I'll be doing this shortly. My plan is to mix up some ABS sludge using Acetone & shaved ABS scrap, but I'm a bit nervous about it. I'm going to try a test run on some scrap ABS that I'll drill a hole in so see how I go with a colour match. I've got wet & dry down to as fine as 2000grit so once it's dry I plan to sand it, and then use the 3 stage Novus polish and see how I go. -
BID's ANH Hero Build Thread - RT-Mod
BIDS replied to BIDS's topic in Build Threads Requireing Maintenance
UPDATE - Ab Buttons & Crotch Split Rivet After polishing the Ab Panel to clean it up I gave the bottons a light sand & wiped them over with thinners to prepare them for painting. I used some CD/DVD labels for templates for the ab buttons. the hole in the centre of them was the right size so I could simply cut the label down to the right size so it could sit flat around the button being painted. I painted the blue buttons first, followed by the top grey buttons, then the middle (allowing drying time between each so that the next template didn't damage the paint). I did have a little trouble with paint bleed through on some of the templates so a tidy up with thinner soaked ear buds, and a hand paint here and there fixed that. The Adhesive CD/DVD Label Templates ready for Blue Paint Blue Buttons Painted & first Grey as well Buttons Completed UPDATE - Crotch Split Rivet Brass Split Rivet installed in the Crotch Panel UPDATE - Helmet Upgrade I removed the RT-Mod decal from the vocoder and hand painted it. I also removed the neat decals & replaced them with Trooper Bay's "Hand Painted Emulation" Decal Kit. While doing this I also removed the black ear rank decals fitted by RT-Mod & painted them by hand as well. Once the vocoder paint was dry I replaced the standard neck seal with an "S-Trim" style instead. Hand Painted Vocoder "Hand Painted Emulation" Tears & Tube Stripes Hand Painted Ear Rank Bars "Hand Painted Emulation" rear Trap's. S-Trim Neck Seal Still have the following to do :- * Crotch Strap * Butt Plate Male Snaps & Split Rivet * Ab Male Snap * Paint Ab Buttons (bought the paint & brushes today) * Complete Thermal Detonator (until I can find a Grappling Hook to replace it) * Put velcro on tops of boots to stop shins rotating * Fit foam in Shins & Thighs to improve fit * Replace Undersuit (to get rid of visible logo on chest) * Fit Ab/Kidney Side Split Rivets (will probably hold off on these until I've figured out how to shim the sides for EIB/Centurion. * Still got to paint the heads of the rivets on the thigh pack Update Helmet with :- * Hand Painted Vocoder * Hand Painted Decals * Permanently fix Bubble Lenses. * Fit Helmet Fans * Install Static Burst Kit -
BID's ANH Hero Build Thread - RT-Mod
BIDS replied to BIDS's topic in Build Threads Requireing Maintenance
Yep will do, I hadn't realised how low it was sitting in the front compared to the back until I looked through these photo's. Had a little trouble with bleed through on the stencil, but have cleaned up and touched up freehand, probably looks more authentic now anyway, a little messy. -
BID's ANH Hero Build Thread - RT-Mod
BIDS replied to BIDS's topic in Build Threads Requireing Maintenance
Thanks Tony, you won't be dissapointed mate, Rob's kit is awesome. Looking forward to seeing your build thread, good luck, enjoy the ride. -
BID's ANH Hero Build Thread - RT-Mod
BIDS replied to BIDS's topic in Build Threads Requireing Maintenance
Thanks Derrek, I appreciate the feedback. I had put the belt dead centre over the split between the ab/cod, but I can see now it's a bit low. Just put a coat on some of the ab buttons, have left them to dry. I've used a stencil around the button and need these to dry before I do the ones in the middle. Not coming up too bad considering I've never painted stuff by hand before. Cheers Craig -
BID's ANH Hero Build Thread - RT-Mod
BIDS replied to BIDS's topic in Build Threads Requireing Maintenance
UPDATE - Sniper Plate The Plate fits really well especially compared to some I've seen, so just a quick clean up with sand paper, a trial fit and then glued away :- Pictures showing the amount of Clamps required to get the plate to sit flush. Pictures showing the Plate glued into position. Close-up pictures showing the nice flush fit on the sides of the plate. UPDATE - Thigh Battery Pack The Battery Pack does not go as far around the thigh as some I've seen (the reference pic I was using shows the ends of the pack level with the back corners of the thigh). It only goes as far as the 2nd corner but still looks neat. It also has some round molds in the top corners so I drilled through these to fit the rivets (used the rivets supplied by SeanTrooper here on FISD). After drilling the holes in the battery pack panel I lined it up on the thigh and marked through the hole one side at a time. Once I had one side riveted I marked the opposite side and drilled it before riveting. I used the Brass Anvil (female side) from my snap set to sit the domed head of the rivet in, and then punched the inside of the rivet using the punch out of the same set. This set the rivet securely and gave a nice neat finish. UPDATE - Test Fit 27/12/12 Put the full suit on to check fit with the new components. After uploading the pictures I can see I've let the right shoulder bell creep up to high (it may have even slipped out of the strap) so I'll have to check that next time I suit up. Also the belt is sitting too high at the back, but once again something I can check next time I'm wearing it. I think the foam/velcro in the shin & top of the boot will lift them slightly which should cut down some of the black showing at the back of the knees. Still have the following to do :- * Crotch Strap * Crotch Male Snaps & Split Rivet * Ab Male Snap * Paint Ab Buttons (bought the paint & brushes today) * Complete Thermal Detonator (until I can find a Grappling Hook to replace it) * Put velcro on tops of boots to stop shins rotating * Fit foam in Shins & Thighs to improve fit * Replace Undersuit (to get rid of visible logo on chest) * Fit Ab/Kidney Side Split Rivets (will probably hold off on these until I've figured out how to shim the sides for EIB/Centurion. * Still got to paint the heads of the rivets on the thigh pack Update Helmet with :- * Hand Painted Vocoder * Hand Painted Decals * Permanently fix Bubble Lenses. * Fit Helmet Fans * Install Static Burst Kit -
BID's ANH Hero Build Thread - RT-Mod
BIDS replied to BIDS's topic in Build Threads Requireing Maintenance
UPDATE - Belt / Drop Boxes / Holster OK, so I've been a bit slack of late, but finally pulled my finger out to do a bit more. Unfortunately this is the first part I've had a stumble with, but this is a WIP afterall and I'm going to show it wart's and all so others can learn from my mistakes and hopefully not make their own. All along I've been building with the theory to have all (or as many as possible) parts replaceable, especially straps ect. for when elastic stretches, or if plastic cracks or breaks ect. I decided I wanted to have the Belt Plastic attached to the Canvas Belt with Snaps so that I could simply pop it on or off at any time to replace it ect. The RT-Mod belt ends are a little long according to a post I found on here so I shortened them up accordingly. Also the square buttons are molded on the ends, but the middle is simply a square mold with no round centre. I was lucky enough to get a set of three buttons off a guy in my Garrison so planned on glueing them on to cover the fasteners. Unfortunately when I tried to heat & mold the middle button to make it fit over the centre mold on the belt it distorted. I had to trim one of the outer ones I removed to replace it with. Components ready to start Inner centre spacer glued in Female Snaps riveted in using panel washers on front to stop them pulling through Plastic Belt snapped onto Canvas Belt Elastic straps riveted onto Drop Boxes (used large head rivets to stop them pulling through the strap) Drop Boxes fitted to canvas belt using snaps Male snaps on Ab Panel to hold belt level & square I don't have a picture showing it but at this point I had glued the square buttons over the rivets holding the female snaps onto the plastic belt. I was happy with how it looked, however when I tried it on the outer snaps kept popping off the canvas belt as I curved it around my body. I think a combination of the room taken up by the rivet not allowing a firm snap, and the tension placed on the belt by the curve were the main issues. Another problem was the head of the female snap holding the drop boxes on putting pressure on the edge of the molded plastic belt. To combat this I moved the strap 10mm inboard to clear the edge of the plastic. To combat this I drilled out the snaps on the plastic belt, taking care not to drill through into the square button. I then cut rectangle sections of ABS and riveted them onto the canvas belt though the holes that the original snaps were in. I used panel washers on the back of the belt and put the rivet in from the back so that it's domed head was smooth against the armor. I drilled out the rivet in the plastic belt and carved a domed indent into the back of the plastic to allow clearence for the new rivet. Once I was happy with the placment of these ABS panels I glued them to the plastic belt in the same position the original snaps were in. This allowed the plastic belt to be held firmly to the canvas even when curved and prevents it pulling off the canvas anymore. The ABS panel showing the rivet, the domed indent in the plastic to clear it, and the relocated drop box snap. The backside of the canvas belt showing the domed rivet head & the panel washer to stop it pulling through the canvas. Belt showing all 3 ABS panels riveted into place. Shows the Plastic Belt glued onto the ABS Strips riveted to the Canvas belt (glued into the same spots the snaps were originally. Front view of finished belt with drop boxes installed. Back view of finished belt. Holster fitted to canvas belt as per dimensions off of this sight (showing distance of strap from plastic, gap between belt & top of holster, width of straps ect. Showing completed belt fitted over Ab Panel Showing completed belt from holster side. -
Thanks very much.
-
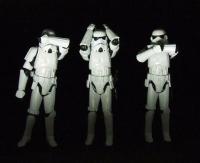
Requesting 501st Access TKID-4751 - BIDS - Craig Redback Garrison - QLD - AUSTRALIA http://www.501st.com/members/displaymember.php?userID=14391&costumeID=76
-
I'd suggest you try riveting (steve from New Zealand) on here. He's a great guy to deal with and his lenses are beautiful. There are some pictures in my build thread if your interested in looking at them.
-
Powering through already mate, have fun with the build.
-
BID's ANH Hero Build Thread - RT-Mod
BIDS replied to BIDS's topic in Build Threads Requireing Maintenance
Thanks very much Ron, I really appreciate the feedback. I'll endevor to keep the updates coming and hopefully the build will continue to go well. Great to hear you've chosen Rob's RT-Mod armor, not only is he a true gentleman to deal with, he also makes beautiful armor. Good luck with your build, make sure you start a WIP when you get it so we can all follow your progress. -
BID's ANH Hero Build Thread - RT-Mod
BIDS replied to BIDS's topic in Build Threads Requireing Maintenance
Thanks Champion, it will be your turn soon enough. -
Congrat's on receiving your RT-Mod, it's beautiful armor. Please find my replies in BLUE , have fun with your build.
-
BID's ANH Hero Build Thread - RT-Mod
BIDS replied to BIDS's topic in Build Threads Requireing Maintenance
Update - Shoulder Bell Strapping I finished off the strapping on the shoulder bells by adding a snap plate to the bicep so it could be attached to the bell to avoid any possibility of it sliding down past the bottom of the bell. This strap is elastic to give some flexibility for movement ect. These pictures show the strap with the extra tab to join onto the shoulder bridge strap. Completed Arm Assemblies Update - Thigh Strapping I put the armor on so I could figure out where the thigh straps had to be attached, and I also put on the arm assemblies so that I could figure out the length required for the shoulder bell straps. Front & Rear Pictures, Thigh straps taped on to check height I used Nylon for the snap plates, again with velcro sewn on, and 4 snaps per leg. For the strap I doubled over the elastic for maximum strength and the least chance of premature stretching. The strap slides over the belt I use to suspend the thighs. These pictures show the belt used to suspend the thighs with I've got a pair of suspenders ready in case I need to use them. I won't know until after a couple of troops, but the suspenders will allow the height of the thighs to be adjusted for height by lifting or lowering the belt slightly.