

skyone
-
Posts
326 -
Joined
-
Last visited
Content Type
Profiles
Forums
Gallery
Articles
Media Demo
Posts posted by skyone
-
-
i dont' think hasbro have space to place the mp3 player boardfits the hasbro? do i have to gut the internals and swap it for the new ones?
-
if it was so, there was no need of resistors. Or maybe it had a very small range of voltagei think the blaster core has it built in
-
you could use a Constant Current Regulated LED Driver for more efficient way
-
great work! my arduino-blaster dont' feel alone anymore

i also wished to use all the resin kit (such as the receiver) but i ended that it would take more work to fix it than building a new one with forex
-
thanks, yea i should change the sd card with a black one

-
today i changed the front speaker with this one, 2w 8ohm
the loudness is almost like the old one and the quality is much better because of wider range of frequencies (170 hz -20 khz)
Edit: this speaker has issues with the mini-amp, had to remove and put back the old speaker!

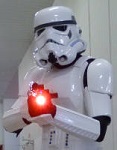
so i got the chance to take some pictures of the weapon, battled-damaged after 2 war-events


-
i don't think u can use the sds blaster with arduino+mp3 board+speakers, there is not enought space; also the mp3 board need some extra millimeters in the hengstler counter as well the battery inside the receiver. This project fit a pvc/metal pipe blaster with a custom hengestler and receiver.Hi Manuel!
I am interested in purchasing an Arduino for my Blaster, but ... is it possible to somehow adapt to SDS?
Thanks and greetings from Spain

you are right, i can also decrease the brightness via arduino but i think it will absorb the same energy and it's not very efficient that way (as well adding a resistor). If i dont' need that light it's better to change the led. So first i will test moving the led and adding a cover, after that i will decide..It may be a hi-bright led, you make be able to get a duller one or even add a resister to the led to reduce the power to it

-
i am still unsure if remove the on/off status blue light because it's too powerful and bright
or maybe i can direct the light emitted to the front filter of the hengstler..
or maybe i will add just a plastic cover
-
more pics from today, with the blaster firing at will
(only the first is me, the others was a garrison member using my arduino blaster)


-
today i tested for the first time the blaster with arduino in a big event here in Rome (Romics). It was amazing. So many sounds, so much fun. The battery Phottix Lp-e8 lasted around 7 hours of massive use, that means with a spare battery it will last a full day event.
these 2 shots show the blaster in action (was me and a friend from rebel legion), soon i will post a review video.


-
do you know any free sharing site where to upload? megaupload is closed, mediafire need to register..
-
doopydoos resin is solid and you can choose to buy only some parts and build your blaster easily with a pvc pipe.
-
thanks guys
i am adding some new sounds
another folder(weapon) with star wars soundtracks, imperial march included (fire to skip tracks)
last folder with funny sounds (farts..
just for fun)Edit:
just for fun
Fart machine added: 6 fart sounds at random with led off (last weapon after jawas sounds)
-
since everything is working,i editet the first post of this topic with the final scheme and the code for arduino
-
great work, now we looking forward to watch pictures or video of the gun in action
p.s.
where did you install the speakers?
-
yes painted finished and now installing t-tracks with super-attack. Tomorrow will paint also the folding stock and the aim, so the blaster will be completed.
the paint is a bit textured to give a more metal look


-
yea! i had to order smaller speakers but the sound is so good nowI had a hard enough time fitting my electronics into my spring, can't believe how much is in yours, looking good
-
i understand why the paint is not yet dry but still sticky: it's a water based acrylic paint, that's the problem. But i couldn't find any other satin black spray than this.
 i hate when big store have anything but not the thing you are looking for. I think i am going to order on internet.
p.s.
had to remove all the paint because of it.
a lot of workNow i painted again with a matte black NOT WATER BASED paint, mixing a bit with the grey metal background
-
very good work
mine is also mostly finished, today i loaded the electronics even if the paint stil it's not 100% dry!
tomorrow i will try to finish to paint and install the missing parts

-
as expected, it was not easy to fit the cables inside, mostly because the speakers fit exactly the inner pvc pipe without gaps, so don't leave much space for placing wires.
but i did it

everything is working 100%
now i should give another coat of paint to cover the colored cables, paint the handle grip, add the vent rails (i have the rubber ones), and it's ready fro Romics event at end of month
Arduino inside

-
it is is going to live

-
good replica; just a note: it looks like the bayonet lock is not in the right way.
---------
-
to begin to assembly electronics i am still waiting the satin black to get dry.. maybe because it's water based, this paint need more than 24 hours to get dry!!Rain today so looks like clear will have to wait until tomorrow

-
Love quick drying primer, now a bit of silver and bronze, black tomorrow
 ù
ùi am also in painting phase
painted silver, and now the satin black

i never used the satin black, it was also quite hard to find (and expensive
8 euro!) but i really like this color, gives so close the metal look.when dry, the hand grip will be painted glossy black (as for the scope).
Ducati's Build
in ANH BlasTech E11
Posted
i see that now blastercore turned also into the more appealing led bars graph rather then previous row of leds..
Btw great work!