

skyone
-
Posts
326 -
Joined
-
Last visited
Content Type
Profiles
Forums
Gallery
Articles
Media Demo
Posts posted by skyone
-
-
good work and good luck with your project!
sounds interesting the code mods you did
You also added #2 RGB 3watt leds, but in your scheme i see only 3 drives , if so how can they power both? these drivers are constant current drivers, that means they give 320/350mA constant with variable voltage (max 1 watt); if you use them to power 2 leds the voltage will be the half (as well the light emitted by leds); but if you never use them at same time then it's ok.
-
I'm advancing ... But I'm having a problem ... I don't know why, but it seems that the "firing" switch event is firing to often ... When I click on the switch it sometimes fires 2-3 times, and also when releasing the switch. Does someone have an idea ?
try add a debounce time, i did for the selector switch but i didnt' for the fire button cause i didn't experience your problem
http://arduino.cc/en/Tutorial/Debounce
for the led not lighting, what is your power source? how many modules have you connected?
-
still waiting the delivery of the mic amp modules but i think i will try in a more simple way (just powering the microphone using resistors and capacitor) as showed here
http://www.epanorama.net/circuits/microphone_powering.html
then it should work connected to the mini amp 3w
-
have a nice time with your arduinos

-
i had problem with microphone, i can't amplify the voice simply using the mini amplifier connected to a condenser mic, i need something more specific
i ordered this module some weeks ago, let's see if it will work when delivered

-
Where is the ribbing ?
maybe the ribbing is added over the suit
-
The Force awakens stormtrooper undersuit
-------------
-
I love the look. I love the fact they made an homage to the old one.
Sent from my iPhone 6 using Tapatalk
i love the look too, can't wait to build it

the scope look a bit like this ASG optic

-
 1
1
-
-
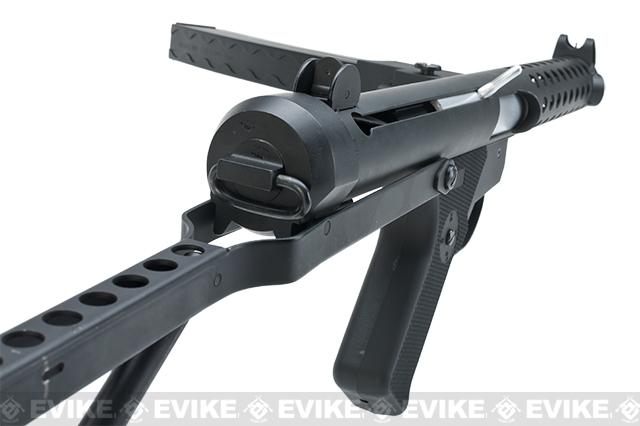
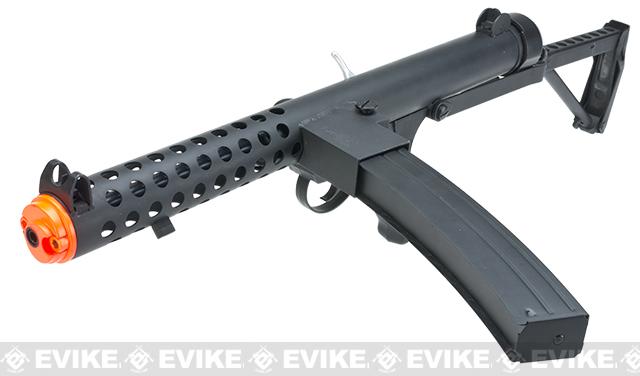
Here we can discuss and speculate about the new troopers blaster as seen on ep.VII trailer


From what i can see, it's an evolution of sterling, added lights, different scope, there is no holster, maybe the use magnetic
-
On 11/18/2014 at 10:58 PM, gazmosis said:
$500. That's painful
nope, we are making confusion
in this thread now are discussed two Sterling ASG
----------
-
i don't know if it was posted, but there is a new airsoft sterling on sale
this time is the L2A1 (that should look the same of L2A3, the one used on ANH)
Estimated Arrival 12/2014: Matrix Full Steel WWII Sterling L2A1 Airsoft AEG Submachine Gunhttp://www.evike.com/products/50076/


-
sorry hasbro, rubies win.
-
this picture is from our garrison member TB 1340

-
i have all the components now, i just have to assemble them
i don't like too much the microphone part, i might change something
-
new arduino rifle has just born in our garrison ...


-
Hi,
Great project - thanks for sharing and open sourcing
...
You are right, then it should work better a code like this
//return hex from int

int intToHex(int i) {

  return 0x00 + i;
}
TrackCounter2 = random(60,64); // play files random vader voice int trackHex = intToHex(TrackCounter2); Serial.write(0x7E); Serial.write(0x04); Serial.write(0xA0); // A0 for SD card Serial.write(0x00); // high byte hex Serial.write(lowByte(trackHex)); //Track number - low byte hex Serial.write(0x7E); -
much better than the old one, hope the size is not too small
-
Hi ,
Great tutorial and project. I'm looking for sound files and can't find the link. Could you help me?
Thx
hi i sent you a pm
-
Hi... I am trying to put this together... Thank you so much for this Project.
Still waiting to receive some pieces but I need some assistance... (Sorry I know very Little about electronics)
In the led drivers... Do I have to install a 100uf capacitor ?? I dont see it in the components list.
Also in the led drivers... what doesthe symbol on the dim cable mean? ( the one that goes to d9 in arduino).
Again in the led drivers...whats the symbol after the led ??
Thanks !!
the 100uf capacitor is already included in the led driver. On the capacitor terminals you will connect positive and negative of the battery (the "minus" labeled on the capactitor shows wich one is anode and cathode).
the dim pin on the chip goes to the pin digital 9 of arduino
that way you can control the power and the brightness of the led


-
so i did it today
i also changed the cd rom again
this time i used a commercial cd rom because the reflective film is more resistant


-
thanks, i will upgrade it soon with this reticle
http://s69.photobucket.com/user/TheCloudwalker/media/ScopeRectilwb.gif.html
have to buy a transparent sheet for color laser printer first
-
i had lens from broken chinese binocular; i cutted a CD-Rom..


then placed everything inside the scope (no glue on the cd-rom part or the reflective film will tear out from the plastic)

final..


the scope is not dead anymore

-
I like the play random TK voice's, Nice work

I seem to get this error with the code ?
e11_ver_04_02L_WT5001.ino:306:33: error: invalid suffix "cvf00" on integer constant
yea sorry i mistyped something in the code now i reupload the right one (i also added minor mods)
edit:
i added the code with radio mode (hold button) also for previous mp3 player WTM-SD (as mine) and it's working great
if you are going to update you will need the new mp3 files (pm me, or just add two files in folder advert02, named 013.mp3 for button sound, and 014.mp3 for radio stormtrooper chat, link in the first page)
-
i just uploaded a new code in the first page that supports this WT5001 sound module and also add some new features:
- long pressing of select button enter into radio mode, that means a loop mp3 file with stormtroopers voices (i used the one from the legion website) tha's a nice feature i think when you keep your blaster in the holster
- a welcome voice of vader when turn on the blaster
you need the sound files as i uploaded in the microsd card in orfer to make it works (pm me)
also, after copied in the microsd card it needs to be ordered again or it will not work correctly. For that purpose i use a very simple software:

Phoenix Props ANH E-11 Pipe Build
in ANH BlasTech E11
Posted · Edited by skyone
that should be ok when you connect them straight to a battery; but in this case, they are connected to drivers. Those drivers can power max 1 watt each one at 320/350 mA; that means at maximum they can give around 3 volts @ 350 mA; with 2 leds in parallel you will needs 700mA @ 3volts and these driver cant' do that. You can test it lighting up them at the same moment.