

skyone
-
Posts
326 -
Joined
-
Last visited
Content Type
Profiles
Forums
Gallery
Articles
Media Demo
Posts posted by skyone
-
-
so sad, bad people are everywhere. As someone told, the garrison uncostumed staff are your best protection for such events.
by the way good luck with your new blaster!
-
thanks! hope tomorrow i will get the cables bought from ebay so i can complete the project.
-
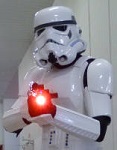
finished the nozzle, the house for the 3WATT RGB LED
the LED will be secured with 2 screws inside the plastic plug


some minor stuffs


painted the Hengslter counter and re-assembled. Then tested again before installing on the blaster, wich is under painting


very soon it will be finished, but the hardest part will be to place cables inside..
-
worked on nozzle
I sliced ​​2 pvc pipes like a sausage and I got the 2 "slices"
sanded a lot, drilled and sanded again. Then glued togheter. When dry, i will finish to sand and screw on the black plastic cap where inside it will be installed the LED


-
receiver with 7.4volt lithium battery inside installed and ready to paint
i also installed the folding stock with 2 screws on the front and 2 screws on the back
next steps:
finish the nozzle and install the RGB led on it (i am not going to use the resin one)
install the 3 or 4 resin doppydoo stuffs (as the aim)
paint the blaster without electronic inside
intall the electronic and kills the rebels!

p.s.
had to buy more wires! i finished them.


-
today i worked on the magazine receiver, where the battery will be stored
as told before, the battery chosen to run Arduino is a Phottix Titan 7,4volts 1400mAh litium for canon 550d/600d/650d EOS cameras. I tested that battery before and the amperage is real; it costed just 10 euro from Hong Kong.
Then i bought from ebay a charger plate for only 2 euro, that solved me a lot of troubles to build the battery housing. I had just to cut the unnecessary part.


Finally, i added the ON/OFF main switch.
Tomorrow i will close the box and will build the magazine, that will cover the excess part of the battery.

-
for my arduino project i discarded the AA batteries, they are too big and affected of memory effect, while the 9v is too low amperage
the L123A lithium batteries from china could be an alternative but again their amperage is not true and most of them are no brand with bad stories (explosions).
i ended to use a Phottix LP-E8 7,4 volts 1400mAh lithium battery. That battery is for Canon 550d/600/650D cameras and i used with my reflex without problems. They last even more ther original canon.
-
testing that everything is still working before assembly and paint the hengster counter

everything working fine :)the sd-card slot now is moved on the upside because in the front side i didn't consider that the receiver doesn't allow to eject or insdert the sd-card (dumb me!)i am going to install a transparent palstic sheet to protect the led bar. I drilled the hole for the led status. I added inside the box a filter in the front side.


-
if you are using the same mp3 player board u can get my code here [not final]
http://arduino.cc/forum/index.php/topic,109432.0.html
you must login the forum to be able to download
as for the wiring u need to connect the RX of the mp3 board to the TX of the arduino to send data, as well the 5volts and the audio pins.
-
On 8/27/2012 at 12:41 AM, Potty Meister said:
Looks like the teeth need a bit more paint coverage on the tops and bottoms. Other than that, looks great!
yes you are right, so i removed the gray sickers and i painted myself
sometime i needed Turpentine to remove the paint
tomorrow i will give another coat where needed
------
-
thanks guys, that batman was attracted by the dark side of the force
-
this is a video i made last year to promote our garrison, like to share here

-
i would like also the shield

-
-
umm i just took some flash photos with the reflex and with a compact camera and i can't see my eyes, that visor seems flash proof and maybe the black painted inside help
then i am not going to change the lens, but i will add plastic net on frown
---------
-
green lens make eyes visible when people take photos with flash
-
completed
------------
----------
next upgrade:
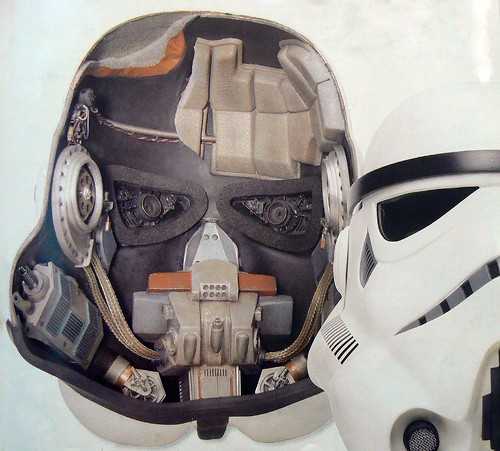
brown lenses and Mich army helmet pads inside
-
today worked on the hengster box
first i desoldered and removed the pins from the board because the space inside for the use of the pins is not enought; i soldered only the wires needed for the project (power, R-L audio in/out, RX, data ground)

then i secured the led bars on the back with 3 screws from inside


then i planned the work on the box:

that red part will be removed to insert and eject the SD_CARD
an hole will be made on the hidden side of the box to let the wires go inside the blaster pipe
the mp3 board will be secured with 4 screws over 4 small bases of forex, glued (E6000) inside the box
-
today i got the right screws to secure the toggle switch, so i installed it


now all the 3 buttons are fully operative, tested with tester
in the back part of the pvc pipe there is enought space for the arduino nano, then the speaker.
in the front part, the second speaker, the constant current regulators and finally the RGB led
time to work on the mp3 player house (hengster counter) and then on the receiver where to store the battery (a phottix Lp-E8 for canon 550D)
can't wait to see it working


-
you can see that pads inside the helmet of user Dearmeat, link in my previous post
-
today i worked on the reload button
first i prepared the cover in alluminium where to install the toggle switch, that cover will protect also the first speaker
the toggle switch is installed on a second sheet of alluminium, then secured with 2 screws on the cover. I didn't find the right screws for that job, tomorrow will buy them.
the cover is secured on the pipe trought the 2 screws of the scope rail, and the 2 screws of the handle.


-
yea and i have found that the user Dearmeat already installed the same pads in his helmet here: http://www.whitearmo...?showtopic=9529
so cool
-
-
On 1/15/2010 at 11:12 AM, Dearmeat said:
I have been working some more on this bucket by adding some more pads. Fits like a glove. Also have gotten rid of the green lenses and replaced with dark lenses. An option for using dark lenses I have found are the ARMY dust goggles. You can buy replacement lenses in the dark "Smoke" color for around $2 a set. It takes two sets for a helmet due to the size of the lenses. They have worked out great! I just thought I would post this. I'm getting ready to start on the body armor this weekend. Hope to have it ready by spring. Here are some pics of the up dated padding. Do you guys think the helmet is ready for trooping?
that's cool, i just ordered the same pad set
that remember me the pads inside the riddel version
can you post bigger pictures of inside of your helmet? i can't see your work on lenses, i presume you had to cut and shape them. I am also interested to buy real lenses because of UV eyes protection.
-
On 6/19/2012 at 5:56 AM, Chiassontimothy said:
For those looking to buy MICH pads, Being in the military, I have already installed them. They not only look good but are very comfortable. A brand new set sealed can run roughly $30 for a set of 6 pads, One large circular, on large back and four mini pads for the side. You can find them at almost any army surplus for much less as I bought mine for $3.00 for the whole set. I hope this helps some.
i was looking for pads for my ATA helmet
first i checked the pads included inside the latest mich airsoft helmet
--------
Doopydoos
in General Weapons Discussion
Posted · Edited by skyone
this topic should be moved to
General Weapons Discussion