Ravenwood
-
Posts
537 -
Joined
-
Last visited
Content Type
Profiles
Forums
Gallery
Articles
Media Demo
Everything posted by Ravenwood
-
I decided to add a little more dimension with some sound to the inside of my TARDIS for Halloween night and my party..... what do you think? of course the pictures are just so you have something to look at while you listen lol. http://s203.beta.photobucket.com/user/jeryhorn/media/TARDIS_zpsd5885662.mp4.html
-
Thanks guys.. it turned out great, I'm really happy with it. Now once Halloween is out the way back to the TK build
-
OK here is the reason why I haven't make any progress on my TK....... also here is my build pic on Facebook. http://www.facebook.com/media/set/?set=a.10152164600640417.912808.724595416&type=3#!/media/set/?set=a.10152164600640417.912808.724595416&type=3
-
Thank you both
-
I can do that, but how do you move a thread?
-
I'm in Kenyon not far from Rochester, where are you ? I found all the canvas and elastic straps at Joann Fabrics in Apple Valley I also got the heavy duty snaps and snap pliers there too. I did order some incidentals from Trooperbay too. I want to finish my helmet before I move on to the armor, but Halloween is a busy time for me. We throw huge Halloween party and I put up alot of props and decorations inside and out side. I am going to build a full size TARDIS this year to stand by the grave yard LOL not sure how its going to turn out, but it should be fun.
-
I got the rest of my supplies today, so now can move on. I have stripped the helmet and rebuilt it, so I think I will finish that first then move on to the armor rebuild.
-
While I had the camera out I snapped a shot of the gap between the ab and kidney plates. Yes I am not a skinny trooper lol so I am thinking as the gap is close to 4" I will use the white sign idea that some people shared with me unless any one has other ideas?
-
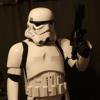
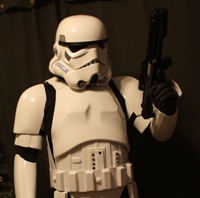
OK just waiting for the reticle decal for the scope but other wise done... what do you think?
-
Thanks Ingrid, It has a D ring on the end already, just terrible photo taking lol. I think I will get rid of all the Velcro and glue (apart from the back of the greaves) and I have been reading and looking at snap and strapping threads for weeks, and this looks like the best way to go, a little more more but I think it will hold up better during troops. I have started to remove the Velcro from the armor already on some pieces. Really excited to get started on the armor, just waiting for some supply's to come.
-
I am almost done with the blaster. I got a couple of coats of satin black on the E11 then one coat of clear coat. I have a recticle decal in the mail to finish it of then its done.
-
I Did a little work on the Ab plate and buttons tonight. Stripped it back and re trimmed and cleaned it up ready for VaderDave's Ab buttons. Also took apart the thermal detonator re trimmed and cleaned it up ready for a new coat of Grey paint, the tube then its ready for new belt clips. I am having a load of fun getting this together and its gonna look awesome when its done. Still a lot of work ahead of me but am feeling more comfortable doing it with every step I take
-
All filled and sanded ready for a new paint job.
-
So I decided to do a little upgrading and revamping of the E-11 while I wait for a few things to come in the mail..... its looking really good so far, a little filling then a new paint job and on to the armor next week
-
I did a quick fitting on some parts last night, but didn't have time to snap pics, and have a super busy week end one thing I did learn is this armor has been boxed for many years and need some work, the elastic and Velcro is not hold well at all so when I do take pics it I will have to hold some pieces in place. All in all this is a good quality armor from what I can tell just needs some TLC
-
Thanks for the welcome, and I think painting will be the way to go. This Friday I am going to do a test fit and get some pics, so I can see how the armor sits and fits as is. Then I will have a good idea where and what may need trimming or shimming. I am excited to make a start on this.
-
Thanks for the welcomes guys, next week will be my first fitting to see what needs trimming and what doesn't I will try to get pic so I can get everyone's input.
-
The charity part of it is my biggest motivation and am looking forward to doing more.
-
The more and more I look at the helmet I keep saying "I can paint this" but was worried about screw ups, now I know you can use a little thinner to clean up messes I think I will look at doing most of the painting myself As for mum, well she really doesn't the whole idear of a grown man dressing up lol and I can say "but its Star Wars" till I'm blue in the face lol, I also have a cough - X-wing pilot - cough cough - and Jedi - cough and she ddon'tget them either
-
WOW! you're build link will help me out so much thank you. As for the fitting, my mum is visiting from England so have to put everything on the back burner for a couple of weeks then its time to get started. I will start with a full fitting and try to get some pic to post so you all can all let me know your opinions on fit before I do any trimming. The helmet decals are lifting and I want to replace them and will do a complete redo on the paint on the frown and ears to. It looks like this suit has been boxed for a very long time and needs some TLC. What is a good method for removing the paint on the ears and frown? would paint thinner to it or is that not good to use on plastic, also any idea where I could get replacement decals? I think from what I am reading every where the snaps are the way to go, and may look at gluing the fronts of the shines and fore arms and leaving the velcro on the backs.
-
Thanks for the welcome He just told me it was ANH ABS armor, it seems pretty well made to me, but its the first armor I have handled so what the hell would I know lol. There are a few black scuff here and there, what is a good way to get ride of them and clean up the armor? not sure whether to leave the velcro or convert to glue or do a mix? the rigging is also all velcro and looks like it will need replacing. I was thinking of putting the snaps in what are your thoughts on that? I have read so many threads here my head is spinning lol I know once I get started I will feel a little bebetter)
-
OK the guy was a medium build, everything seems good just need to trim the returns on the arm pieces. I may need to shim the shins a little, but might work. I am for sure a little bigger around the middle than he was so may need to add a piece between the ab and kidney plates, unless its OK for a gap there? This armor was old school velcro'ed together so I can really manipulate it to what I need to a point.
-
Hello from MN I am just getting started on a remodel project that may take a little time and effort but I'm excited about it. I posted this on my local 501st forum and it was ssuggestedI post here also to get some help and input...... OK I picked up a used stunt ANH TK costume from a former 501st member, I know I will need to do some trimming and upgrades to the armor but it gets me started. I am super excited to start work on it and making it better and my hope is when its all done I can join the 501st myself. Any tips on trimming or anything else would be greatly appreciated. here is where I and so far.
-
As promised here are some of my photo albums let me know what you think? remember I said armature photographer lmao The first album is some of my favorite shots I have taken over the last 6-7 months, the other albums are shots I took at some large paintball games. http://www.facebook.com/album.php?aid=423978&id=724595416 http://www.facebook.com/album.php?aid=435005&id=724595416 http://www.facebook.com/album.php?aid=472990&id=724595416
-
Thanks for the information Guys, I am on vacation till the week end and when I get home I will sign up for my local garrison. I aslo play paintball and do some photography for some of the games, again when I get home I will add some links to a couple of my photo albums.