


gazmosis
-
Posts
4,043 -
Joined
-
Last visited
-
Days Won
23
Content Type
Profiles
Forums
Gallery
Articles
Everything posted by gazmosis
-
That is one sweet DLT.
-
 Sweet looking armor there Dude! Are you going to suit up regularly as TK or TD? If it's TD, you're gonna need to change out the knee plate. Lovr the DLT-19!!! I think you might want to include some close-ups of your blaster to show details(counter,power cylindars, d-ring)
 -
I didn't know that Lionel Ritchie and Tim Burton were TD's!!!! Wow!!!
-
Dang!!!! There are some thick necked troopers!!!! 16 US inches here
-
Foam, huh? That's gotta be light as all get out. Awesome!! Hey, I might take a detail brush and some bright silver and weather it a bit just on the edges. Lay it down in several positions and wherever it touches....a little dab'l do ya. A little sandblasting effect.
-
I can't explain why, but I love to see the frames of the films where the "hero" sterlings were used. Muzzle flash and shell ejecting. We all know that the E-11s were based off the Sterling. Many were resin casts off the real ones that they added a scope rail, grips, a hengstler, and power cylinders. The blanks that were fired made a cool muzzle flash that was, well, cool...and also made it easy to to identify where to paint in the laser..... great for close-ups! Here are the spots I love to see frame by frame: #1 Han shoots the operator after Chewie lays out the guy going to check the bad trasmitter. #2 Han in disguise shoots the communicator "boring conversation anyway" If you listen carefully, you can actually hear the shell bounce off the floor. #3 Han in disguise yells to Chewie to get behind him. The lift door blows open..Han fires. #4 Right after #2, the first TK through the blown up door gets waxed. As he is falling his blaster is firing round after round sending shells everywhere. #5 Chasm swing scene. Most shots Luke and Leia fire and one as the TK crawl under the door after the swing. ESB: As they enter the Falcon to escape the Cloud City, Lando and Leia are slinging serious...uh....plasma? Here's an interesting point...just before Lando yells.."Leia...Go!!", you will notice that Leia's gun is either jammed or out because the charging handle is locked in the rear position. Then right after he yells to her, look at Leia's gun....it lost it's rail and scope!! Her gun was a wreck!!! Maybe I have seen these films a few too many times? Nah!!! There are more. Have fun finding them.
-
TK-4034 requesting EIB status[173]
gazmosis replied to gazmosis's topic in Request Expert Infantry Status
I had my WTF moment during the build. Seeing as the armor needed to be painted, I wanted to do as little glueing as possible after painting. All the connecting strips were glued into place prior to painting so that afterward I would only have 1 strip to glue to connect the halves. I applied glue and clamps and moved on not realizing the mistake until the next day.(insert "Tim the Tool Man" grunt...."OH NO!") By that time, since I used plast-weld, it was too late. I trid to slowly seperate the strips but the weld is very unforgiving once set and it began to tear the shin. I will get new shins at a later time. It's trooping season now so I will wait to do this as a winter project. -
Sweet! Is that all a resin cast?
-
I am living vicariously through you! Did I spell that right? Anyway, amazing sterling and other parts. You know, having too many hengstlers can be bad for your health. Call me if/when you start having ill effects. In regards to the rail, whatever material you make it out of, make sure it has a little backbone to it. The weight of the real scopes WILL bend lighter rail material. Here's what I used. I went to the yard fencing section of my Lowes or Depot or Menards, whatever and they have these steel reinforcement strips. There are a messload of them in a tube right next to the fencing. They are 5/8 inch wide by about 1/8 inch thick. This is a bit wider than the 1/2 hole in the top of the sterling barrel so you will need to trim it or taper it on a grinder or with a dremmel tool. I attached it by bending the barrel side 90 degrees down then 90 degrees toward the front of the gun. Use a vise so you get a nice bend. You don't want it too round. "Measure twice" on the first bend! You don't want your rail sitting too high.
-
TK-4034 requesting EIB status[173]
gazmosis replied to gazmosis's topic in Request Expert Infantry Status
Thanks to all who helped me along the way. I REALLY appreciate it!!!! -
TK-4034 requesting EIB status[173]
gazmosis replied to gazmosis's topic in Request Expert Infantry Status
I thought the drop boxes were supposed to sit in a way that the end of the ammo belt sits in the middle of the boxes. Great idea about the chest/back!!! -
TK-4034 requesting EIB status[173]
gazmosis replied to gazmosis's topic in Request Expert Infantry Status
I just answered my own question. I forgot to post pics of helmet details, (hand painted) and "s" trim -
TK-4034 requesting EIB status[173]
gazmosis replied to gazmosis's topic in Request Expert Infantry Status
I know it's a lot of pics. Please let me know if there are any I missed that I need. Thank you! -
My name is Steve Gaza and after a long and hard two year battle with the bulge, I am finally comfortable enough to don the armor I have worked so hard on detailing. I was issued TK-4034, my forum name is Gazmosis, and I am a member of the Midwest Garrison. Armor: Painted and polished HIPS Original maker unknown Helmet(s): The one that came with the armor and an AP bought a couple years back (see if you can spot the difference!) Blaster: PVC,scratchbuilt. Resin handle, butt cap, scope, rear sight, and muzzle. Everything else, incl. hengstler, was scratchbuilt and weathered. Height: 5' 11" weight: 211 Boots: CABoots Canvas belt: made it myself Handplates: Karin's high gloss, flexible, white handplates attached to black, rubber chemical gloves Electronics: In helmet, 3 total fans (1 intake on mouth, two exhaust in rear traps) Aker amp system Neckseal: Glossy black, ribbed (hot as all getout!!!) Holster: Made myself from black cowhide. Double layer back for clean look. Stitched at a local shoe/luggage repair shop. DLT-19: Resin handle/trigger, top cover, and muzzle. The rest was scratchbuilt from PVC, wood, metal then painted and weathered.
-
trustfire 3.7 V locally available?
gazmosis replied to gazmosis's topic in Electronics for Helmets / Blasters
Sweeeeeeet! Thanks -
O.K. Troops......Now that I have totally shot myself in the foot with the " new compact battery source" I posted, I like the idea of the 3.7 V trustfires but my Batteries Plus store nor radio shack carries them. Any local source have them or am I stuck with Ebay?
-
I painted my armor and was fairly anal about the finish. I too started with 600 grit and LIGHTLY sanded it until I smoothed the paint to what i wanted. You will get some paint removal here. There will be no shine at this point. Then I moved to Turtle Wax rubbing compound for clear coats. This on a wet rag and I really went after it. With two coats of paint, I never accidentally sanded through the paint. The gloss will start to come out. Then I moved to Meguiar's "ultimate compound". Unlike the turtle wax which is a paste, this is more of a liquid. Go after it with this as well. Now you will be able to pinpoint your gloss. When you think you are there, wipe it down with a wet rag, and buff it with a soft towel. There will be a tell tale high pitched squeek when polishing that will tell you when you're almost there. Look at your shine using a light as your reflection. IF there is any haze, keep going with the polishing compound, wash and buff until you get a mirror reflection. Then I moved onto Meguiar's Cleaner Wax. No water here, just a soft application towel and get after it. This will fill in all the micro scrathes. Let dry, polish with a soft towel, and marvel at your gloss. This takes time and some elbow grease but it's worth it!!
-
Need suggestions for scissor to buy to cut my armor
gazmosis replied to LittleOne's topic in Assembly, Mods, and Painting
If you have a dremmel or similar rotary tool, get hold of the small, coarse sanding drums. They're about 1/2 inch wide and was an indispensable addition to my armor building. It helped to micro-trim in areas the scissors can't reach. -
belt drooping problem at holster
gazmosis replied to gazmosis's topic in Boots, Soft Parts, and other Accessories
I don't know if you are saying that you are liking it or not? I hope you do. Anyway, I bought a beautiful piece of black cowhide from a leather man in SE Milwaukee, Wisconsin. After I cut the holster to specs, I realized that once you fold it over, The smooth,outside is at the bottom while the not smooth, almost fuzzy inside is at the top. I guess I just wanted the whole thing to look smooth so I cut an additional piece and before the guy folded over the front, he glued and sewed the additional piece in place giving the entire thing the smooth look I wanted.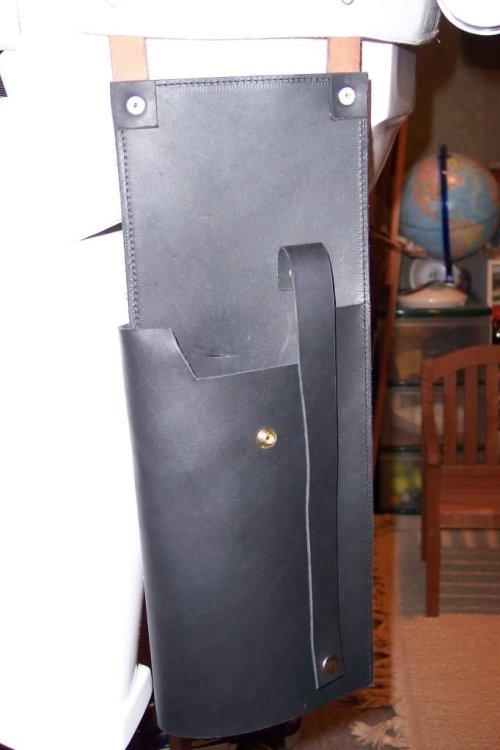
-
New power source. Compact battery
gazmosis replied to gazmosis's topic in Electronics for Helmets / Blasters
Stuart hit the lid on the head. I wish to say that I am sorry for not applying it completely in the lid before recommending it. I lined everything up and strapped it in the lid and it pulled the lid down so much on the one side it made it unusable. I sure hope that no one went out and bought one on my recommendation. ALthough the battery has a ton of other uses, this one just doesn't apply. Once again, I am terribly sorry if I steered anyone in the wrong direction. I will next time make sure it works out before saying anything. -
(sniff sniff) I love you, man!!!
-
belt drooping problem at holster
gazmosis replied to gazmosis's topic in Boots, Soft Parts, and other Accessories
Thnaks for the info guys. In looking at it carefully, I pulled the trigger on a rather permanent solution. I took the belt out of the equation and riveted the holster directly to the kidney plate. This way the suspender harness over my shoulders takes all the weight rather than the belt. I riveted the holster in the exact spot the belt rivets are so in the end it still looks like the belt is holding the holster.--------- -
belt drooping problem at holster
gazmosis posted a topic in Boots, Soft Parts, and other Accessories
I have a little issue with the weight of my holster plus the blaster pulling down on my belt. Any suggestions to reinforce the belt without yet another snap?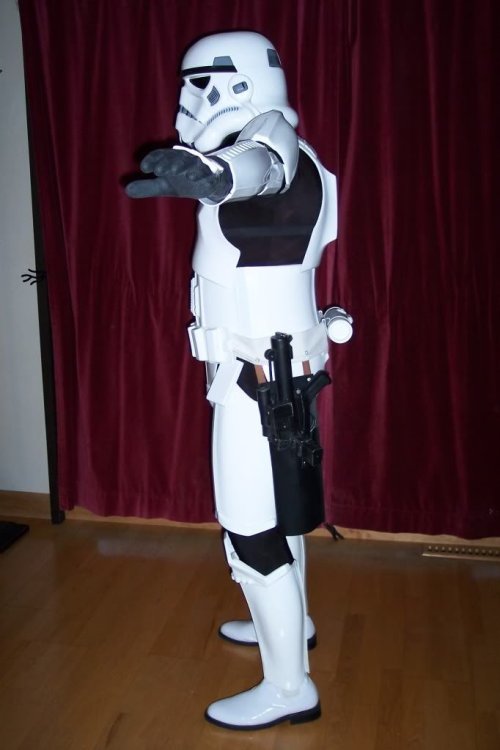
-
New power source. Compact battery
gazmosis replied to gazmosis's topic in Electronics for Helmets / Blasters
Although It did fit into my lid, I did think of the larger melloned troops and how this might not favor them. I need to be sent two CPU fans to replace the two that arrived broken. As soon as I get them in, I will post pics. -
New power source. Compact battery
gazmosis replied to gazmosis's topic in Electronics for Helmets / Blasters
Piss on my chips? Hahahahaha I am laughing hard. Anyway, I held it with the tip of my thumb against the rear corner of the helmet. This would be between the ear and the back of the helmet. My head went it fine. I do have kind of a small mellon (so I'm told) I do see this being a concern, however, in a smaller helmet like AP. But if it works for the tiny mellon crowd, then it is what it is. Can I use the " piss on your chips" ?

