NAZGÛL Posted October 9, 2009 Report Share Posted October 9, 2009 So a package arrived today, and everything looks great! The only thing I need to think about is one of the holes for the hovimics. It is really thin. That seems to be a problem area among different helmets. I am planning to make this helmet prop looking, not idealized. Were talking paint drips, paint chipping, and perhaps some slightly off white to look aged. I have been thinking of two different helmets to make this after. I have 2 helmets Id want to base my look uponThe first is the Move along trooper, man I just love that look. The other is the ESB trooper shooting at Luke when Leia shouts "Its a trap". The ATA helped me decide as the "eye sockets" are way deeper then the original and therefore I cant do the characteristic sleepy Move along eyes. Thats fine as I love the ESB troopers, and always has. So I guess its the Its a trap helmet then. Here he is, pissed at Lando for being a Judas. So a couple of questions: Is there a way to strenghten the weak spot at the hovimic? If possible, invisible repair? How do you guys make the chin straps? Are there correct ones to get? The original padding, what to use to imitate it? Red primer inside helmets. Anyone having pics showing the red interior? Cheers Quote Link to comment Share on other sites More sharing options...
naatsirhc[TK] Posted October 9, 2009 Report Share Posted October 9, 2009 [*]Is there a way to strenghten the weak spot at the hovimic? If possible, invisible repair? I used an old sock and superglue gel, it is not invisable but strong. Clear epoxy might work. Quote Link to comment Share on other sites More sharing options...
NAZGÛL Posted October 9, 2009 Author Report Share Posted October 9, 2009 Yeah, epoxy should work perfectly. Thanks man! Quote Link to comment Share on other sites More sharing options...
NAZGÛL Posted October 11, 2009 Author Report Share Posted October 11, 2009 [*]Is there a way to strenghten the weak spot at the hovimic? If possible, invisible repair? I used an old sock and superglue gel, it is not invisable but strong. Clear epoxy might work. Clear epoxy worked like a charm. Great advice. Im doing the trimming now. A little nervous to cut to much. Ill try to make the ears thicker and trim when I fit them on the helmet. Quote Link to comment Share on other sites More sharing options...
JoeR Posted October 11, 2009 Report Share Posted October 11, 2009 (edited) Here's a pic of the inside of an ANH helmet: -------- Joe Edited May 16, 2022 by gmrhodes13 link removed no longer working Quote Link to comment Share on other sites More sharing options...
NAZGÛL Posted October 11, 2009 Author Report Share Posted October 11, 2009 (edited) Thanks, thats exactly what I need! I wonder why they wanted to have primer inside the helmets? I saw this pic posted by firebladejedi in another thread. I think it a ESB version. The acetate looks different. And you cant see any primer. I believe they repainted the ESB helmets andmaybe the new paint reached the inside, making that white also. Edited June 13, 2021 by Sly11 Edited to restore images Sly11 2021 Quote Link to comment Share on other sites More sharing options...
NAZGÛL Posted October 11, 2009 Author Report Share Posted October 11, 2009 So Im rougly done with the trimming. For the eyes I used reference pics on the helmet with the SW badge on the back. Do you think Im on the right track? Should I cut out more? To me it looks about right. I just love the rough cuts on the original and I try to implement that look. Its kinda funny because people was more impressed with the "perfect" MR CE, then they will be with this helmet. I think people will beleve Im a really bad painter and bad builder if I manage to nail the look of the originals, LOL. But I dont care, I love the original look! Quote Link to comment Share on other sites More sharing options...
Kind Posted October 11, 2009 Report Share Posted October 11, 2009 lookin good i would say. the ATA is what im thinking about getting as my first set to build so i dont ef up an AP or TM. would really like to se more pics as you move along. did you get the full armor or just the helm i still havent seen a complete ATA set and looking at the rough cuts looks like ab plate might be missing some of the smaller detales Quote Link to comment Share on other sites More sharing options...
NAZGÛL Posted October 12, 2009 Author Report Share Posted October 12, 2009 lookin good i would say. the ATA is what im thinking about getting as my first set to build so i dont ef up an AP or TM. would really like to se more pics as you move along. did you get the full armor or just the helm i still havent seen a complete ATA set and looking at the rough cuts looks like ab plate might be missing some of the smaller detales Thank you Kind! (Cool name btw) Ill post pics as I move along. My first build too and its great fun I must say. I just went for the helmet. Quote Link to comment Share on other sites More sharing options...
runewolf[TK] Posted October 12, 2009 Report Share Posted October 12, 2009 (edited) Glad to see that mine wasn't the only one that looked like the back was not going to fit right! Nice looking helmet! Kind, here is a complete ATA for you to see. Mine will hopefully be done in the next few weeks. ----------- Edited May 16, 2022 by gmrhodes13 link removed no longer working Quote Link to comment Share on other sites More sharing options...
Kind Posted October 12, 2009 Report Share Posted October 12, 2009 yep thats the one for me thank you for the link it looks great Quote Link to comment Share on other sites More sharing options...
runewolf[TK] Posted October 12, 2009 Report Share Posted October 12, 2009 yep thats the one for me thank you for the link it looks great It is a great price for armor. And I will say that at the armor party I went to, I did change some minds about the quality of HIPS. I had a sandy that was really impressed by the armor and is considering getting an entire new suit to go shiny for a while in lol. Quote Link to comment Share on other sites More sharing options...
NAZGÛL Posted October 15, 2009 Author Report Share Posted October 15, 2009 (edited) So I trimmed and assembled the helmet. I decided to base the assembly after the "Stop that ship" helmet as there are so many great reference photos, and to me the look seems close to the "Its a trap" helmet. I just love that high brow look! I first used screws to see how it worked, and finally used rivets. Heres a side by side with a original pic (thanks to starwarshelmets.com): ----------- I made the mouth holes and eyes slightly bigger. Started with the ears today and Im leaving quite alot, making them bigger then the ones you can see in the plastic (lol hope you understood what I ment). I really enjoy building this! Edited May 16, 2022 by gmrhodes13 link removed no longer working Quote Link to comment Share on other sites More sharing options...
dougefresh Posted October 15, 2009 Report Share Posted October 15, 2009 Matti -- lookin' really good! I'm with you-- I love high-brow troopers. Definitely my favorites. I think you've got the aesthetic dialed in really nicely so far. Looking forward to following your progress! Quote Link to comment Share on other sites More sharing options...
NAZGÛL Posted October 15, 2009 Author Report Share Posted October 15, 2009 Thank you doug! Im trimming the ears now. Tricky to get them just right. I think Ill just put them down now, and perhaps Ill see what needs to be done with a fresh pair of eyes tomorrow. Thanks for the support man! Quote Link to comment Share on other sites More sharing options...
dougefresh Posted October 15, 2009 Report Share Posted October 15, 2009 Thank you doug! Im trimming the ears now. Tricky to get them just right. I think Ill just put them down now, and perhaps Ill see what needs to be done with a fresh pair of eyes tomorrow. Thanks for the support man! I did the same thing -- I let my enthusiasm get the better of me and I kept trimming away when I probably should have given it a rest. I ended up with ears thinner than I wanted, and having to disassemble and re-fiddle with everything to get the look I was after. I think that's a smart move to give it some space. Quote Link to comment Share on other sites More sharing options...
NAZGÛL Posted October 16, 2009 Author Report Share Posted October 16, 2009 Ah, there, the ears are finished and assembled! Im into modelbuilding also, and Im kinda surprised how subtle the assembly of these helmets are. Very tricky, but fun indeed! I post pics later on. Quote Link to comment Share on other sites More sharing options...
NAZGÛL Posted October 16, 2009 Author Report Share Posted October 16, 2009 (edited) Heres a front pic showing the ears. I tried to leave a smalll gap, right ear. ---------- Oh yeah, I just ordered decals from TK-4510. Edited May 16, 2022 by gmrhodes13 link removed no longer working Quote Link to comment Share on other sites More sharing options...
dougefresh Posted October 16, 2009 Report Share Posted October 16, 2009 Nice! Oh yeah-- you did a MUCH, MUCH better job on the ears than I did. Mine ended up really thin-- yours are nice and fat! You got that brow SKY high. Lovin' it -- it looks MEAN! :angry: Quote Link to comment Share on other sites More sharing options...
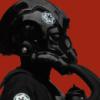
NAZGÛL Posted October 16, 2009 Author Report Share Posted October 16, 2009 Nice! Oh yeah-- you did a MUCH, MUCH better job on the ears than I did. Mine ended up really thin-- yours are nice and fat!You got that brow SKY high. Lovin' it -- it looks MEAN! :angry: Thanks! Yeah. High brow really looks cool and gives the helmet a personality: (Top pic is the helmet inspiring me in this build) I started to prepair for painting. Im planning to use auto spray. This will be the first paintjob I do were I want some runnings in the paint. Quote Link to comment Share on other sites More sharing options...
NAZGÛL Posted October 17, 2009 Author Report Share Posted October 17, 2009 Hey all. I painted the lid today. I used a VW white color that is slightly broken. I did this in an attempt to make the helmet look aged. Its hard to say if the color is to grey. The paint job is a mess -as planned . A lot of runnings and dust. I havent removed the spots where I want the paint to look chipped yet. I havent decided if I want to paint it with a more bright white. I put it on hold and decide later. What do you guys think? Does this darker white help the aged prop look, or should I go with a brighter white? Heres a pic from starwarshelmets.com to show what Im aiming for. Quote Link to comment Share on other sites More sharing options...
naatsirhc[TK] Posted October 18, 2009 Report Share Posted October 18, 2009 Matti, looking like a worn bucket. Can't wait to see it with all the trimmings! Quote Link to comment Share on other sites More sharing options...
NAZGÛL Posted October 18, 2009 Author Report Share Posted October 18, 2009 Matti, looking like a worn bucket. Can't wait to see it with all the trimmings! Thanks christaan. I still havent decided if I did it to off white. I gotta stand back and think about that. Cheers Quote Link to comment Share on other sites More sharing options...
NAZGÛL Posted October 21, 2009 Author Report Share Posted October 21, 2009 Iwasnt happy with the paint so I decided to paint it with a lighter color. This turned out as I wanted it. Thanks. Quote Link to comment Share on other sites More sharing options...
Darth_Finger Posted October 21, 2009 Report Share Posted October 21, 2009 Going for a nice high brow on this Quote Link to comment Share on other sites More sharing options...

Recommended Posts
Join the conversation
You can post now and register later. If you have an account, sign in now to post with your account.