Crusader_6[TK] Posted April 3, 2015 Report Posted April 3, 2015 (edited) My kit arrived! Sent from my iPhone using Tapatalk A the E-11 Doopydoos resin blaster Edited April 3, 2015 by Crusader_6 1 Quote
A Master Builder Posted April 3, 2015 Report Posted April 3, 2015 Full Kit & Blaster?! Woah...you are going to have a lot of fun with this. Best of Luck on the Build, Ruben. 1 Quote
Crusader_6[TK] Posted April 3, 2015 Author Report Posted April 3, 2015 (edited) Full Kit & Blaster?! Woah...you are going to have a lot of fun with this. Best of Luck on the Build, Ruben. Thanks! I'm having a lot of help from members of the local garrison. I'll be posting photos of my progress during the weekend. Members of Puerto Rico Garrison lending a hand. This is me: Sent from my iPhone using Tapatalk Edited April 3, 2015 by Crusader_6 Quote
Snaps[TK] Posted April 3, 2015 Report Posted April 3, 2015 One of the best days of a TK...Best of luck with your build! 1 Quote
Crusader_6[TK] Posted April 3, 2015 Author Report Posted April 3, 2015 (edited) AM 2.0 kit ?Yes, it is an NE 2.0 Stunt Stormtrooper. Sent from my iPhone using Tapatalk Edited April 5, 2015 by Crusader_6 Quote
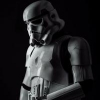
Crusader_6[TK] Posted April 4, 2015 Author Report Posted April 4, 2015 (edited) Legs build. [/ Helmet Edited April 4, 2015 by Crusader_6 Quote
Delta-98 Posted April 4, 2015 Report Posted April 4, 2015 you are doing a great job! Keep it up. 1 Quote
Deetz1 Posted April 6, 2015 Report Posted April 6, 2015 Enjoy the building process, it really is fun to see it come together. Looks like a great job so far! Quote
Crusader_6[TK] Posted April 7, 2015 Author Report Posted April 7, 2015 I started working on my blaster a couple of days ago... This is it so far. Used the Dremel to cut hex screws. Power cylinders mod Cut and screwed the scope rail and screwed the buttstock wishbone part to the main body. Sent from my iPhone using Tapatalk Quote
Crusader_6[TK] Posted April 7, 2015 Author Report Posted April 7, 2015 M-38 Scope weathered and ready to be screwed to the aluminum rail. Sent from my iPhone using Tapatalk Quote
Crusader_6[TK] Posted April 23, 2015 Author Report Posted April 23, 2015 Here's more progress on my armor and I also finished my bucket. I assembled my thermal detonator. Materials for the calves strapping. Cut the 1" elastics in 4" long strips Sew the hooks. Glued the elastic strips to the calves armor section. Rear view of the calves. Sent from my iPhone using Tapatalk Quote
Crusader_6[TK] Posted April 24, 2015 Author Report Posted April 24, 2015 (edited) Blaster update of my ANH Stunt TK Stormtrooper I used the tooths paste weathering technic and also painted the Doopydoos display stand. Gave it a gray primer then flat black spray paint. The used testor aluminum paint for the Imperial COG. Then a light spray mist of rustoleum hammered black. Once the paint dried, I then removed the toothpaste to give the damage look on the blaster. Once I finished, I sent out these pictures to T-Jay for CC and he pointed out that it was too battle worn and that some parts couldn't have the metal underneath (t/tracks and grip) So I decided to paint it all over with Rustoleum hammered black and sand it slightly to give a more subtle battle worn look. And this was the result... Before sanding After slight sanding and subtle weathering. This is its final look: Any tips or anything that could have been done better, I'm all eyes Sent from my iPhone using Tapatalk Edited April 24, 2015 by Crusader_6 Quote
Tusken RTT Posted April 24, 2015 Report Posted April 24, 2015 Everything is looking really good! Swap out those TD screws! Quote

Recommended Posts
Join the conversation
You can post now and register later. If you have an account, sign in now to post with your account.