Logon Posted August 14, 2013 Report Posted August 14, 2013 (edited) Hello!I started doing this build awhile ago but i really need a good place to ask specific questions about my build and show of what I've done. Workstation! First question! I am supposed to remove the middle part right? From what I've gathered i should but i want to be sure. Thanks for reading!Logon Edited August 14, 2013 by Logon Quote
LeMaxim[TK] Posted August 14, 2013 Report Posted August 14, 2013 Excellent! I look forward to follow your build. To answer your question. Yes. The middle part shall be removed. Check this FISD thread for some references: http://www.whitearmor.net/forum/topic/18522-e-11-real-sterling-build-blastercore-40/ (by veteran E-11 builder TK Bondservnt 2392) And the reference pictures: http://www.whitearmor.net/forum/gallery/album/40-sterling-l2a3-mk-4/ It will simply be difficult get the handle in and the stock folding if the support piece in the middle is left. Quote
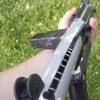
Logon Posted August 15, 2013 Author Report Posted August 15, 2013 (edited) Fixed the bold so that it can be placed in the guide hole and be held in place by the bolt when slid forward. like so Also did the endcap lock Sorry for the blurry pictures Edited August 15, 2013 by Logon Quote
Logon Posted August 15, 2013 Author Report Posted August 15, 2013 (edited) Does anyone have a good place to see where the T-Tracks are supposed to be? Progress!Drilled a hole 11mm for the nut and 6mm below it for the screw so i didn't have to cut the screw at all. Nut Installed Affixed the nut using epoxy Also did some repairs using Epoxykitt(swedish atleast) Repair pics. Edited August 15, 2013 by Logon Quote
Logon Posted August 16, 2013 Author Report Posted August 16, 2013 More progress, plus props to lemaxim on sending me a new D-ring, even if it is not the right model it will have to do for now. Retouch Quote
SorenM[TK] Posted August 17, 2013 Report Posted August 17, 2013 More progress, plus props to lemaxim on sending me a new D-ring, even if it is not the right model it will have to do for now. Retouch Ser bra ut David!. Looking real good! I started working on my Doopydoos kit yesterday. It does unfortunately not come with a bolt, but I intend to make a similar system as yours with the bolt and cocking handle.... I have seen so many pimps of those resin kits, I am thrilled to continue working on mine..:-). Quote
Logon Posted August 17, 2013 Author Report Posted August 17, 2013 (edited) Fast question!Should the top most T-Track cover all the holes except the one closest to the body where you place the scopemount, because there is a 12mm hole at the front just behind the sight, should that be open? edit: NVM Did it already! Made this better then it looks on the picture. Done! Turned out good!Using a metal pipe makes it so much easier as you can heat it on the pipe instead. Edited August 17, 2013 by Logon Quote
LeMaxim[TK] Posted August 17, 2013 Report Posted August 17, 2013 Well done! Looks good. At this rate you'll finish long before me. Quote
SorenM[TK] Posted August 17, 2013 Report Posted August 17, 2013 Fast question! Should the top most T-Track cover all the holes except the one closest to the body where you place the scopemount, because there is a 12mm hole at the front just behind the sight, should that be open? edit: NVM Did it already! Turned out good! Using a metal pipe makes it so much easier as you can heat it on the pipe instead. Looking fantastic!....:-) Quote
Logon Posted August 17, 2013 Author Report Posted August 17, 2013 (edited) Well done! Looks good. At this rate you'll finish long before me. Still the scary parts of epoxying everything to the pipe Looking fantastic!....:-) Thanks! Made some small progress before i quit for the day. Glued the endcap slot Bended the dring in, it's not the exact model but i was thinking of doing epoxy(bondo) between the gap and paint it to make it seemless. Trigger, I still haven't decided if i want to do a functioning trigger. Edited August 17, 2013 by Logon Quote
SorenM[TK] Posted August 19, 2013 Report Posted August 19, 2013 Still the scary parts of epoxying everything to the pipe Thanks! Made some small progress before i quit for the day Glued the endcap slot Bended the dring in, it's not the exact model but i was thinking of doing epoxy(bondo) between the gap and paint it to make it seemless. Trigger, I still haven't decided if i want to do a functioning trigger. Re. The D ring...you should turn it around, so the gap is behind the "socket/attachment..then there will be no need for bondo.... Quote
Logon Posted August 19, 2013 Author Report Posted August 19, 2013 Re. The D ring...you should turn it around, so the gap is behind the "socket/attachment..then there will be no need for bondo.... The problem is bending the 3mm ring because I am afraid to break the resin Quote
SorenM[TK] Posted August 19, 2013 Report Posted August 19, 2013 (edited) Ahaaa so the ring is made from resin?..just assumed that it was metal...but getting a piece of metal to make a D ring is not difficult. The wire coat hangers for kids from Ikea will do the trick.... Edited August 19, 2013 by SorenM Quote
Logon Posted August 20, 2013 Author Report Posted August 20, 2013 Ahaaa so the ring is made from resin?..just assumed that it was metal...but getting a piece of metal to make a D ring is not difficult. The wire coat hangers for kids from Ikea will do the trick.... No it's made of metal, hmm i find it hard to explain what i mean... Quote
SorenM[TK] Posted August 20, 2013 Report Posted August 20, 2013 No it's made of metal, hmm i find it hard to explain what i mean... I think I know what you mean now. You cannot detach the ring, because that would cause the resin to break? You need a pair of pliers that open outwards, think they are called ringopeners..that shoud do the trick Quote
Logon Posted August 24, 2013 Author Report Posted August 24, 2013 Forgot to take pictures of a lot of the progress... anyways! Pictures! Fixing some ! Bought paint for painting, and brushes for weathering details later, forgot to buy brass screws... sheit Quote
SorenM[TK] Posted August 24, 2013 Report Posted August 24, 2013 (edited) Hi David, looking really goooood!:-) How did you fix the D-ring? I see that the spring turned out good:-).. Brass screws..remember that the ones on the scope are actually not brass:-)... Did you make the trigger work?:-) Is that the "Jawa to be" that I see on the shadow:-)..... Edited August 24, 2013 by SorenM Quote
Logon Posted August 24, 2013 Author Report Posted August 24, 2013 (edited) Hi David, looking really goooood!:-) How did you fix the D-ring? I see that the spring turned out good:-).. Brass screws..remember that the ones on the scope are actually not brass:-)... Did you make the trigger work?:-) Is that the "Jawa to be" that I see on the shadow:-)..... Just kept the d-ring as it was and bondoed that looks the same so it doesn't matter hmm, maybe i'll just paint the brass or something, o i didn't make the trigger work... next build ill do that And yes that is the Jawa to be don't know when tho forgot to buy weathering paint tho... Guess i need copper, brass and silver? Edited August 24, 2013 by Logon Quote
SorenM[TK] Posted August 24, 2013 Report Posted August 24, 2013 (edited) Just kept the d-ring as it was and bondoed that looks the same so it doesn't matter hmm, maybe i'll just paint the brass or something, o i didn't make the trigger work... next build ill do that And yes that is the Jawa to be don't know when tho forgot to buy weathering paint tho... Guess i need copper, brass and silver? If you can't see the difference, hen sweet:-)Okey dokey on the trigger:-) Jawas are awesome:-)... Well regarding paint..I use Citadel Colours that is normally used for miniatures (Warhammer etc.) and I use three different silvers on the blaster and the rails, and both brass, copper, bronze and gold paint on my scope and Hengstler......... Those paints are waterbased, and dry quickly but are very very easy to work with, especially for drybrushing and highlighting Edited September 5, 2013 by SorenM Quote
Logon Posted August 27, 2013 Author Report Posted August 27, 2013 Pictures,Started paint today just a primer on it tho. Quote
SorenM[TK] Posted August 27, 2013 Report Posted August 27, 2013 Coming along very nicely!....:-).. Looking forward to seeing it finished:-) Quote
Logon Posted August 28, 2013 Author Report Posted August 28, 2013 (edited) Done with the painting of the "main" gun, still have scope and counter left but will deal with them later. Unfortunately the paint turned out a bit glossy especially on the mag / frontsight / barrel but i am hoping i can either sand it a bit with some wet sandpaper or i could hope that the weathering will hide the gloss by painting silver on parts where the glossyness is high and weathering makes sense. Please come with ideas! (rather not strip it of color and redo ) Did use the rough side of a kitchenspounge to try and make it more matte, worked somewhat. Edited August 28, 2013 by Logon Quote

Recommended Posts
Join the conversation
You can post now and register later. If you have an account, sign in now to post with your account.