TieRacer[TK] Posted November 15, 2012 Report Share Posted November 15, 2012 Ok time for me to start my TK build that is going for EIB. After Rob was able to get me my armor early the excitement built to fever pitch. Buying glue, looking for accessories, scaring the heck out of the dog with my bucket, ect. I hunkered down in the workshop that I stole from my sons playroom to start putting it together. First to make snap plates out of black strapping and industrial snaps....... A crap load of them! Cut, burn, punch out, hammer, cuss, repeat again and again. I've seen so many other build treads and have tried to count how many I need and I think I'm almost there. I'm going with Robs instructions on doing an overlap build and I should have some pics soon for your scrutiny on my progress. Although I'm still one holster short of a complete kit, so far I'm getting there. Quote Link to comment Share on other sites More sharing options...
BIDS[TK] Posted November 15, 2012 Report Share Posted November 15, 2012 Good on you Sam, have fun with the build. I'm in the middle of an RT-Mod build at the moment as well and enjoying it immensely, especially now that I'm over that "first cut anxiety". Post up pic's as you go, I know I for one live vicariously though the builds here, especially when I've hit a snag. Sometimes it's all you need to see a hint or tip to push you over the edge to keep going. Quote Link to comment Share on other sites More sharing options...
boomshakra[TK] Posted November 15, 2012 Report Share Posted November 15, 2012 Ah, snap plates. I think I ended up making ~50 or so, but buy more of the snaps than you think you need. During my build I would hammer it wrong or forget to put one of the two pieces on the strap & make both parts useless... I would also suggest making the webbing lengths a bit long so you will be able to cut them down to the length you need for where you're placing it. I made a few too short and those ended up being useless as well, since you want to keep the glue off of the metal snap if at all possible. Have fun & look forward to seeing build progress! Quote Link to comment Share on other sites More sharing options...
Darth Aloha[Admin] Posted November 15, 2012 Report Share Posted November 15, 2012 We are the 1st Imperial Snap Detachment. -Eric Quote Link to comment Share on other sites More sharing options...
TieRacer[TK] Posted November 15, 2012 Author Report Share Posted November 15, 2012 Ya, it's all in fun! I can't be happier with how it's going. Well, with the exception of a few small hiccups and the need for a beer or two All my parts are glued together now I'm getting ready to start placing snap plates and fitting them to my chassis. Why do you not want to get glue on the metal of the snaps? Depending on the answer this might be a serious face/palm incident !!! I've already placed a couple of plates and I just put that infernal glue on the whole strap, snap and all. BTW even with all the treads I've read to get to this point I say again if you haven't delt with E6000 be prepared it gets EVERYWHERE !!! And yes, that first cut anxiety sucks. My armor layed on the floor for a couple of days before I got up the nerve to start, but once I got going it was all good! Quote Link to comment Share on other sites More sharing options...
TieRacer[TK] Posted November 15, 2012 Author Report Share Posted November 15, 2012 We are the 1st Imperial Snap Detachment. -Eric Hahahahahaha, I get that now! Quote Link to comment Share on other sites More sharing options...
TieRacer[TK] Posted November 18, 2012 Author Report Share Posted November 18, 2012 Got to do a test fitting last night!!! Nothing like putting on your bucket on a full set of armor to get you motivated! Ran into a few fitting issues but nothing to bad ( I hope ) that I can't work on. If I could figure out how to post pics on this stupid computer I will so I can get some input from you guys. Quote Link to comment Share on other sites More sharing options...
Darth Aloha[Admin] Posted November 18, 2012 Report Share Posted November 18, 2012 Howto post images. -Eric Quote Link to comment Share on other sites More sharing options...
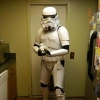
TieRacer[TK] Posted November 19, 2012 Author Report Share Posted November 19, 2012 Ok, here we go Rubber chemical gloves with latex hand guards Glued shoulder straps that float in the rear Sniper plate with no visible rivits Bucket off. I still need to paint the ab buttons and install thigh ammo belt Bucket on !!!!! What do you think so far? Quote Link to comment Share on other sites More sharing options...
Necron[TK] Posted November 19, 2012 Report Share Posted November 19, 2012 I think the only thing I see is maybe move the biceps down more to cover more of the black under suit. Quote Link to comment Share on other sites More sharing options...
TrooperJesse[TK] Posted November 19, 2012 Report Share Posted November 19, 2012 Yaya an RT-MOD build! Quote Link to comment Share on other sites More sharing options...
TrooperJesse[TK] Posted November 19, 2012 Report Share Posted November 19, 2012 Good luck mate! My armor has been sitting in my guest bedroom since I got it! I scattered it out and started my snaps but nothing more.. ;(. Did you trim a lot? Well so far your build looks amazing! Quote Link to comment Share on other sites More sharing options...
TrooperJesse[TK] Posted November 19, 2012 Report Share Posted November 19, 2012 I too am going EIB Quote Link to comment Share on other sites More sharing options...
TieRacer[TK] Posted November 19, 2012 Author Report Share Posted November 19, 2012 Hey Jesse, no I didn't hardly trim at all. It came together pretty easy. I just fit one piece per night and plugged away at it. I did the over lapping seems as the instructions said and used E6000 on all of it. Just watch out for using too much glue and overly strong clamps so as to not deform the pieces. So far the only issue I have come up with is that the ab button plate is molded on upside down. But that shouldn't be that big of a deal. Good luck on your build too! Hope to troop with you and my Garrison mates soon! Quote Link to comment Share on other sites More sharing options...
8BitBry Posted November 20, 2012 Report Share Posted November 20, 2012 I think the only thing I see is maybe move the biceps down more to cover more of the black under suit. I think his biceps are good. Maybe he can attach the forearms to the biceps to move them up a little so they gap the black better and not so close to the hands. There's a tutorial out there for this, I can't find it right now but I've seen someone post it. Quote Link to comment Share on other sites More sharing options...
TrooperJesse[TK] Posted November 20, 2012 Report Share Posted November 20, 2012 Hey Jesse, no I didn't hardly trim at all. It came together pretty easy. I just fit one piece per night and plugged away at it. I did the over lapping seems as the instructions said and used E6000 on all of it. Just watch out for using too much glue and overly strong clamps so as to not deform the pieces. So far the only issue I have come up with is that the ab button plate is molded on upside down. But that shouldn't be that big of a deal. Good luck on your build too! Hope to troop with you and my Garrison mates soon! what do you mean Ab button plate is molded upside down? Quote Link to comment Share on other sites More sharing options...
TrooperJesse[TK] Posted November 20, 2012 Report Share Posted November 20, 2012 Oh shoot! Never mind! I see what you mean.. Damn that sucks! Tell Rob I am more then certain he will send you another Ab Plate. He ended sending me another Thermal Detonator because the one he sent was bad.. He is great at his customer satisfaction. So far he has been a great help and honestly it is a great feeling knowing that all your worries will be answered and not just put on the back burner after he gets his money. Great guy to deal with I am sure he could send you a replacement Quote Link to comment Share on other sites More sharing options...
TieRacer[TK] Posted November 23, 2012 Author Report Share Posted November 23, 2012 Hey guys, I just got an email from Rob and he is sending me a new ab plate. This guy is just awesome!!! In the mean time I'll do a little more fitting and finish my blaster. I thought about taking the old ab plate and adding some blast damage or the like, what do you guys thing of that? Quote Link to comment Share on other sites More sharing options...
TrooperJesse[TK] Posted November 24, 2012 Report Share Posted November 24, 2012 Dang I told you he would send you another. He's a great guy to deal with. Adding battle damage to your extra would be sweet! Show me how it comes out after Quote Link to comment Share on other sites More sharing options...

Recommended Posts
Join the conversation
You can post now and register later. If you have an account, sign in now to post with your account.