tmcp51d Posted November 24, 2010 Author Report Posted November 24, 2010 The bottom of the armor...it is assembled with snaps on the side and Velcro for the tops and bottom, all with elastic for movement. The belt was made by my girlfriend by sewing together 4 layers of white canvas. TMC Quote
tmcp51d Posted November 24, 2010 Author Report Posted November 24, 2010 AB buttons painted with a mix of 5 min epoxy with tamiya acrlic paint for color. When it dries the paint is almost indestructible. TMC Quote
tmcp51d Posted November 24, 2010 Author Report Posted November 24, 2010 The interior and exterior of the helmet. I used the guts of a baseball batting helmet...no just waiting to get the electronics and I can finish it up. TMC Quote
pandatrooper[TK] Posted November 24, 2010 Report Posted November 24, 2010 Looking good, nice progress! 2 fixes: the tube stripes on your helmet are a bit too low to the sides. They should be about 1/2" or so from the "valley" of the cheek tube. Also, if you make some 45 degree cuts on the corners of the belt, it will look a bit more accurate. Quote
tmcp51d Posted November 24, 2010 Author Report Posted November 24, 2010 Looking good, nice progress! 2 fixes: the tube stripes on your helmet are a bit too low to the sides. They should be about 1/2" or so from the "valley" of the cheek tube. Also, if you make some 45 degree cuts on the corners of the belt, it will look a bit more accurate. Thanks Panda...I know I messed up the tube stripes, new ones are on the way. Will fix the belt...Thanks for all the help (your build threads) you are the best... TMC Quote
tmcp51d Posted November 24, 2010 Author Report Posted November 24, 2010 Here is the first fitting so far....need to add some more details and a little more tweaking... TMC Quote
tkrestonva[TK] Posted November 25, 2010 Report Posted November 25, 2010 Nice job, especially given that AM was designed for guys much larger than yourself. How about bringing up the drop boxes an inch or so, and clipping the corners on the belt? And needless to say - definitely get a different helmet. I'd be suprised if you could even move your head in that thing. Quote
Femtrooper Julie[501st] Posted November 25, 2010 Report Posted November 25, 2010 lookig good for a first shot! Quote
tmcp51d Posted November 25, 2010 Author Report Posted November 25, 2010 Nice job, especially given that AM was designed for guys much larger than yourself. How about bringing up the drop boxes an inch or so, and clipping the corners on the belt? And needless to say - definitely get a different helmet. I'd be surprised if you could even move your head in that thing. Yes being a thin guy I had to do lots of trimming and sanding...Already trimmed the belt, will raise the boxes up. The helmet is large but the pictures do make it look worse than it is...I can move in it. A new helmet is next on my list but I do want to finish this one first...any suggestions on which on to get? Thanks for all the help and advise TMC Quote
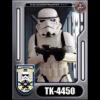
tmcp51d Posted November 28, 2010 Author Report Posted November 28, 2010 OK so here is the finished product....sound system is in, blaster holster attached, hovi mic tips, and finished the details. I'm feeling good about my first armor build....I am now known as TK4450... TMC Quote

Recommended Posts
Join the conversation
You can post now and register later. If you have an account, sign in now to post with your account.