Reco Posted September 13, 2010 Report Share Posted September 13, 2010 Well, here goes nuthin! I've been working on my ATA kit off and on since april, and although I knew it would be work, I had no idea what I was getting myself into. Six months in and I'll admit, I'm struggling. I keep thinking that maybe I bit off more than I could chew for my very first armor project. Alas, it's like a roller coaster though. I know it was the way I needed to go, because I want to earn this thing: blood, sweat, and tears. My bucket is ready for paint and I've got most everything trimmed and edged, except for my thighs. Right now I'm working on forearms and biceps, trying to find the right adhesive. I had bad luck with the recommended devcon plastic welder, and I keep hearing E6000, so that's what I'll try next. I also had a debacle with my first attempt at painting. I went with rustoleum gloss white, but I didn't know that humidity would play such an important role in the process. As a result, several of my pieces came out with horrible orange peeling, and I've had to wet sand them pretty good to get them paintable again. Now I'm a bit leery as to the paint, so I picked up some krylon fusion to see how that works. Has anyone had good/bad results using it by chance? Hopefully I'll get some advice at the armor party next weekend and I can get back on track. I start class at the DAVE School on the 27th and I'd really like to be able to use my armor in some of my projects. Anyway, I'll post here when I have questions or I run into a wall. Thanks for having me again! Here's the link to my flickr WIP album: I post to that album and I have an album on facebook as well. Right now my big question is adhesive and paint. I've heard a lot of different things, so I suppose the only way to know for sure is to try and try again! Quote Link to comment Share on other sites More sharing options...
chaosticbunny Posted September 13, 2010 Report Share Posted September 13, 2010 I just wanna say your build looks like it is coming along swimmingly! Quote Link to comment Share on other sites More sharing options...
Femtrooper Julie[501st] Posted September 13, 2010 Report Share Posted September 13, 2010 (edited) The journey of 1000 miles begins with a single step. And you are dozens of steps in! Keep going Edited September 13, 2010 by Femtrooper Julie Quote Link to comment Share on other sites More sharing options...
SydB1974 Posted September 13, 2010 Report Share Posted September 13, 2010 Well, here goes nuthin! I've been working on my ATA kit off and on since april, and although I knew it would be work, I had no idea what I was getting myself into. Six months in and I'll admit, I'm struggling. I keep thinking that maybe I bit off more than I could chew for my very first armor project. Alas, it's like a roller coaster though. I know it was the way I needed to go, because I want to earn this thing: blood, sweat, and tears. My bucket is ready for paint and I've got most everything trimmed and edged, except for my thighs. Right now I'm working on forearms and biceps, trying to find the right adhesive. I had bad luck with the recommended devcon plastic welder, and I keep hearing E6000, so that's what I'll try next. I also had a debacle with my first attempt at painting. I went with rustoleum gloss white, but I didn't know that humidity would play such an important role in the process. As a result, several of my pieces came out with horrible orange peeling, and I've had to wet sand them pretty good to get them paintable again. Now I'm a bit leery as to the paint, so I picked up some krylon fusion to see how that works. Has anyone had good/bad results using it by chance? Hopefully I'll get some advice at the armor party next weekend and I can get back on track. I start class at the DAVE School on the 27th and I'd really like to be able to use my armor in some of my projects. Anyway, I'll post here when I have questions or I run into a wall. Thanks for having me again! Here's the link to my flickr WIP album: I post to that album and I have an album on facebook as well. Right now my big question is adhesive and paint. I've heard a lot of different things, so I suppose the only way to know for sure is to try and try again! Reco, I'm in the middle of my build as well. I'm almost totally finished with my bucket (decals, screen, lens and interior bits are all that's left to be done), and I used the Rustoleum Pro paint. Whether it was humidity or lack of skill, I too am experiencing some orange peel here and there. On the bucket, I found a thread here and on another site that explains how to fine sand and polish orange peel out. I did it on my bucket and was pretty impressed with the results. Get some very fine grit sandpaper from a hobby shop....I found a set made by Revell that starts out at 3200 grit and goes up to 12000. You wet sand the surface, starting with the lowest grit and move up through each successive grit level. When you're done sanding, use an automotive scratch polish (I used Meguiar's Scratch X 2.0) to polish/even it out. Ends up looking pretty darn good. I painted some more pieces this weekend, and will have to do it to these pieces as well. Good luck finishing up your build! Quote Link to comment Share on other sites More sharing options...
TK_LEPER Posted September 13, 2010 Report Share Posted September 13, 2010 Very clean, nice work! Quote Link to comment Share on other sites More sharing options...
Reco Posted September 14, 2010 Author Report Share Posted September 14, 2010 Thanks for the encouraging words everyone, it feels good to know I'm not alone in this. I won't stop until it's done, but man sometimes even at this point it can seem like such a daunting task. Never surrender! On the bucket, I found a thread here and on another site that explains how to fine sand and polish orange peel out. I did it on my bucket and was pretty impressed with the results. Get some very fine grit sandpaper from a hobby shop....I found a set made by Revell that starts out at 3200 grit and goes up to 12000. You wet sand the surface, starting with the lowest grit and move up through each successive grit level. When you're done sanding, use an automotive scratch polish (I used Meguiar's Scratch X 2.0) to polish/even it out. Ends up looking pretty darn good. Wow, 3200-12000 grit!! That's insanely fine!! On my chest plate, shoulders and a few other pieces I started at 800 and worked my way up to 1200 and am happy with the result, but now I'll need to find some of that stuff and continue up. Did you order that sandpaper online or get it at an actual store? I went with norton automotive sanding sponges because the sponges soak up water real well and they also conform to curves and those hard to reach places really well. (Also the Sherwin Williams place I got them from was trying to get rid of them and was selling boxes of them for 20 bucks) Again thanks for the comments, hopefully I'll have some new photos to post soon. Quote Link to comment Share on other sites More sharing options...
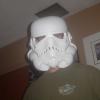
Rebel Doughboy[TK] Posted September 16, 2010 Report Share Posted September 16, 2010 I love all these ATA builds, just such a great kit! I am lovin' that helmet liner you got in lid, looks fantastic. I just use a hard hat liner. Believe me, I definitly know that overwhelming feeling. But think of how damn rad it's going to be to walk around in that purty armor. All the joy you will bring to kids and all the old fans. Stay on target! Looking good Reco! Quote Link to comment Share on other sites More sharing options...
SydB1974 Posted September 16, 2010 Report Share Posted September 16, 2010 Thanks for the encouraging words everyone, it feels good to know I'm not alone in this. I won't stop until it's done, but man sometimes even at this point it can seem like such a daunting task. Never surrender! Wow, 3200-12000 grit!! That's insanely fine!! On my chest plate, shoulders and a few other pieces I started at 800 and worked my way up to 1200 and am happy with the result, but now I'll need to find some of that stuff and continue up. Did you order that sandpaper online or get it at an actual store? I went with norton automotive sanding sponges because the sponges soak up water real well and they also conform to curves and those hard to reach places really well. (Also the Sherwin Williams place I got them from was trying to get rid of them and was selling boxes of them for 20 bucks) Again thanks for the comments, hopefully I'll have some new photos to post soon. I got the sandpaper at a store....HobbyTown USA. Check http://www.hobbytown.com to see if there's a location near you. Quote Link to comment Share on other sites More sharing options...

Recommended Posts
Join the conversation
You can post now and register later. If you have an account, sign in now to post with your account.