

SydB1974
-
Posts
39 -
Joined
-
Last visited
Content Type
Profiles
Forums
Gallery
Articles
Everything posted by SydB1974
-

SydB1974's ATA Build[*ATA]
SydB1974 replied to SydB1974's topic in Build Threads Requireing Maintenance
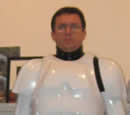
Well.....I think main armor assembly is DONE! Here's a few pics from the last few weeks up until tonight where I donned the full suit for the first time (sans Thermal Detonator....not quite done with it.) I still need to finish up shin closure too....trying to use the bra hook method. I'll get more pics up when I can get someone over to take em! -
I didn't have to shim mine, but having recently finished assembling my armor, here's what you probably need to do. To shim the back, you'll want to create an inner join strip. If you take a look at the Thigh/Shin tutorial on the site, it does a pretty good job of showing/explaining the inner strips. On my build, I glued the inner strip to one side first, and let it cure for 24 hrs. Then I glued the other half the next day. You'll want to create your inner strip wide enough so that you can glue it together so it fits. Remember, measure twice, cut once. Leave plenty of excess on your inner strip and glue to one of the halves. When the glue is cured, do a test fit. Tape up the back, measure and mark the shim, and cut off the excess so you can get the join to fit.....then glue them together. That should do it!
-
SydB1974's ATA Build[*ATA]
SydB1974 replied to SydB1974's topic in Build Threads Requireing Maintenance
Busy last couple weeks.....but making progress on the ATA. Biceps and forearms are assembled and painted. I need to hit a couple spots on the forearm with another coat of paint, though......and got a couple nice drip spots on one that I'll have to sand down got one thigh piece done earlier this week, and finished the other tonight (sans battery pack, which I'll attach after bending and painting). I'll prime those Sunday morning.....maybe paint Sunday evening? Got lenses in the bucket....just need to put in the mesh. Shin assembly will start tomorrow....and will probably start getting snap plates together!!!! Got my boots from TKBoots yesterday, neckseal came today.....belt should be on it's way soon....and still waiting on my E-11 barrel. Things are coming together!!! -
SydB1974's ATA Build[*ATA]
SydB1974 replied to SydB1974's topic in Build Threads Requireing Maintenance
Been a little hectic around here lately (wrestling with some computer issues ), but here's a progress update: Helmet: - Attached aerators. one is a bit wonky (pointing down) due to where the holes were drilled. thinking about re-backing the area with milliput and re-drilling - Applied TK-4510's decals. Wow! How freaking awesome are those?! - Put on the S-Trim and brow trim. The S-trim was a pain! Armor: - Primed and painted Shoulder Bells, Back, Kidney, Butt, Chest, and Ab/Cod. got a couple ripples on the Chest (straps) and on the cod, I think due to higher than optimum humidity when I painted. I should be able to sand those bits down and polish it up once the paint cures. - Fully assembled the left bicep. didn't quite get the pieces totally flush, so will probably fill the small spaces with bondo. Blaster: - Ordered the requisite DoopyDoos kit and elements to do a PVC build. Have some pix of the bucket on my cell phone, but need to take some proper pics when it's done and upload them. This thread is seriously lacking photo updates! -
I got the sandpaper at a store....HobbyTown USA. Check http://www.hobbytown.com to see if there's a location near you.
-
Reco, I'm in the middle of my build as well. I'm almost totally finished with my bucket (decals, screen, lens and interior bits are all that's left to be done), and I used the Rustoleum Pro paint. Whether it was humidity or lack of skill, I too am experiencing some orange peel here and there. On the bucket, I found a thread here and on another site that explains how to fine sand and polish orange peel out. I did it on my bucket and was pretty impressed with the results. Get some very fine grit sandpaper from a hobby shop....I found a set made by Revell that starts out at 3200 grit and goes up to 12000. You wet sand the surface, starting with the lowest grit and move up through each successive grit level. When you're done sanding, use an automotive scratch polish (I used Meguiar's Scratch X 2.0) to polish/even it out. Ends up looking pretty darn good. I painted some more pieces this weekend, and will have to do it to these pieces as well. Good luck finishing up your build!
-
SydB1974's ATA Build[*ATA]
SydB1974 replied to SydB1974's topic in Build Threads Requireing Maintenance
yep....using the E-6000. it's a little like rubber cement...although it doesn't seem to spread quite as easily as rubber cement. But, it gets the job done very well. -
SydB1974's ATA Build[*ATA]
SydB1974 replied to SydB1974's topic in Build Threads Requireing Maintenance
went ahead and ordered TK-4510's decals and a few other items. the test didn't go as smoothly as I would have liked. no worries though. work on the armor stalled last week, as my brother and his wife welcomed a new addition.....work will commence again tonight...prepping some pieces for priming, and going to get started gluing the rest of the pieces finally. -
SydB1974's ATA Build[*ATA]
SydB1974 replied to SydB1974's topic in Build Threads Requireing Maintenance
Bucket is looking good after a few days of drying and curing. Still going to let it sit until Friday (7 days since painting). Glued my first piece last night to get a feel of working with E-6000. Went with the ab button cluster. Followed the advice from some threads here. First, I sanded the areas that would be getting the glue. Then I washed and dried the pieces to get rid of the dust from sanding. Applied E-6000 to the pieces using a popsicle/craft stick. I put down a line and then spread it out, like buttering bread. I let the pieces sit for a couple minutes, then put em together, and threw a few magnets on it. worked pretty well....the glue is a little gummier than I expected. tonight I'm going to start gluing the biceps. I'm going to go with the "inner strip" method to join the pieces. I have plenty of scrap laying around, so I figure I'll put it to good use! Back to the bucket for a sec.....I'm thinking about hand painting the traps and tears, but creating some stencils for them, so they have a neat/clean look. Actually, the grey I'll do by hand, but the stencils would be for the black outline and lines. I was thinking about using the sticky backed vinyl sheets that RC car builders use to mask and paint designs (flames) on their cars. Does anyone have experience with these sheets? I am going to get a piece and create a test template and do it on a piece of scrap material. If it turns out well, then I'll go ahead and do it. If not, TK-4510's decals will do the trick. I plan on using his tube stripe stencil anyway -
SydB1974's ATA Build[*ATA]
SydB1974 replied to SydB1974's topic in Build Threads Requireing Maintenance
went ahead and painted the bucket today. now the wait for drying/curing! -
SydB1974's ATA Build[*ATA]
SydB1974 replied to SydB1974's topic in Build Threads Requireing Maintenance
vacation has had me running around the last couple days, but finally got back to the build yesterday. trimmed/fit the shins. primed the handplates yesterday. I'm using the handplates as a test for using the Rustoleum Professional High Performance Enamel before painting the bucket. Since I'm off this week, and the temps and humidity are down (especially in the mornings) it's actually perfect. I just got done priming the helmet and then painting the handplates with the enamel. After sanding the bucket, I may run another coat of primer on it, just for giggles. -
SydB1974's ATA Build[*ATA]
SydB1974 replied to SydB1974's topic in Build Threads Requireing Maintenance
Basic assembly on the bucket is DONE!!!! Ears are attached! Ended up with a bit of a high brow, which I don't mind at all. this kit will start out as a regular Stunt kit, but may end up going Sandy in the future (next year project could be AP armor as ultimate shiny Death Star TK). The brow could almost be 'Move Along' height. Actually VERY HAPPY with the results. Finishing the basic bits of the bucket was a great way to spend the last day of my 35th year on this rock, transitioning into year 36. Here's some pics! -
SydB1974's ATA Build[*ATA]
SydB1974 replied to SydB1974's topic in Build Threads Requireing Maintenance
Ok....Here's the bucket sans ears. -
SydB1974's ATA Build[*ATA]
SydB1974 replied to SydB1974's topic in Build Threads Requireing Maintenance
Luckily, I used the bolts/washers Terrell included, so I don't have any extra rivets hanging out in there right now. After sleeping on it, and taking a fresh look at the bucket this morning, I really like how it came out. Should look pretty good once I get the ears shaped and on there. From there, I need to trim out the bottom a bit more to fit my melon in there comfortably, then reinforce the aerator sockets (picked up some Milliput yesterday). Would love to run some painting tests on my hand plates before I tackle painting the bucket, but our weather here may not be ideal over the next week or so for painting. -
SydB1974's ATA Build[*ATA]
SydB1974 replied to SydB1974's topic in Build Threads Requireing Maintenance
Last couple nights labors included: fitting of the forearms, trimming ends of shins and thighs, filing of teeth, and assembly of faceplate and cap'n'back, trimming of one ear piece. my first pass @ the faceplate and cap'n'back didn't really give a good spot for ear attachment @ the bottom of the ears. So, I ended up drilling a second set of holes to attach the cap'n'back. at first, i was kind of bummed, because i thought i had a good look going with the original holes. after attaching to the second pass at holes, and taking a long look, and thinking about it, i'm pretty fine with the second setup. realizing that every set of screen used armor had it's own individual quirks and "imperfections" helped me appreciate the work I put into my bucket. I'll take some pics of it this evening.....my batteries on my camera were kaput. after assembling the bucket, i got to work on one of the ears. i'm gonna go with a screen style on the ears...i.e. the tell tale gaps here and there. i'm gonna spend some time shaving them down though, so it's not too gappy. the ear pieces so far are the more nerve wracking pieces to work on. the words "be careful....don't trim too much" keeps bouncing through my head. -
SydB1974's ATA Build[*ATA]
SydB1974 replied to SydB1974's topic in Build Threads Requireing Maintenance
Here's some more pics of the latest progress from the end of this week. Worked on the second bicep and trimming the ends of the forearms. then, i started on the bucket. I feel pretty good about the cut on the eyes.....I had no idea how asymmetrical they were until i started cutting and looking at reference photos. kinda freaked me out. got the teeth cut initially, but need to get some files and clean them up a bit. -
when i cut out Coke from my diet, i melted away pounds at the beginning too. It was pretty amazing. Good going, and keep it up!
-
SydB1974's ATA Build[*ATA]
SydB1974 replied to SydB1974's topic in Build Threads Requireing Maintenance
Here are the fruits of the last couple nights of labor. a couple questions about the biceps. I know the finishing strip for each joint is supposed to be 5/8" wide. I've trimmed one of my bicep pieces down to a point where they'll fit pretty comfortably on my arm, but the joints on each side are about an inch on both sides. Is that acceptable? I haven't seen too many isolated pics of the biceps on some of the build threads to be able to judge. -
SydB1974's ATA Build[*ATA]
SydB1974 replied to SydB1974's topic in Build Threads Requireing Maintenance
worked on some more trimming last night. Ab, kidney, and butt plate are trimmed. i think tonight i'll tackle the arms. I'll post up some pics later tonight! -
SydB1974's ATA Build[*ATA]
SydB1974 replied to SydB1974's topic in Build Threads Requireing Maintenance
alrighty! here are some progress pics. worked on both upper chest pieces tonight....front and back. I think I did pretty well with the return edges and trimming in general. I sanded the edges with some 220 grit paper and like the results so far. Did have a bit of a slip on the back piece with my exacto up by the neck, but sanded the offending nick down. Great confidence boost on the trimming front. Goal for this week....get all the non-bucket items trimmed and sanded and start bucket after that. the bucket seems to be the most intimidating part to me......especially the ear pieces. gonna leave a lot of excess to begin with on the ears and trim/shave from there. straight on shot of front chest piece a side view of the front chest trim back chest piece straight on profile of the back chest piece couldn't resist taping it up and putting it on! More to come and comments welcome! Thanks! Doug -
SydB1974's ATA Build[*ATA]
SydB1974 replied to SydB1974's topic in Build Threads Requireing Maintenance
got started later than I wanted to...but am trimming right now. started with the chest piece. trimmed and sanded the edges. working now on the back piece. Pics to come later. got my curved lexan scissors and exacto workin....tried both methods....scissor trimming and score/snap. either seem pretty easy to do with HIPS. didn't quite get all the supplies today, but did find that my hobby store DOES stock Humbrol paint. tiny little tins! -
SydB1974's ATA Build[*ATA]
SydB1974 replied to SydB1974's topic in Build Threads Requireing Maintenance
It seems like a really good pull. Even the aerator sockets on the bucket don't seem to be too terribly thin. the fun will start tomorrow.....gonna run to a hobby store and a hardware store and get to work! -
I came home from work Wednesday to find a large box waiting on my front porch. Here's the obligatory first post of pictures of the box and unboxing! The glorious box from Terrell: Contents neatly packed: Everything laid out on the floor: I've been away from home for the last couple of days, and today is Saturday, which means I have to work most of the afternoon. So, I plan on starting to prep my work area tonight after work, then running out for some armor building supplies tomorrow....then, I'll start TRIMMING! Watch this thread for progress, and inevitably, I'll post my questions up here. Doug
-
I'm getting ready to start an ATA build and have been researching all of the different tools. If you have a HobbyTown USA near you, you can get the heat sealing iron there. you may be able to order it online as well @ http://www.hobbytown.com. they're only $19.99!
-
Good to see a Fit Club on here! Besides wanting to look good in your armor, the health benefits of dropping some lbs/kgs and trying to eat right is a great habit to get into. I started my weight loss journey in March of 2009. at that time I was 5'7" and 203 lbs....mostly in my belly. A friend of mine suggested we start doing P90X. after researching it, i knew i was way too out of shape to start there....so i started off with Tony Horton's first workout DVD set, Power 90. Took off about 28 lbs in 90 days of that. Then I moved on to the Power 90 Masters Series...kind of P90X Lite. shaved off about another 10 lbs there. Late September of 09, I started my first round of P90X, and haven't look back. right now I'm about 150 lbs....16% body fat, and building up some good TK muscle diet wise, i dropped soda out of my life....and don't eat fast food very often. if i do, it's subway, or some sort of grilled chicken. through it all, i've felt better than i have in a long time, both physically and mentally. it's been a great boost for me. If there are any other P90X'ers here on FISD, or anyone who has questions about it, or nutrition/workouts in general, send me a PM or post it up here. Really, when it comes to getting fit and healthy, it's all about finding something YOU like to do, and keeping at it. Cheers, Doug