

CT 1977
-
Posts
158 -
Joined
-
Last visited
-
Days Won
1
Content Type
Profiles
Forums
Gallery
Articles
Everything posted by CT 1977
-
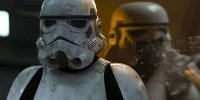
Since I first started building my ANH Stunt bucket (and probably long before) I always wondered as to the official design and technical features of the helmet. I found this image online and wanted to post here and see what the real experts have to say about it.
-
Hey Glen, or anyone...I'm looking for a diagram or an illustration of a ANH storm trooper helmet, pointing out what all the parts are, do you know where I can find that? Any help would be appreciated.
-

Info posted on your build thread
")
-
-
Hey Dan, that's a huge help, thanks so much. I'm always open to any tips and advice. I'm putting together my materials for lenses and frown mesh now. I'll be basing it on Paul's idea (or Paul's use of another troopers idea) of using standoffs and JB welding putty. I'm planning on using "Plastidip" for the black coating on the inside of the lid. I'm always open to any advice so keep'em coming.
-
Hey Paul, that's perfect, and yes, I get it that it's way more than needed but not bad for just $12. I'm ordering today. (PS: my build is going a bit slow as well, just plugging along, fitting in where I can).
-
hey Paul, I like the idea of using those standoffs and so that is what I'm planning to do. I couldn't find the standoffs at Lowe's, Home Depot or even a local hardware store specializing in unusual screws, bolts and other attachment means. I found them on Amazon but when I went to add the M3 screws, I saw two different thread configurations for M3, .035 and .50. The thread configuration on the standoff page just listed M3 as the their thread configuration. So, short question made very long, where or what type of business did you find your standoffs and screws?
-
Cool, I got a promotion
-
I forgot to answer your first question...I traced out the cut lines and used standard tin snips to cut well below the line then made many small grinds and files along the way. One of the biggest helps was to make a small cut-out for where the helmet joins the faceplate, that really helped it comply.
-
Thanks, Steven. Ha, yeah. trim, look, measure repeat 500 times. It's not really completely done. Another trooper, Paul, had the idea to bolt the face and helmet together, get everything fitted and done then rivet all together, which is what I plan to do and, especially with the ears, make the final..."surgical" adjustments. Much was done with small files ( https://www.amazon.com/gp/product/B07YCC28NF/ref=ppx_yo_dt_b_asin_image_o02_s00?ie=UTF8&psc=1 ) that I bought at Amazon for $25...really perfect for this kit. Also, I took my Dremel and put it in a vice and used it like a mounted grinding wheel to make smaller, more controlled adjustments. I gotta tell you I was pretty nervous about it, still am a bit but not as much as before. I poured over all the ear tutorials. Panatrooper has a build that was helpful...even though it was 10 years ago it's still appropriate . Good luck with your build and I've learned there's plenty of experience armor builders out that are more than willing to help. This is my first build but if I can help at all just let me know.
-
Thanks, Glen. I was going for no gaps, which I plan to end up with when I put it all together.
-
I set up my dremel in the vice and used it like a grinding wheel. I'm sure I'm not the first one to think of this but it really helped. I was able to control the grind much better. I started with the left ear as I've heard the right ear is harder...not quite sure where I read or heard that but went that direction...just in case. I pretty much followed Paul's lead in just using screws for the faceplate to helmet and I'm glad I did. I had some adjustments to make that made a big difference in how the ears fit. My plan is to make adjustments to the right side then fit the ear. Once that's done then I'll work on getting the faceplate done then paint the inside, rivet the faceplate to the helmet and attach the ears. THEN...figuring out what kind of helmet fit apparatus I want to use...padding or hard hat helmet liner. The paint I'm planning on using is below. Anyone tried this one? Any reason I should look at something else? As always, I'm open to suggestions and ideas so please feel free to post - Thanks!
-
Thanks, Glen. That's pretty much what my research has shown too. Its telling that the kit comes with two sets of ears.
-
I just traced out the ears but will wait to the next session to start trimming and fitting.
-
The teeth didn't come out as well as I had hoped. I ended up taking a bit too much out and had to carefully compensate. Pretty followed Paul's technique using the Dremel barrel sander to open the holes then worked them with the needle files. I found that the far right/left tooth holes were easier to use a 5/64 drill bit with a very slow rotation then clean it out and shape it again with needle files. Comments, thoughts, improvements or changes I should make, just let me know.
-
oh yeah, thanks for taking a look and spending the time on a Sat & Sun to help me out.
-
oh yeah, I've been looking at them and found another good one on You Tube. Funny story...I got to looking at the 4 ears I got from ATA and almost panicked that they were all the same. But once I took a better look, it was clear which was which.
-
here you and thanks! I'm pretty much done with the eyes unless anyone see's anything that needs work. The teeth still need cleaning up. Ears are next then dissassemble to work the lenses, voco pieces. I'm heading out to Michaels on Wed to p/u the paint.
-
I used Paul's idea to use screws to hold it together so I can work on the ears. Once I've got the ears done, I'll go back and finish the faceplate, reattach it and start on the inside. Big thanks to all who have helped and keep it coming. Let me know your thoughts on my bucket. Keep in mind I still have to clean up the teeth. I'm thinking the eyes are done unless something pops out to you.
-
Based on this photo, I've still got some room to trim on the faceplate section. That should help!
-
I was suspecting maybe the sideways donning was going to be the answer, as you stated. The issue is that if I move the faceplate forward, it loses congruency with the tube and creates a gap that appears at the top of the tube because it is no longer in line with the tube/rounded part of the helmet, as you see here: I'll try putting it on sideways and see what happens.
-
Here are some more pics.
-
I've run into a problem that I can't seem to resolve. When I get the faceplate matched to the helmet, the opening isn't big enough to go over my head. It doesn't look like there's much left to trim so I'm at a loss. Anyone run into this before? I thought I was following the trim lines here but it doesn't look good.
-
thanks for the move, Glen.
-
Thanks, Glen! Very helpful. That tutorial video is great!
-
The eyes are done, unless someone sees something that needs improvement. The left eye, upper outside corner got away from me a bit. I recovered the best I could and am hesitant to file any more material as it looks like its getting pretty close. I don't know, that left eye is giving me a hard time. Thoughts?
-
Here I have two lines and not really sure which line will be the best. I definitely don't want to cut it too short. Any thoughts here?

